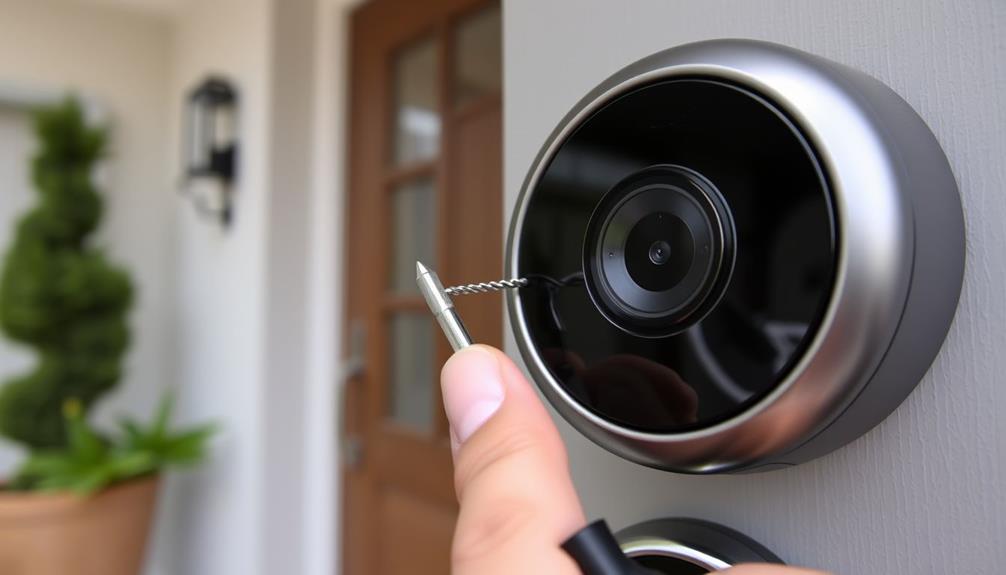
To access the battery of your Ring Doorbell 2, you will need a star-shaped screwdriver. Locate the security screw at the bottom of the faceplate and turn it counterclockwise to loosen it. Use your thumbs to push up from the bottom of the faceplate, or if it’s stuck, a flat, skinny object like a butter knife can help. Be cautious while handling everything to ensure security. For additional tips and further details on the process, there is a wealth of helpful information available.
Key Takeaways
- Use a special star-shaped screwdriver to remove the security screw at the bottom of the faceplate.
- Push up from the bottom of the faceplate with your thumbs to detach it.
- If the faceplate is stuck, insert a flat object like a butter knife to help pry it off.
- Carefully pull out the battery by pressing down on the black tab while removing it.

Ring Doorbell Screws Replacement, Blue Double-Ended T6 T15 Screwdriver with 20Pcs/5Set Security Screws – Battery Change & WiFi Setup for Video Doorbell Camera Replacement Kits
Compatible with: Our universal screwdriver works for multiple scenarios (doorbell maintenance, small electronics repair), while the matching screws…
As an affiliate, we earn on qualifying purchases.
As an affiliate, we earn on qualifying purchases.
Tools and Preparation
To open the Ring Doorbell 2 cover, you'll need a special star-shaped screwdriver or a T6 torx-head screwdriver. These tools are crucial for removing the security screw located at the bottom of the faceplate. Once the security screw has been removed, you can carefully lift and remove the faceplate to access the inside of the Ring Doorbell 2. If you are replacing the faceplate with a new one, simply line up the new faceplate and secure it in place with the security screw using the same special star-shaped screwdriver or T6 torx-head screwdriver. Make sure the faceplate is securely attached before testing the functionality of the doorbell.
Before you start, take some time for preparation. Clear a clean workspace so you won't lose any small parts during the process. It's also helpful to ascertain that your tools are in good condition, as using worn or damaged tools can make the job more difficult. Additionally, consider organizing your workspace with smart organization techniques to reduce clutter and improve functionality.
Once you're set up, locate the security screw and use your screwdriver to loosen it by turning it counterclockwise. Make sure to set the screw aside in a safe location. Losing this screw can complicate the process, so it's good to be cautious. If you happen to misplace it, don't worry—security screw replacements are available online in packs.
Additionally, having a flat and skinny object, like a butter knife, can be handy for prying the faceplate away from the doorbell body after you've removed the security screw. By gathering the right tools and preparing your workspace, you'll make the process of opening your Ring Doorbell 2 much smoother and more efficient.

Video Doorbell Screwdriver, Double-Ended T6 T15 Screw Driver Tool for Camera Video Doorbell Replacement, Battery Change, Wifi Password Reset
DOORBELL SCREWDRIVER: This video camera screwdriver is used for Wifi password reset access, battery replacement, charging and secure…
As an affiliate, we earn on qualifying purchases.
As an affiliate, we earn on qualifying purchases.
Faceplate Removal

Removing the faceplate of your Ring Doorbell 2 involves a few simple steps that guarantee a smooth process.
Start by locating the security screw at the bottom of the faceplate. Using the included star-shaped screwdriver, turn it counterclockwise to loosen it. Once the security screw is removed, you can detach the faceplate by pushing up from the bottom with your thumbs, applying upward pressure.
It's important to take your time during this process to avoid any unnecessary stress on the device, ensuring that the operation is smooth and efficient. For additional tips on maintaining your devices, consider exploring insights on personal growth and wellness.
If you find the faceplate doesn't easily come off, gently insert a flat, skinny object, like a butter knife, to help pry it away. After successfully loosening the faceplate, carefully pull it away from the doorbell, ensuring a fluid motion to avoid any damage.
To make the process easier, here's a quick checklist:
- Locate the security screw at the bottom.
- Use the screwdriver to loosen it.
- Push up from the bottom with your thumbs.
- If necessary, use a flat object to assist.

Video Doorbell Key Removal Tool Compatible with Ring Battery Doorbell 2024 Release, Wired Doorbell Pro (N ewest Model), Wired Doorbell Plus (N ewest Model) 2PACK
COMPATIBILITY: compatible with Ring Battery Doorbell 2024 Release,Compatible with Wired Doorbell Pro (Newest Model), Wired Doorbell Plus (Newest…
As an affiliate, we earn on qualifying purchases.
As an affiliate, we earn on qualifying purchases.
Battery Access

After you've successfully taken off the faceplate, you can access the battery compartment of your Ring Doorbell 2. Start by locating the black tab on the battery. It's vital to confirm the device is powered off before proceeding to avoid any security risks.
Press down on the black tab while carefully pulling the battery out towards the bottom. Make sure you have a firm grip to prevent dropping the battery during this process. Regular maintenance of your doorbell, much like improving indoor air quality, can enhance its performance and longevity.
Once you've removed the battery, check its charge level. If it's low or dead, you'll need to replace it with a fully charged battery to guarantee your Ring Doorbell 2 continues to function correctly. Remember, the battery is critical for maintaining your doorbell's security features, so handle it with care.
After replacing the battery, verify that it's properly seated in the compartment before reattaching the faceplate. This procedure will keep your Ring Doorbell 2 running smoothly and guarantee it remains an effective part of your home security system.

Soseieiu S2 (6-Pin) 6000mAh Replacement Battery Compatible with Ring Video Doorbell 2 (2nd Generation, Model 5UM5E5), Rechargeable Li-Polymer Battery Pack Part# 1ICP6/50/56-2 with Repair Tools Kit
✅ 【Exact Fit for Ring Doorbell 2 (S2 Version)】Specifically designed for the Ring Video Doorbell 2 (2nd Gen,…
As an affiliate, we earn on qualifying purchases.
As an affiliate, we earn on qualifying purchases.
Reassembly Steps

Begin by aligning the top hook of the faceplate with the corresponding hole on your Ring Doorbell 2. To make the process smoother, hold the faceplate at a 45-degree angle. Once aligned, snap the bottom of the faceplate back into place. You'll know it's securely attached when you hear a click, signaling that it's locked in.
Next, follow these steps to complete the reassembly:
- Replace the security screw at the bottom using the provided star-shaped screwdriver.
- Turn the screwdriver clockwise to tighten the security screw firmly.
- Verify the edges of the faceplate are flush against the doorbell unit.
- Check for any gaps that might lead to moisture ingress.
Additional Resources

For those looking for extra help, numerous video tutorials and user manuals are available to guide you through the process of opening the Ring Doorbell 2 cover. These resources can make cover removal straightforward and hassle-free.
Here's a quick overview of additional resources you might find useful:
| Resource Type | Description | Access Link |
|---|---|---|
| Video Tutorials | Step-by-step visual guides for cover removal | [YouTube Tutorials](#) |
| User Manuals | Detailed instructions for Ring Doorbell 2 | [User Manuals](#) |
| Community Forums | User-shared experiences and solutions | [Community Forum](#) |
| Support Team | Direct assistance for inquiries and tools | [Contact Support](#) |
You can turn to the Ring support website for thorough FAQs that offer troubleshooting tips specifically for your device. If you have specific questions or need help with cover removal, don't hesitate to reach out to the support team or browse the community forums. Engaging with fellow users can provide you with valuable insights and solutions.
Frequently Asked Questions
How to Remove Ring Doorbell 2 Faceplate?
To remove your Ring Doorbell 2 faceplate, start by unscrewing the security screw at the bottom with the provided star-shaped screwdriver.
Once the screw's out, use your thumbs to gently push up from the bottom of the faceplate.
If it's stuck, carefully insert a flat object, like a butter knife, to pry it off.
Be cautious when lifting the faceplate away and store it safely to avoid any damage or loss.
How Do You Open the Ring Video Doorbell 2?
Imagine your Ring Video Doorbell 2 as a treasure chest, safeguarding what matters most.
To access this chest, start by finding the security screw at the bottom. Use the star-shaped screwdriver to remove it, then push up gently from the bottom of the faceplate.
If it's stuck, a flat object can help pry it loose. Once open, you can access the battery or make adjustments, keeping your home secure.
How Do You Open a Doorbell Cover?
To open a doorbell cover, start by looking for any screws or clips holding it in place.
If you see screws, use the appropriate screwdriver to remove them.
Gently push or pry the cover off, being careful not to damage it.
If it feels stuck, check for hidden clips or tabs.
Once you've removed the cover, keep it in a safe spot until you're ready to reattach it.
How to Take the Battery Out of a Ring Doorbell 2?
To take the battery out of your Ring Doorbell 2, start by ensuring the device's powered off.
Next, unscrew the security screw at the bottom and gently push up the faceplate using your thumbs.
Once it's off, find the black tab on the battery, press down, and pull the battery out towards the bottom.
Handle the battery with care and make sure it's charged before reinserting it back into the doorbell.
Conclusion
Now that you know how to open your Ring Doorbell 2 cover, you're ready to tackle battery changes or maintenance like a pro!
Just remember, with the right tools and a bit of patience, you can master this task faster than a speeding bullet.
Keeping your doorbell in top shape will guarantee it's always ready to keep an eye on your home.
So go ahead, plunge in, and enjoy the peace of mind your Ring provides!