To install the security screw on your Ring doorbell, first gather all necessary tools, including a security screwdriver. Charge the battery for four to six hours, then align the doorbell with the mounting bracket. Insert the security screw using the screwdriver, tightening it snugly but avoiding over-tightening. Verify that the screw is the correct size and type for your specific model to guarantee a secure fit. Regularly inspect the screw to maintain security. If you encounter any issues or need further tips, there's more guidance available to help you through the process.
Key Takeaways
- Gather all necessary tools, including a security screwdriver, flathead screwdriver, and level tool, before starting the installation process.
- Align the Ring doorbell with the mounting bracket to ensure proper placement before inserting the security screw.
- Use the provided security screwdriver to attach the screws snugly, avoiding over-tightening to prevent damage.
- Regularly check the tightness of security screws after installation to maintain doorbell security and prevent unauthorized removal.

20Pcs Security Screws for Camera Doorbell Screws Replacement with Video Doorbell 2/3/4/Pro 2, CTYUKHS
Video Doorbell Screws: If you lost your original video doorbell screws, this will be the perfect replacement for…
As an affiliate, we earn on qualifying purchases.
As an affiliate, we earn on qualifying purchases.
Tools Needed for Installation
To install the security screw on your Ring doorbell, you'll need a few essential tools to guarantee a smooth process.
First, grab the security screwdriver from your installation kit; it's specially designed for the security screws used in Ring devices. If you're removing any existing doorbell faceplates, keep a flathead screwdriver handy to access the mounting bracket easily.
Additionally, make sure you're in a well-ventilated space, as maintaining good air quality is important, especially if you're often around devices that might circulate dust and allergens, similar to how air purifiers improve indoor air quality.
Next, a level tool is vital for making certain that the mounting bracket is perfectly aligned before you secure it with the security screw. This step helps prevent any crooked installations that could affect functionality.
If you encounter difficulties with the provided screwdriver, having pliers can assist you in securely tightening the screw.

Screwdriver for Doorbell Screwdriver Replacement with WiFi Password Reset and Battery Change, Fits for All Doorbell Models (Orange), CTYUKHS
Doorbell Screwdriver: If you lose the doorbell screwdriver, this doorbell screwdriver will be the perfect replacement for battery…
As an affiliate, we earn on qualifying purchases.
As an affiliate, we earn on qualifying purchases.
Preparing Your Ring Doorbell

Before you start installing your Ring doorbell, gather all the necessary tools and equipment, like the security screws and screwdriver. Make sure you have a charged drill with the right bit if you need to mount it on a tougher surface. If you’re planning to install Ring doorbell on brick, you’ll also need a masonry bit and anchors to ensure a secure fit. Always follow the installation guide to avoid damaging the device or your home’s surface.
It's also advisable to familiarize yourself with the key factors in choosing a home cleaning service as a way to guarantee your home is secure and properly maintained.
If your doorbell runs on a battery, make sure it's charged and ready to go.
Checking these details now will save you time and hassle during installation.
Required Tools and Equipment
Gathering the right tools and equipment is vital for effectively preparing your Ring doorbell installation. To guarantee a smooth process, make sure you have everything you need before you begin. Here's a handy list of required items:
| Tool | Purpose |
|---|---|
| Included screwdriver | Perfectly fits the security screws, prevents tampering |
| Level tool | Makes certain your doorbell is mounted straight |
| Drill | Necessary for brick or stucco surfaces |
| Flathead screwdriver | Helps remove the faceplate for easier access |
Having the included screwdriver is important for securing the security screws properly. If you're mounting your Ring doorbell on tougher surfaces, a drill with a masonry bit is a must. Don't forget the level tool; it'll help you achieve proper alignment, making your installation look professional. Finally, a flathead screwdriver can assist in removing the faceplate if you need to access the security screw after installation. Before starting, double-check the packaging to verify you haven't missed any screws or hardware. Being well-prepared will make your installation experience much more enjoyable!
Battery Charging Instructions
Charging your Ring doorbell's battery is vital for guaranteeing it operates smoothly from the start.
To begin, locate the battery compartment and connect it to power using the provided charging cable. Make certain to charge the battery for about four to six hours, as this aligns with the ideal maintenance practices similar to those for energy-efficient appliances. You'll know it's fully charged when a green light appears on the device.
Before installation, it's important to verify the battery is fully charged. A fully charged battery ensures proper functionality and helps prevent interruptions in service. If you find the battery difficult to remove, press it against a flat surface to make access easier.
After installation, don't forget to regularly monitor the battery status through the Ring app. This app will help you track the battery's performance and remind you when it's time for recharging. Keeping an eye on the battery status will guarantee your Ring doorbell remains operational, providing you with peace of mind.
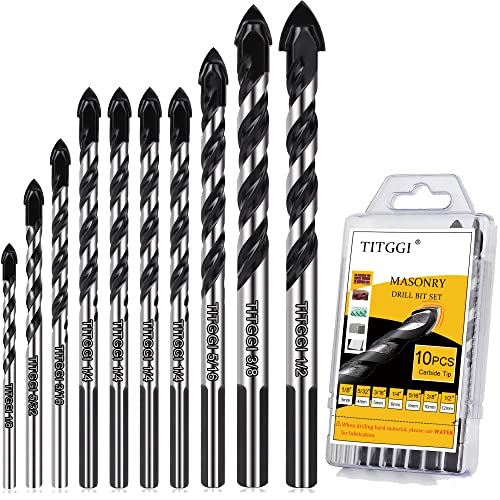
10-PCS Masonry Drill Bit Set & Concrete Drill Bit Set, Professional Drill Bit Set for Glass/Brick/Plastic/Cement/Wood/Tile/Etc, Industrial Strength Carbide Drill Bit Tip, 1/8"-1/2" by TITGGI
HIGH QUALITY DRILL BIT SET; TITGGI Masonry drill bit set, industrial strength carbide drill bit tip, excellent abrasion…
As an affiliate, we earn on qualifying purchases.
As an affiliate, we earn on qualifying purchases.
Understanding Security Screw Importance

Security screws play an essential role in keeping your Ring doorbell securely mounted and protected from theft or tampering.
These specialized screws are designed to prevent unauthorized removal, making them a vital component of your doorbell installation.
Their unique head design requires a specific screwdriver, guaranteeing that only those with the right tools can access or detach the device.
As seen in various best practices for employee background checks, securing property through reliable measures is key to protecting valuable property.
Proper installation of security screws is fundamental for maintaining the integrity of your Ring doorbell.
When installed correctly, these screws not only secure the doorbell to its mounting bracket but also greatly reduce the risk of theft or vandalism.
It's important to choose the right screw size, typically 35mm or as specified in the installation manual, to achieve a tight fit and enhance security.
Additionally, regularly checking the security screws can help you identify any issues early on, making sure your doorbell remains securely in place throughout its use.

Ring Spare Parts Kit for Battery Doorbell
Everything you need to setup your Ring Battery Doorbell in just a few minutes.
As an affiliate, we earn on qualifying purchases.
As an affiliate, we earn on qualifying purchases.
Step-by-Step Installation Process

Before you start, gather all the required tools and materials for the installation process.
It's also beneficial to stay informed about current security trends to enhance your understanding of safety measures.
Next, you'll want to pay close attention to the security screw placement to guarantee everything fits correctly.
Let's walk through each point to make the installation smooth and straightforward.
Required Tools and Materials
To get started with installing the security screw on your Ring doorbell, you'll need the special security screwdriver provided in the package along with the correct size security screw. This screwdriver is specifically designed for the screw type included, ensuring a proper fit and easy installation.
Additionally, ensuring a clean and dust-free environment for your installation can help prevent any interference during the process. Before diving in, check the packaging carefully for any missing screws, as they might be hidden within the materials.
The security screw is essential for securing the faceplate of your doorbell, preventing unauthorized access and potential theft. If you find that the screw isn't included or if you have the wrong size, you could face installation issues, which might lead to damage.
Remember, utilizing projector maintenance tips can enhance the longevity of your device components and the overall setup.
Once you've gathered your tools and verified you have the right security screw, you can proceed confidently. Remember that the security screw typically goes at the bottom of the Ring doorbell.
As you're installing, align the screw with the designated hole and use the screwdriver to turn it clockwise until snug. Avoid overtightening, as this could harm your doorbell. With these tools and materials ready, you're set for a successful installation.
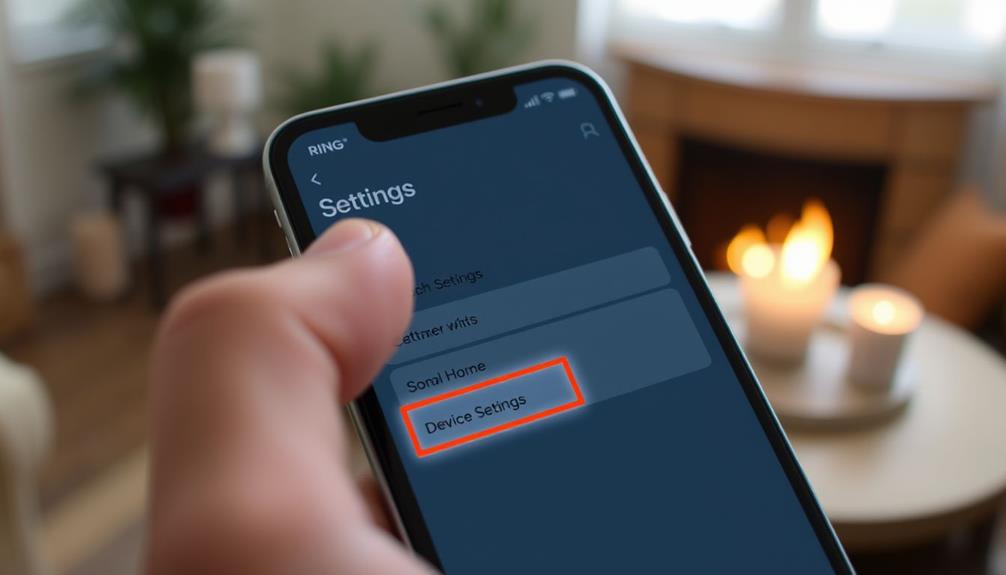
Security Screw Placement
Align your Ring doorbell with the mounting bracket, making certain it's securely attached before you move on to inserting the security screw. Locate the designated hole at the bottom of the doorbell, where the security screw will be inserted. Use the provided security screwdriver to carefully insert the screw.
| Step | Action |
|---|---|
| 1 | Align doorbell with mounting bracket |
| 2 | Locate designated hole |
| 3 | Insert security screw |
| 4 | Tighten until snug |
As you tighten the security screw, be certain it's snug but not overly tight, as this can damage the doorbell casing. If your Ring doorbell has a cover plate, verify that it's properly aligned and seated before inserting the screw. This helps maintain a clean appearance and makes sure the doorbell functions correctly.
Lastly, remember to regularly check the security screw to confirm it remains tight and the doorbell is securely mounted, especially after extreme weather events. This step is essential to prevent tampering and make certain your Ring doorbell stays in place.
Ensuring Proper Fit
Guaranteeing a proper fit for your Ring doorbell involves using the correct security screws and following a precise installation process.
Start by locating the security screws included in your Ring doorbell package. These screws are typically longer and designed with a unique shape to prevent tampering.
Next, grab the provided security screwdriver that comes with the kit. This tool will help you guarantee a proper fit while attaching the screws to the mounting bracket.
Carefully insert the security screws into the designated holes on the bottom of the Ring doorbell. As you tighten them, make sure you do so firmly but avoid over-tightening to prevent any damage.
Before you fully secure the screws, confirm that the doorbell is mounted securely to the wall. This step helps maintain proper alignment and guarantees the device functions correctly.
If you run into any fitting issues, double-check to confirm you're using the correct screws specified for your particular Ring doorbell model. Different models may require different sizes, so it's essential to get this right for a secure and effective installation.
Common Installation Challenges

Installing a Ring doorbell often presents common challenges, especially when you struggle with the provided screwdriver and security screws. Many users report difficulties using the screwdriver, which can lead to frustrating installation complications. It's vital to guarantee you have the correct screws to avoid safety hazards, like your doorbell being easily removed.
Here's a table highlighting some common installation challenges you might face:
| Challenge | Emotion Evoked |
|---|---|
| Difficulty with screwdriver | Frustration |
| Confusion over screw types | Confusion |
| Incorrect screws used | Anxiety |
| Misunderstanding instructions | Overwhelm |
Following installation instructions can sometimes be tricky, particularly if the screws or tools don't meet your expectations. Clear communication from manufacturers about specific screw types and installation requirements is essential. This clarity can greatly reduce your frustration and improve your overall installation experience. Remember, taking your time and making sure you have everything you need will make the process smoother and more successful.
Troubleshooting Security Screw Issues

Addressing security screw issues can help alleviate some of the frustrations you may have encountered during the installation process.
If you've discovered that your security screws are missing, take a moment to thoroughly check the packaging. They might be hidden among other materials included in the box.
Confirm you're using the correct size security screws; typically, the commonly used size isn't 35mm. Verify the specifications before buying replacements. If you find that screws from local hardware stores don't fit properly, consider ordering from the Ring accessories page to confirm compatibility with your doorbell model.
When installing, always use the provided screwdriver specifically designed for security screws. This can prevent stripping or damaging them, which could lead to further installation issues.
If problems persist, don't hesitate to turn to community forums. Many users share their experiences and solutions regarding security screw challenges, which might provide you with valuable insights.
Community Resources and Support

The Ring community offers valuable resources and support, making it easier for users to tackle installation challenges together.
By joining the community forums, you can connect with fellow Ring users who share their experiences and solutions, particularly regarding security screws. If you're missing any parts, these forums often feature links to spare parts collections, making it simple to find replacement security screws.
Engaging with the community not only helps you locate small parts but also enhances your overall user support experience. You can document and share your tips, which can be incredibly helpful to others facing similar issues.
Common installation problems are frequently discussed, allowing you to troubleshoot effectively with input from others who've navigated the same challenges.
To get the most out of this resource, don't hesitate to log in or create an account. This way, you can actively participate in discussions and receive timely support from users who understand the intricacies of security screw installations.
Tapping into the collective knowledge of the Ring community can greatly ease your installation process and guarantee your doorbell is securely mounted.
Best Practices for Doorbell Security

Engaging with the Ring community not only helps you find missing parts but also emphasizes the importance of implementing best practices for securing your doorbell.
First and foremost, always use the included security screws during installation. These screws are designed to guarantee your Ring doorbell is securely attached to its mounting bracket, preventing unauthorized removal.
Make sure you're using the correct size security screws; incorrect sizes can compromise the installation, making it easier for someone to detach the doorbell. When you tighten the screws, use the provided screwdriver to avoid stripping the heads, which could make future removal impossible.
Before completing the installation, check that the faceplate is securely attached with the security screws. This not only enhances the overall security of your device but also keeps it functioning correctly.
Lastly, regularly inspect the security screws for tightness and integrity. Environmental factors can cause screws to loosen over time, potentially compromising your doorbell's security.
Frequently Asked Questions
Where Do the Security Screws Go on the Ring Doorbell?
The security screws on the Ring Doorbell go at the bottom of the device.
Once you align the faceplate with the mounting bracket, you'll see where they fit to secure everything in place.
Make sure the faceplate clicks in before you insert the screws.
Use the screwdriver provided to tighten them, but be careful not to over-torque, as that could damage your doorbell.
Check the packaging if you can't find the screws!
Does Ring Doorbell Work Without a Security Screw?
Yes, your Ring Doorbell can work without a security screw, but it's not advisable.
Operating it without this screw compromises its security, making it easier for someone to steal or tamper with your device.
If you want to protect your investment and guarantee it functions properly, you should always use the security screw during installation.
It's a simple step that greatly enhances the overall security of your Ring Doorbell, especially in high-risk areas.
What Are the Two Screws on the Bottom of the Ring Doorbell?
The two screws on the bottom of your Ring Doorbell are security screws that keep the device securely attached to its mounting bracket.
These screws are typically Torx (star) screws, which require a specific screwdriver for installation.
They're essential for preventing unauthorized removal and tampering, ensuring your doorbell remains stable and functional.
Make sure to tighten them properly to avoid any potential issues with detachment or movement after installation.
How Do You Attach a Ring Doorbell to a Security Door?
Attaching a Ring Doorbell to a security door is like crafting a fortress for your home.
First, check that your doorbell's compatible with the door's material.
Use the mounting bracket to mark holes, ensuring it's level.
Pre-drill with the right bit for your door, then secure the bracket with screws.
Conclusion
Installing a security screw on your Ring Doorbell is a small yet essential step in safeguarding your home.
Think of it like locking your front door; it may seem minor, but it's your first line of defense against unwanted visitors.
Just as a sturdy lock gives you peace of mind, a properly secured doorbell enhances your home's security.
So, take the time to install that screw—your home deserves every layer of protection you can provide.