Installing your Ring Doorbell Stick Up Cam is simple. First, charge the battery fully and pick a spot with a clear line of sight. Use the included mounting hardware to secure the cam on a wall or flat surface between 7 to 10 feet high. Connect your device to Wi-Fi using the Ring app; 2.4 GHz works best outdoors. Customize your alerts and adjust settings through the app for maximum functionality. Don't forget to perform regular maintenance checks to guarantee everything's working properly. If you want to know more tips and tricks for an effective setup, there's plenty more to discover.
Key Takeaways
- Charge the Stick Up Cam battery fully before installation using the provided USB cable for uninterrupted setup.
- Choose a location with a clear view and strong Wi-Fi signal, ideally 7 to 10 feet high.
- Follow the mounting instructions using the provided hardware for secure installation on walls or ceilings.
- Connect the camera to Wi-Fi through the Ring app, selecting the 2.4 GHz band for better outdoor connectivity.

2Pack Adjustable Security Wall Mount Bracket for Ring Stick Up Cam & Ring Outdoor Cam Plus, Perfect View Angle for Your Surveillance Camera System – White
Universal Compatibility – This mounting bracket is designed for Ring Stick Up Cam & Outdoor Cam Plus 2K…
As an affiliate, we earn on qualifying purchases.
As an affiliate, we earn on qualifying purchases.
Overview of Ring Stick Up Cam
The Ring Stick Up Cam offers a flexible and reliable security solution, allowing you to easily monitor your property both indoors and outdoors. This versatile security camera provides multiple installation options, whether you want to place it on a table, mount it on a wall, or install it on a ceiling.
With HD video recording at 1080p, you can capture detailed footage, even in low-light conditions thanks to its night vision capabilities. Furthermore, investing in a quality security system can be just as important as maintaining a clean home, as both contribute to your overall peace of mind and safety. For those interested in enhancing their home environment, key factors in choosing a home cleaning service can also play a significant role in creating a safe and welcoming space.
One standout feature is the two-way audio, which lets you communicate in real time with visitors directly through the Ring app. You can power the Stick Up Cam using a rechargeable battery, or opt for a hardwired installation if you prefer a continuous power source.
Additionally, the camera's adjustable motion sensitivity allows you to tailor its responsiveness to your environment, ensuring you receive relevant notifications. With customizable alerts, you can set preferences that suit your needs, keeping you informed of any activity in your designated monitoring areas.

2026 Enhanced 2K UHD Security Cameras Wireless Outdoor – Free Cloud & SD Storage, Dual-Band WiFi 2.4G/5G, Full-Color Night Vision, 6-Month Battery, Motion Alerts, IP66 Weatherproof, 2-Way Talk
📌【Why Choose Us?】 Millions of families trust realhide for hassle-free, reliable home security. From easy setup to long-lasting…
As an affiliate, we earn on qualifying purchases.
As an affiliate, we earn on qualifying purchases.
Required Tools and Materials

You'll typically need a few essential tools and materials to install your Ring Stick Up Cam effectively. First, grab a screwdriver and a drill, especially if you're mounting the camera on a wall or ceiling. Additionally, having some wall anchors handy can be beneficial if you’re mounting on a surface like brick or concrete. For those aiming to install Ring Doorbell without screws, you might consider using adhesive mounting strips or no-drill brackets specifically designed to hold security cameras. This offers a secure alternative while preserving the exterior of your home.
The installation also requires the included mounting hardware, which will secure your camera in place. For added peace of mind, consider enhancing your home security with a modern garage door opener, as it complements the functionality of your Ring device.
A fully charged Quick Release Battery Pack is important for powering the device unless you choose hardwiring. If you opt for hardwiring, a weatherproof power cable will be necessary for outdoor installations.
Don't forget that you need access to a reliable Wi-Fi network to set up your camera using the Ring app, as this is essential for functionality and accessing video footage.
To confirm your camera is perfectly aligned, a level tool can be helpful. This will assist in capturing the best video footage, preventing any tilting that could affect the camera's performance.
If you're hardwiring, you may also need an indoor plug faceplate removal tool. With these tools and materials on hand, you're all set for a successful installation of your Ring Stick Up Cam.

Security Cameras Wireless Outdoor, 2K Indoor Cameras for Home Security Battery Powered, AI Motion Detection, Color Night Vision, 2-Way Talk, Spotlight Siren Alarm, Cloud & SD Storage-Jet Black Camera
2K HD Live Video, Picture & Color Night Vision: The security cameras wireless outdoor provide a degree wide…
As an affiliate, we earn on qualifying purchases.
As an affiliate, we earn on qualifying purchases.
Preparing Your Device

Before you start the installation, make sure to charge your Stick Up Cam battery using the provided USB cable.
Once it's fully charged, think about where you want to place the camera for the best view and Wi-Fi signal.
Consider how this setup can enhance your entryway with a touch of rustic charm while ensuring security.
This preparation is key to ensuring your device works perfectly once it's installed.
Charging the Battery
Start by charging your Ring Stick Up Cam's battery with the provided USB cable connected to a power source until the green LED light shows a full charge. It typically takes about 5-6 hours to get the battery fully charged, so it's best to plan ahead and do this before your installation for peak performance.
To guarantee a healthy indoor environment, you may also want to take into account the use of an air purifier, as air purifiers reduce allergens and harmful particles that could affect your overall well-being.
Once the battery is charged, you can check the battery status through the Ring app. This feature helps you monitor the charge level and confirms your device is ready for use.
If you choose to use a Quick Release Battery Pack, it allows for easy swapping, so you won't need to remove the entire camera while charging the battery. This can save you time and hassle.
Before you proceed with the installation, always make sure the battery is securely placed in the device. This step is essential to prevent any power issues once your Stick Up Cam is mounted.
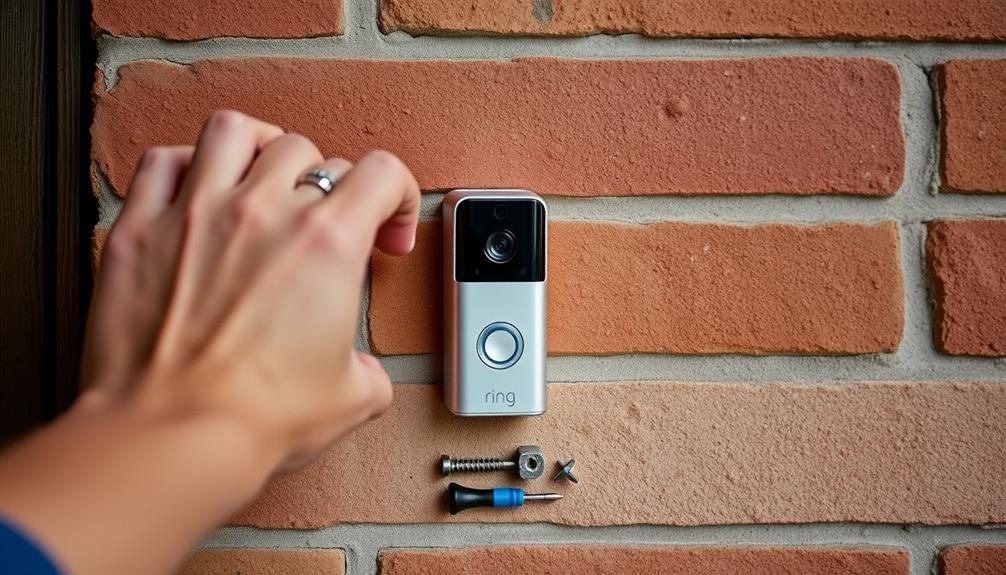
Choosing Installation Location
Once your Ring Stick Up Cam's battery is charged, choosing the right installation location plays a significant role in maximizing its effectiveness. Start by identifying a spot that allows for a clear line of sight to capture movement effectively. Aim for an installation height of 7 to 10 feet; this range provides the ideal angle for monitoring your surroundings. Additionally, consider the thermal energy transfer principles when selecting locations, as extreme temperatures can affect electronic devices. For more insights on maintaining peak performance, consider heat pump efficiency.
Keep the following points in mind as you select your location:
- Lighting Conditions: Avoid areas with excessive backlighting to guarantee video clarity, day and night.
- Obstructions: Make sure to avoid obstructions like trees or furniture that could block the camera's view.
- Wi-Fi Signal Strength: Test the Wi-Fi signal strength in your chosen spot; a strong connection is essential for reliable streaming and notifications.

SimpliSafe 6 Piece Wireless Home Security System with Outdoor Camera – Optional 24/7 Professional Monitoring – No Contract – Compatible with Alexa and Google Assistant
Simple to set up. Seriously secure – Get ready to protect right out of the box.
As an affiliate, we earn on qualifying purchases.
As an affiliate, we earn on qualifying purchases.
Choosing the Installation Location

Choosing the right installation location for your Ring Doorbell Stick Up Cam is essential for guaranteeing it captures the best possible footage of your property's high-traffic areas. Start by selecting an installation site that offers a clear view of these areas while minimizing obstructions.
Ideally, mount the camera at a height of 7 to 9 feet for ideal detection. Consider how a Cottagecore Home Office approach to design emphasizes a connection to nature, which can inspire thoughtful placement that enhances your outdoor aesthetic.
Make certain the location is within the Wi-Fi range; a stable connection is important for good performance. If the signal is weak, it can greatly affect the camera's functionality.
Avoid positioning the Stick Up Cam directly in bright sunlight or near reflective surfaces to prevent glare and maintain video quality.
Consider the angle of the camera, as mounting it slightly downward can enhance its field of view and improve motion detection. Additionally, if you're installing the camera outdoors, choose a weatherproof location to protect it from rain or extreme elements.
Step-by-Step Installation Process

Now that you've chosen the perfect spot for your Stick Up Cam,
it's time to get into the step-by-step installation process.
You'll start with some preparation and setup,
then explore your mounting options to find the best fit for your space.
Let's walk through each stage to guarantee your camera is ready to monitor your home effectively.
Preparation and Setup
To guarantee a smooth installation process, start by charging the Stick Up Cam battery with the provided USB cable until the green LED shows a full charge. This confirms you won't have to worry about battery life during setup.
Next, choose an ideal location for your camera.
- Ensure a clear view of the area you want to monitor.
- Avoid installing it upside down to prevent video orientation issues.
- If it's for outdoor use, remove the indoor plug faceplate and connect the outdoor power cable for proper weatherproofing.
Once you've selected the location, follow the step-by-step instructions in the Ring app to connect your Stick Up Cam to your Wi-Fi network. This completes the initial setup.
Mounting Options Explained
Mounting your Stick Up Cam requires careful consideration of both location and method to guarantee peak performance and security.
First, choose an ideal spot that captures your desired view while being near a power source, especially if you plan to hardwire it. You have a couple of mounting options: you can place the camera on a flat surface or securely mount it to a wall or ceiling using the hardware provided.
If you opt for wall or ceiling installation, attach the mounting bracket using the included screws and anchors. Make sure you install it right side up to avoid upside-down video orientation.
If you're using the Quick Release Battery Pack, charge the battery through the USB port beforehand, indicated by the green LED light when fully charged.
For outdoor installations, don't forget to remove the indoor plug faceplate and connect the outdoor power cable. This step is essential for implementing proper weatherproofing measures to protect your device from the elements.
Following these guidelines will guarantee your Stick Up Cam is installed securely and effectively.
Connecting to Wi-Fi

Connecting your Ring Stick Up Cam to Wi-Fi is vital for ensuring it functions properly and remains accessible via the Ring app. To get started, make sure your Stick Up Cam is powered on and within range of your Wi-Fi network during the setup process.
Follow these steps to connect:
- Choose the 2.4 GHz band for better range and connectivity, especially outdoors.
- Open the Ring app and select your Wi-Fi network from the list.
- Enter the correct password to establish a connection.
It's important to keep your Ring app updated to the latest version to avoid any connectivity problems during the Wi-Fi setup.
Ensuring a strong signal can make all the difference in performance, so take your time to find the best placement for your router.
Once connected, your Stick Up Cam will be ready to monitor your space effectively, giving you peace of mind knowing you can access it anytime through the Ring app.
Using the Ring App

Now that your Stick Up Cam is connected to Wi-Fi, it's time to explore the Ring app.
You'll want to familiarize yourself with app navigation and adjust your notification settings to stay updated on any activity.
Let's go through the key features that will help you make the most of your camera.
App Navigation Tips
Steering through the Ring app is essential for making the most of your Stick Up Cam's features and functionalities. With a few taps, you can access live video feeds, customize settings, and keep an eye on your home. Here are some important navigation tips:
- Access Live Video Feeds: Tap on the device icon for your Stick Up Cam on the app's home screen.
- Manage Device Settings: Navigate to the device settings to adjust your Alert Settings and customize notification settings to your liking.
- Review Event History: Check out the Event History tab to see a chronological view of recorded footage and events.
If you run into any issues while using the app, don't hesitate to check the Help section. It offers FAQs and troubleshooting guides specifically designed for the Ring app.
Following these tips will enhance your experience and guarantee that you're making full use of your Stick Up Cam's capabilities.
Notification Settings Adjustment
To customize your notification settings for the Stick Up Cam, open the Ring app and select your device from the "Devices" tab. Once you've selected the Stick Up Cam, navigate to the "Device Settings" menu. Here, you'll find "Alert Settings" where you can adjust your notification preferences.
You can enable or disable notifications for motion alerts, live view access, and other activity types based on your needs. This flexibility allows you to tailor your experience, guaranteeing you only receive the alerts that matter most to you.
Additionally, you can adjust the frequency of notifications. Choose options like "Always" for real-time updates or "Only when specific events occur" to reduce notifications. This way, you can manage how often you're notified about activity around your home.
Once you've made your adjustments, don't forget to save your changes. This guarantees your new notification settings are applied and activated for your Stick Up Cam. By taking these steps, you can easily customize preferences that fit your lifestyle and keep you informed about important events.
Charging and Power Options

When it comes to powering your Ring Stick Up Cam, you have flexible options that cater to your needs. You can either use a rechargeable battery or hardwire the camera for continuous power. This versatility guarantees your security system remains operational without frequent interruptions.
Here are some key power options:
- Rechargeable Battery: Use the provided rechargeable battery, which charges via a USB port. A green LED indicates when it's fully charged.
- Quick Release Battery Pack: This feature allows you to easily remove the battery for charging without uninstalling the camera from its mount.
- Hardwire Option: If you prefer, you can hardwire the Stick Up Cam for continuous power, eliminating the hassle of battery replacement.
Don't forget to use the included security screws to secure both the battery compartment and the camera. This step guarantees your device is safely installed, helping maintain the security of your home while keeping your Stick Up Cam powered and ready to go.
Outdoor Installation Tips

Before you start installing your Stick Up Cam outdoors, make certain to remove the indoor plug faceplate for a proper power connection. This step guarantees that the device can function effectively once mounted.
Choose a location that provides a clear view of the area you want to monitor, while also considering the weatherproofing capabilities of the camera. Proper placement is vital for the best device functionality.
When you're ready to mount your camera, explore different mounting options available. For added security, use mounting options that include security screws to prevent unauthorized removal of your Stick Up Cam. This will help keep your investment safe.
Don't forget to perform regular maintenance checks after installation. These checks are indispensable for confirming that the camera remains in good working condition and can handle any weather-related wear.
Troubleshooting Common Issues

Troubleshooting common issues with your Stick Up Cam can help assure it operates smoothly and effectively. Here are a few common problems you might encounter and how to fix them:
- If the camera won't power on: Ascertain the battery is fully charged, indicated by a solid green LED light, and check the USB connection for any faults.
- Experiencing poor video quality or connection issues? Verify that your Wi-Fi signal is strong at the camera's location. You may need to move the router or consider a Wi-Fi extender.
- Having trouble with installation? Double-check that you're using the correct screws and that you install the camera right-side up to avoid video orientation issues.
Regularly check the camera's battery status through the Ring app to address any charging the battery issues before they impact performance. By following these steps, you can enhance the functionality of your Stick Up Cam and enjoy peace of mind.
Frequently Asked Questions
How Do You Attach a Ring Stick up Camera?
To attach your Ring Stick Up Camera, first, choose a spot with a clear view, ideally 7-10 feet above the ground.
Use the included mounting bracket as a guide to mark your drill holes.
Securely fasten the bracket to the wall or surface using the screws provided.
Once the bracket is in place, slide the camera onto it and tighten any security screws to prevent unauthorized removal.
After that, you're ready to set it up!
How Do I Put My Ring Stick up Cam in Setup Mode?
To put your Ring Stick Up Cam in setup mode, press and hold the setup button on top of the camera for about 10 seconds.
You'll know it's in setup mode when the LED light starts flashing orange and the camera announces "Ready to setup."
Make sure your device's charged or plugged in, and have the Ring app on your mobile device to complete the setup process.
Does the Ring Stick up Cam Come With a Mount?
When you're looking to elevate your home security, you'll be pleased to know that the Ring Stick Up Cam comes with a handy mounting bracket right in the box.
This bracket allows you to easily position the camera exactly where you need it, ensuring you get the best view.
Plus, it includes security screws to keep everything safe and sound, so you can rest easy knowing your camera's secure.
How Long Does a Ring Stick Battery Last?
The Ring Stick Up Cam's battery usually lasts between 6 to 12 months, but it really depends on how you use it.
Factors like motion sensitivity, frequency of alerts, and live view usage can all affect battery life.
Cold weather can also shorten its lifespan during winter.
To keep track, regularly check the battery status in the Ring app, and consider a Quick Release Battery Pack for backup when needed.
Conclusion
Now that you've got your Ring Stick Up Cam installed, you're all set to keep a watchful eye over your home.
Like a trusty sentinel, it'll help you feel secure and connected.
Remember to regularly check the app for updates and guarantee your device stays charged.
If you run into any hiccups, don't hesitate to troubleshoot or consult the help center.
With your new cam, peace of mind is just a glance away!