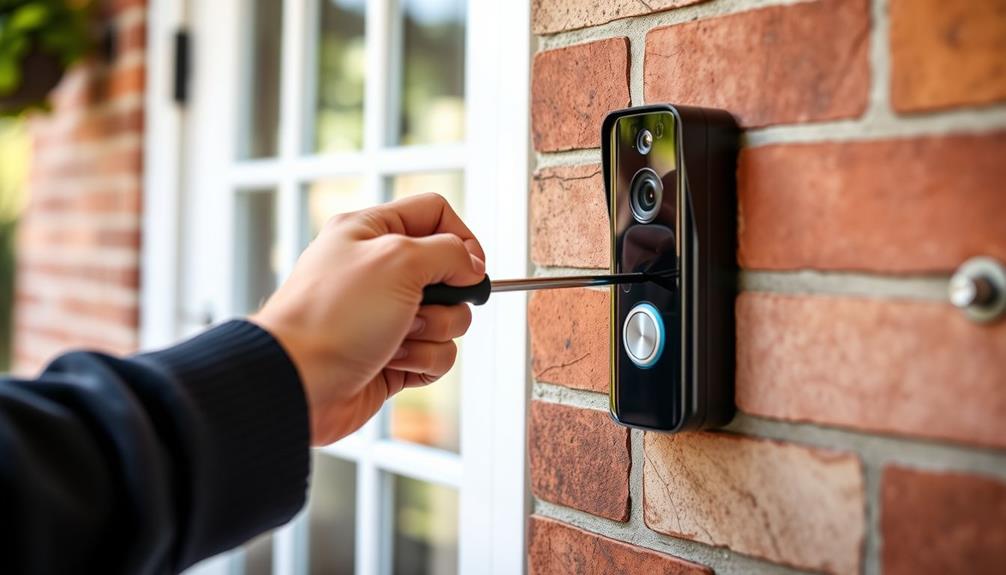
To remove the faceplate of your Ring Doorbell, you can start by using a special star-shaped screwdriver to unscrew the security screw located at the bottom. After that is complete, gently push up from the bottom of the faceplate to loosen it. If it is difficult to remove, you can carefully pry it using a flat object such as a butter knife. Ensure you are in a well-lit area and place the detached faceplate in a safe location. Remember to power off your device before starting any maintenance tasks. For additional helpful tips to simplify the process, there are more resources available for you to explore!
Key Takeaways
- Use a special star-shaped screwdriver or T15 Torx screwdriver to remove the security screw at the bottom of the faceplate.
- Push up from the bottom of the faceplate to loosen it, and gently pry with a flat object if needed.
- Ensure the device is powered off before starting the removal process for safety.
- Place the detached faceplate in a secure area to avoid damage during the process.

Video Doorbell Key Removal Tool Compatible with Ring Battery Doorbell 2024 Release, Wired Doorbell Pro (N ewest Model), Wired Doorbell Plus (N ewest Model) 2PACK
COMPATIBILITY: compatible with Ring Battery Doorbell 2024 Release,Compatible with Wired Doorbell 2nd Gen (Newest Model), Wired Doorbell Plus…
As an affiliate, we earn on qualifying purchases.
As an affiliate, we earn on qualifying purchases.
Ring Video Doorbell Overview
The Ring Video Doorbell offers both wired and battery-operated models, giving you flexible installation options to suit your home. Whether you choose the battery version for easy placement or opt for hardwiring for continuous power, you're enhancing your home's security.
For those looking to improve their home security further, essential kitchen gadgets can also play a role in maintaining a safe and efficient environment.
The device features high-definition video streaming, allowing you to see who's at your door in real-time. With two-way audio, you can communicate directly with visitors without needing to open the door.
You'll appreciate the motion detection alerts sent straight to your mobile device, keeping you informed of any activity at your doorstep. Plus, the night vision capabilities guarantee you can capture clear video footage even in low-light conditions, providing thorough surveillance around the clock.
If you ever need to replace the faceplate, you'll find that it's a straightforward process that requires just a screwdriver. This simple maintenance allows you to keep your Ring Doorbell looking sharp while guaranteeing peak functionality.

Video Doorbell Screwdriver, Double-Ended T6 T15 Screw Driver Tool for Camera Video Doorbell Replacement, Battery Change, Wifi Password Reset
DOORBELL SCREWDRIVER: This video camera screwdriver is used for Wifi password reset access, battery replacement, charging and secure…
As an affiliate, we earn on qualifying purchases.
As an affiliate, we earn on qualifying purchases.
Tools Required for Removal

To remove the faceplate of your Ring Doorbell, you'll need a special star-shaped screwdriver, which usually comes with the device. This screwdriver is designed to handle the security screw(s) that hold the faceplate in place. If you don't have the provided tool, a T15 Torx screwdriver can also work effectively. It's important to confirm you have the proper tools before starting the process to avoid damaging the device, similar to how essential cake pop decorating tools are highlighted for ideal results essential cake pop tools.
Once you have the right screwdriver to remove the security screwss you can proceed. If the faceplate is tightly secured, you might need an additional tool for prying the faceplate. A flat and skinny object, like a butter knife, can be handy for this task. Be careful as you gently pry the faceplate from the bottom edge until it clicks, indicating it's ready to be removed.
In case you lose the original screwdriver or if it gets damaged, you can order replacement screwdrivers through customer service or online marketplaces. It's also a good idea to have extra security screws on hand, as they can be ordered in packs, confirming you're prepared for any future maintenance of your Ring Doorbell.

Doorbell Screwdriver Replacement with 20 Doorbell Screws Kit – Double-Ended Torx T6 T15 Security Screwdriver for Battery Change & WiFi Reset – Video Doorbell Camera Replacement Parts Tool (Orange)
COMPLETE DOORBELL SCREWS REPLACEMENT KIT – Double-ended T6 + T15 Torx screwdriver plus 20 doorbell replacement screws (10…
As an affiliate, we earn on qualifying purchases.
As an affiliate, we earn on qualifying purchases.
Step-by-Step Faceplate Removal

Begin by locating and removing the security screw at the bottom of your Ring Doorbell using the provided Ring screwdriver or a suitable alternative. This screw is essential for securing the faceplate in place, so be certain to unscrew it completely.
Once the security screw is removed, push up from the bottom of the faceplate with your thumbs to loosen it. It's important to guarantee that you're using safe methods to handle the device, as AI-driven solutions can lower operational costs for businesses related to home security systems.
If the faceplate doesn't detach easily, you can use a flat object, like a butter knife, to gently pry it away from the device. Be cautious during this step to avoid damaging the faceplate or the doorbell itself.
Ascertain you're in a well-lit area to clearly see the screw and faceplate mechanism, which helps prevent any visibility issues.
After successfully detaching the faceplate, place it in a secure location to prevent damage, especially during maintenance or battery replacement.
Following these steps carefully will help you remove the faceplate without any hassle, allowing you to access the inner components of your Ring Doorbell whenever necessary. If you are having trouble removing the faceplate, be sure to refer to the user manual for additional guidance. Once the faceplate is removed, you can easily access the battery, Wi-Fi setup button, and other internal components. These steps are essential for setting up Ring Doorbell 3 and ensuring proper functionality.

Ring Interchangeable Faceplate for Doorbells – Video Doorbell 3, Video Doorbell 3 Plus, Video Doorbell 4, Battery Doorbell Plus – White
Customize your security to match your house with an interchangeable faceplate for Ring Video Doorbell 3, Ring Video…
As an affiliate, we earn on qualifying purchases.
As an affiliate, we earn on qualifying purchases.
Common Challenges During Removal

Removing the faceplate can be tricky, especially if the screwdriver doesn't catch on the security screw or if the screws are stripped. Here are some common challenges you might face:
- Poor Visibility: If you can't see the screws clearly, it can be tough to properly align your screwdriver.
- Stripped Screws: Stripped screws can complicate the removal process. If you encounter this issue, try using a rubber band to enhance grip.
- Incorrect Tools: Using the wrong screwdriver can considerably slow down your efforts to remove the faceplate.
To tackle these complications, make sure you have the right tools ready before starting. A compatible screwdriver is key, as is good visibility to navigate the screws effectively.
If you're struggling, don't hesitate to seek assistance from the Ring support team. They can provide troubleshooting tips that help you overcome any persistent issues during the removal process.
Stay patient and focused, and you'll be able to remove the faceplate successfully!
Accessing the Battery

Accessing the battery on your Ring Doorbell is straightforward once you've successfully removed the faceplate. Begin by using the provided Ring screwdriver to unscrew the security screw located at the bottom. Once the faceplate is off, you'll find the battery compartment at the bottom of the device.
Here's a simple visual guide to help you through the process:
| Step | Action | Notes |
|---|---|---|
| 1. Remove the faceplate | Unscrew the security screw | Use the provided Ring screwdriver |
| 2. Locate battery compartment | Found at the bottom | It's easily identifiable |
| 3. Detach the battery | Press the black tab and pull it out | Confirm the device is powered off |
Gently press down on the black tab on the battery to detach it safely. After performing any maintenance, reinsert the battery, confirming it's adequately charged for best performance. Remember, checking the battery periodically can help maintain your Ring Doorbell's functionality.
Reassembling the Doorbell

To reassemble your Ring Doorbell, align the top hook of the faceplate with the corresponding hole on the device at a 45-degree angle for easier attachment. This guarantees that the faceplate can be easily replaced without hassle.
Once aligned, snap the bottom of the faceplate back into place, making sure it fits securely without gaps.
Follow these steps to complete the reassembly:
- Remove the security screw at the bottom of the faceplate, if it's not already removed.
- Reinsert and tighten the security screw using the provided screwdriver, ensuring the faceplate is secured properly.
- Double-check that the faceplate is firmly attached to prevent it from being easily removed or damaged.
If you've lost the original security screw, don't worry; you can order packs of replacement screws online for convenience.
By guaranteeing the faceplate is tightly secured, you'll enhance the security of your Ring Doorbell and maintain its functionality.
Just remember to check your work to make sure everything is in place!
Additional Resources and Support

After securing the faceplate, you might need additional resources to help with any future maintenance or issues you encounter with your Ring Doorbell. Start by accessing expert tips and video tutorials that provide visual guidance on faceplate removal and other maintenance tasks. These resources can make the process much smoother.
If you run into persistent problems, utilize customer support options. Troubleshooting articles can help you resolve common issues, while you can also reach out directly to Ring representatives for assistance.
When it comes to repairs, explore online platforms for replacement parts—like security screws or specialized tools needed for faceplate removal. It's vital to have the right equipment to avoid damaging your device.
Additionally, consider consulting community forums where users share their experiences and solutions related to faceplate removal and similar challenges. These discussions can offer valuable insights and tips.
Lastly, always review safety guidelines to guarantee you're avoiding potential damage to your Ring Doorbell during any maintenance tasks. With these resources in hand, you'll be well-equipped to handle any issues that arise.
Frequently Asked Questions
How to Remove Door Bell Cover?
To remove a doorbell cover, you'll need to find the screws securing it in place.
Use a screwdriver that fits those screws—typically a Phillips head.
Turn the screws counterclockwise until they're loose, then gently pull the cover away from the wall.
If it feels stuck, check for hidden screws or clips.
Always remember to keep the screws in a safe spot, so you can easily reattach the cover later.
How to Take Ring Doorbell Faceplate Off?
To take the faceplate off your Ring Doorbell, start by locating the security screw at the bottom.
Use the star-shaped screwdriver included with the device to loosen it. If you don't have that, a T6 or Phillips screwdriver can work.
Once the screw is loose, push up from the bottom with your thumbs to detach the cover.
If needed, gently pry it using a flat object, ensuring you have a clean workspace to avoid losing parts.
How Do I Get the Mounting Plate off of My Ring Doorbell?
To get the mounting plate off your Ring Doorbell, first locate the security screw at the bottom and use the special star-shaped screwdriver included with the device.
If you don't have it, a Phillips screwdriver #1 or #00 might work, but be careful not to strip the screws.
Once unscrewed, push up from the bottom of the faceplate with your thumbs to loosen it, and gently pry it off if needed.
How to Unscrew Ring Doorbell Without Tool?
You've found yourself needing to unscrew something but don't have the right tool—it's a classic dilemma!
If you've got a rubber band handy, try it for extra grip on the screw.
For those tricky, stripped screws, push gently with a butter knife to pry them while twisting.
And if all else fails, reaching out to Ring support for a tool replacement or checking online marketplaces could save your day.
You've got options!
Conclusion
Removing the faceplate from your Ring doorbell may seem intimidating, but it's easier than you think. Once you have removed the faceplate, you will see the screws that hold the doorbell in place. Simply use a screwdriver to loosen these screws and carefully detach the doorbell from the wall. With the doorbell removed, you can now access the wiring behind it. This is useful for troubleshooting issues or for installing a new doorbell. Additionally, while the doorbell is removed, be sure to inform anyone who may be expecting visitors to refrain from ringing the doorbell until it is reinstalled.
Just as you open a door to reveal what's inside, lifting that faceplate opens up a world of maintenance possibilities.
Whether you're accessing the battery or troubleshooting issues, facing this task empowers you to take control of your home security.
So, embrace the challenge; the satisfaction of a job well done is worth the effort.
Your doorbell will thank you!