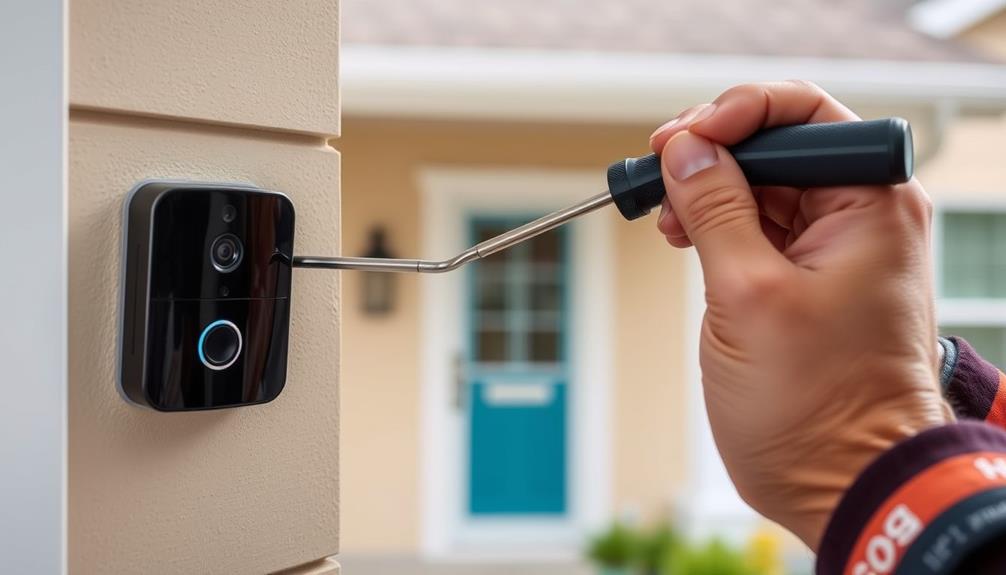

To access your Ring doorbell without tools, you can utilize common household items like a flathead screwdriver or even a butter knife to carefully remove the faceplate. Begin by gently pushing up from the bottom of the plate to ensure a secure fit. If screws are present, wrapping a rubber band around them can enhance grip for easier removal. In case of stripped screws, use needle-nosed pliers for better leverage. Be cautious while handling all components to prevent any damage. Stay tuned for additional helpful tips and tricks for a seamless process!
Key Takeaways
- Use a flathead screwdriver or butter knife to gently pry open the seams of the faceplate.
- Wrap a rubber band around stripped screws for improved grip and easier turning.
- Employ needle-nosed pliers to grip and twist exposed screw heads if they are stripped.
- Utilize thin flat objects like Exacto knives for leverage on stubborn screws.

Ring Alarm 14-Piece Kit (newest model), Wireless smart home or business security system, expandable, easy setup, Mobile App Control, 24/7 Professional Monitoring, Alexa Compatible
A great fit for 2-4 bedroom homes, this Alarm Kit includes one Base Station, two Keypads, eight Contact...
As an affiliate, we earn on qualifying purchases.
Understanding Your Ring Doorbell
To effectively maintain and troubleshoot your Ring Doorbell, it's important to understand its design, including the security screw and the location of key features like the battery compartment and Wi-Fi reset button.
The security screw, usually a T15 or T6 Torx screw, is crucial for securing the faceplate. Regular maintenance can extend the lifespan of appliances and, similarly, understanding the components of your doorbell can prevent operational issues. Without the right tool to remove it, you risk stripping the screw, which can complicate access to the internal components.
Once you remove the faceplate, you'll find the Ring Doorbell battery, which you may need to replace periodically. Familiarizing yourself with the battery compartment helps guarantee you can quickly address any power issues.
Additionally, the Wi-Fi reset button is located inside the device and plays an essential role in reconnecting your doorbell to your network. If your doorbell loses connection, you'll need access to this button to re-establish a connection.

eufy Security Video Doorbell, No Subscription, Dual Cameras, 2K FHD,Head-to-Toe View, Doorbell Camera Wireless & Wired, Color Night Vision, Two-Way Talk, AI Motion/Package Detection, Built-in 8GB
𝐃𝐮𝐚𝐥 𝐂𝐚𝐦𝐞𝐫𝐚𝐬, 𝐃𝐨𝐮𝐛𝐥𝐞 𝐒𝐞𝐜𝐮𝐫𝐢𝐭𝐲 | Dual cameras work seamlessly together. The front camera captures visitors head-to-toe, while the...
As an affiliate, we earn on qualifying purchases.
Common Screw Types

When you're working with your Ring Doorbell, knowing the difference between T15 and T6 screws is essential for a smooth installation.
Understanding the types of what to look for in a home cleaning service can also help you guarantee that your home is properly maintained while you focus on your new installation.
If you encounter stripped screws, there are simple hacks to help you remove them without hassle.
Let's explore these common screw types and some handy tools to make the job easier.
T15 Vs. T6 Screws
Choosing between T15 and T6 screws is essential for ensuring the security and proper function of your Ring Doorbell.
Most modern Ring Video Doorbells use T15 Torx screws, which are larger and provide a strong level of security against unauthorized access. These star-shaped screws require a specific T15 Torx screwdriver for removal, making it important to have the right tool on hand.
Additionally, utilizing project management services can help streamline any renovation projects involving your home's security features.
On the other hand, older models of the Ring Doorbell might use T6 Torx screws. These screws are slightly smaller and, like the T15, also require a unique screwdriver. Using the incorrect screwdriver can lead to stripped screws, complicating installation or maintenance tasks.
Both T15 and T6 screws are designed to enhance your device's security, preventing easy access without the proper tools.
To avoid issues, check your Ring Doorbell model to determine which screw type you need. You can easily find replacement screwdrivers for both T15 and T6 screws at local hardware stores or directly from Ring's website.
Removing Stripped Screws
Removing stripped screws can be frustrating, especially with common types like T15 and T6 found in your Ring Doorbell. Stripped screws often result from using the wrong screwdriver, making them tougher to remove. Understanding proper maintenance of your tools can prevent this issue in the future, as neglected tools may not perform efficiently, leading to stripped screws.
Here are three techniques to help you tackle this issue:
- Rubber Band Trick: Place a rubber band between the stripped screw and your screwdriver. This can provide extra grip, allowing you to turn the screw more easily.
- Needle-Nosed Pliers: If the screw head is exposed, use needle-nosed pliers to grip and twist the screw. This method can be surprisingly effective for stubborn security screws.
- Drill-Driver: For particularly tough screws, consider using a drill-driver. The additional torque makes it easier to loosen and remove the screw without damaging the surrounding area.
Before you start, check for stripped threads on both the screws and the backplate. This can help you decide if you need to try different methods or tools.
If you're still struggling, don't hesitate to seek advice from community support forums where others share their experiences and solutions. Additionally, you might find that energy consumption patterns can also inform your choice of tools for future projects.
Tool Alternatives and Hacks
After tackling stripped screws, it's helpful to explore alternative tools and hacks that can make working with common screw types easier and more efficient.
If you don't have the specific T15 or T6 Torx screwdriver, try using a rubber band between a flathead screwdriver and the screw. This simple trick enhances grip and leverage, making it easier to turn stubborn screws.
For particularly tricky screws, consider using a thin, flat object like an Exacto knife or a razor blade. By wedging it under the screw head, you can gain enough leverage to turn the screw when it's stripped or hard to reach.
Needle-nosed pliers can also be a great alternative; they allow you to grip and turn screws that are spinning without backing out.
If traditional tools just won't cut it, a drill-driver can provide the torque needed to remove tightly secured screws.

Philips Wi-Fi Door Lock, WiFi Smart Lock Keyless Entry Deadbolt for Front Door, Compatible with Alexa & Google Assistant, Remote Control, Built-in WiFi, APP Fingerprint Passcode Unlock, Auto Locking
𝐅𝐥𝐞𝐱𝐢𝐛𝐥𝐞 𝐖𝐚𝐲𝐬 𝐭𝐨 𝐔𝐧𝐥𝐨𝐜𝐤: Unlock the way you want: app, passcode, fingerprint, physical key, or voice via Alexa/Google...
As an affiliate, we earn on qualifying purchases.
Preparing for Removal

To prepare for removing your Ring Doorbell, set up a clean and organized workspace to keep small parts safe during the process. A clutter-free area helps you focus and prevents losing any components.
Before you start, here's what you need to do:
- Locate the Security Screw: Familiarize yourself with the location of the security screw at the bottom of the faceplate. This screw is essential for removing the faceplate and accessing the internal parts.
- Gather Your Tools: If you don't have the original tool, find a flat and skinny object, like a butter knife. This will help you gently pry at the edges of the faceplate.
- Check for Additional Fasteners: Inspect the faceplate for any other screws or clips that may need disengaging. This'll guarantee you don't face unnecessary resistance when trying to remove it.
With these steps completed, you'll be well-prepared to tackle the removal of your Ring Doorbell without tools. This preparation makes the process smoother and minimizes the risk of damage.
eufy Security Floodlight Camera E30, Security Camera Outdoor, 360° Pan and Tilt, AI Detection and Tracking, 2K Video, 2.4GHz Wi-Fi, 2,000 Lumens, Built-in Siren, 24/7 Recording,No Monthly Fee
360° Surveillance, Your All-Seeing Guardian: Enjoy complete 360° coverage of your property. Set the camera to patrol automatically...
As an affiliate, we earn on qualifying purchases.
Using Household Items

When it comes to opening your Ring doorbell, you don't always need specialized tools.
You can use everyday household items to access it easily.
From a butter knife to rubber bands, there are plenty of alternatives that can help you get the job done.
Alternative Tools at Home
Using common household items can simplify the process of opening a Ring Doorbell without needing specialized tools. If you find yourself without the proper screwdriver, try these alternatives to enhance your security: One option is to use a flathead screwdriver and a pair of pliers to carefully loosen the screws. Alternatively, a credit card or thin piece of plastic can be wedged in between the doorbell and the wall to carefully pop it off. When it comes to ring doorbell installation, it’s important to be resourceful and find creative solutions to get the job done without any unnecessary hassle. In addition, if you encounter any issues during the installation process, it’s helpful to explore how to troubleshoot ring doorbell problems. This can include checking the internet connection, ensuring proper positioning of the doorbell, and troubleshooting any technical issues that may arise. By being proactive and resourceful, you can successfully navigate the installation process and ensure your Ring Doorbell is securely in place. Remember, sometimes all it takes is a little ingenuity to solve a problem and achieve your security goals.
Some household items that can be used to open a Ring Doorbell without a screwdriver include a flathead or Phillips head butter knife, a coin, or even a credit card. These items can be used to carefully pry the device open and access the screws without causing damage. Additionally, if you encounter any difficulties during the installation process, troubleshooting common issues can be found on the Ring website or by contacting their customer support for further assistance.
- Flathead Screwdriver or Butter Knife: Insert it into the seam of the faceplate and gently pry it open. Be careful to apply light pressure to avoid damage.
- Rubber Bands: Wrap a rubber band around the security screws for added grip. This trick helps you turn the screws more easily, even without a screwdriver.
- Needle-Nosed Pliers: If you have screws that are stripped but still protruding, these pliers can grip and turn them effectively.
In a pinch, you can also use a small pair of scissors to wedge under the screw head for extra torque, or a metal spoon's edge to pry the faceplate.
Each of these tools can save you time and frustration, allowing you to access your Ring Doorbell quickly and efficiently. Just remember to be gentle to avoid damaging your device!
Improvised Techniques for Access
If you find yourself without the right tools, there are several improvised techniques you can use to access your Ring Doorbell effectively.
One option is to take a flat object like a butter knife or a credit card and carefully insert it along the edges of the faceplate to pry it open, especially if the security screw is inaccessible.
If you encounter stripped screws, don't worry! A rubber band can provide extra grip when you're using a standard screw driver. You can also use needle-nosed pliers to grip and twist stubborn screws that just won't budge.
Another helpful technique involves using an Exacto knife, wedging it under the screw head to create leverage, which may allow you to turn it free.
In cases where you're really stuck, applying a small amount of penetrating oil around the screw can help loosen it, making it easier to remove with your improvised tools.
With these techniques, you can tackle the problem without needing specialized tools. Just remember to be patient and careful to avoid damaging your device.
Step-by-Step Faceplate Removal

Start by gently pushing up from the bottom of the faceplate to loosen it, using your thumbs for support. This simple action often helps to release the faceplate without damaging it. If it feels stuck, don't worry. You can use a flat and skinny object, like a butter knife, to carefully pry it open.
Here's a quick guide to help you through the process:
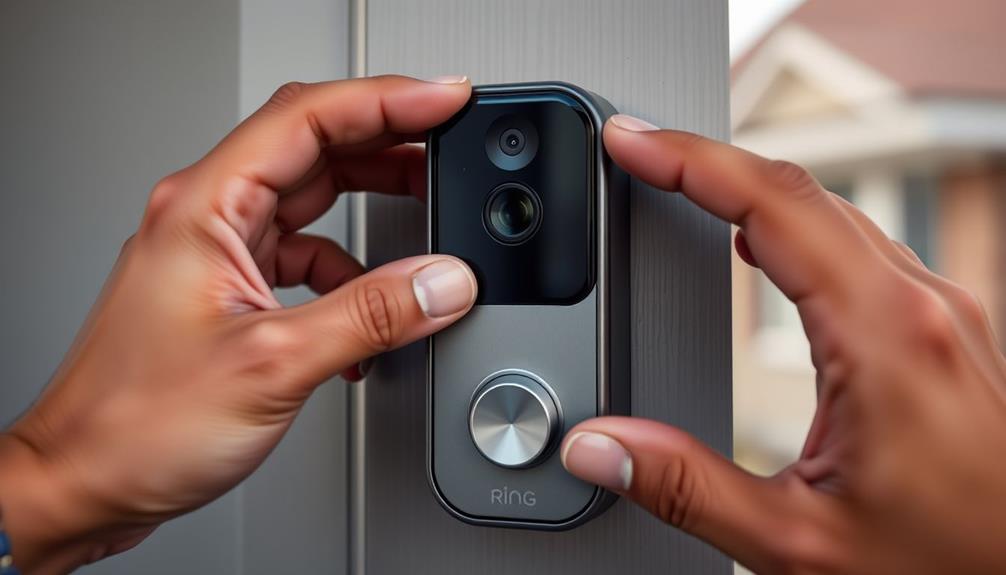
- Loosen the Faceplate: Push up from the bottom to start the removal process.
- Check for the Security Screw: Identify and remove the bottom security screw to make it easier to take off the faceplate.
- Support While Pry: As you pry, support the front with your fingers to prevent it from dropping.
Once you've managed to remove the faceplate, place it in a secure location to avoid any potential damage or loss. Remember, handling the faceplate with care is essential. With these steps, you'll successfully remove the faceplate of your Ring Doorbell without needing any tools!
Accessing the Battery

After successfully removing the faceplate, you'll need to access the battery located at the bottom of your Ring Doorbell.
Before you proceed, verify the device is powered off to prevent any electrical issues. Look for the black tab at the bottom of the doorbell. Press down on this tab while gently pulling the battery out towards the bottom.
Be careful when handling the battery to avoid dropping it. Once you have it out, check that it's adequately charged before reinserting it into the device. If the battery appears low, it's a good idea to charge it before placing it back into the doorbell.
If you find that the faceplate is too secure and you don't have the right tools, you can try using a flat object to gently pry it open if it's loose enough. Remember, the goal is to access the battery without causing damage to the doorbell.
Once you've accessed the battery successfully, you're one step closer to confirming your Ring Doorbell is fully operational and ready to keep your home secure.
Reassembling Your Doorbell

Reassemble your Ring Doorbell by aligning the top hook of the faceplate with the corresponding hole and holding it at a 45-degree angle for easier placement. Once you have the top aligned, follow these steps to guarantee everything is properly secured:
- Snap the bottom of the faceplate into place firmly. Make sure it sits correctly against the doorbell body to avoid any gaps.
- Replace the security screw at the bottom of the faceplate. Use the appropriate screwdriver to tighten it fully, preventing the faceplate from loosening over time.
- Check all components to guarantee they're securely attached. Before finalizing the installation, confirm that your doorbell is functioning properly.
If you want to switch things up, remember that different colored faceplates can be interchanged for a custom look, and silicone skins are available for added aesthetics.
Troubleshooting Common Issues

Even with everything reassembled, you might still run into common issues that can make accessing your Ring Doorbell a challenge. One of the most frequent problems users face is stubborn screws that spin without backing out. Stripped screw heads can make it nearly impossible to reach the internal components, leaving you frustrated.
Here's a quick reference table to help you troubleshoot:
| Issue | Solution | Tools Needed |
|---|---|---|
| Stubborn screws | Use an Exacto knife to wedge under screw head | Exacto knife, razor blade |
| Stripped screw heads | Try flat-ended pliers for better grip | Flat-ended pliers |
| Need for Wi-Fi reconnection | Access the orange button | None (just access the device) |
If you're still struggling, don't hesitate to post a question in online forums. Many users have faced similar obstacles, and sharing your experience can lead to valuable tips. Remember, persistence is key, and with the right approach, you can successfully troubleshoot these common issues.
Community Tips and Support

Joining the Ring Community can provide you with valuable tips and support from fellow users who've tackled similar challenges. Engaging in discussions with other members can help you navigate the task of opening your Ring doorbell without tools.
Here are three helpful suggestions based on shared experiences:
- Use Household Items: Many users recommend using everyday items like butter knives or credit cards to gently pry off the faceplate. Just be careful to avoid damaging the device.
- Rubber Band Technique: If you're facing stubborn screws, try wrapping a rubber band around the screwdriver for extra grip. This method can help prevent stripping and make removal easier.
- Patience is Key: Take your time! Rushing through the process can lead to damaged components. Focus on your technique to guarantee a successful opening.
If you have any questions or need advice, don't hesitate to post in the community. You'll find a wealth of knowledge from others who've been in your shoes. Engaging in these discussions can make your task much more manageable!
Frequently Asked Questions
What Can I Use to Open My Ring Doorbell?
To open your Ring doorbell, you can start by locating the security screw.
If you don't have the right screwdriver, try using a flat object like a butter knife to gently pry the faceplate off.
If the screw's stripped, needle-nosed pliers or an Exacto knife can help. You might also use a rubber band for better grip.
If all else fails, consider contacting customer support for assistance with accessing the internal components.
How Do You Remove a Ring Doorbell Screw Without a Tool?
To remove a Ring Doorbell screw without a tool, you can try a few handy tricks.
Use a rubber band for grip,
apply needle-nosed pliers for leverage,
or insert a flat object like a butter knife for assistance.
If the screw's stripped, an Exacto knife can help you gain traction.
If these methods fail, reach out to customer support for further guidance or replacement options.
You've got this!
How Do I Remove the Cover on a Ring Doorbell?
To remove the cover on your Ring Doorbell, start by locating the security screw at the bottom of the faceplate.
Use a T15 or T6 Torx screwdriver to turn it counterclockwise.
Once the screw's removed, gently pry the faceplate off, applying upward pressure with your thumbs while supporting the front.
If you encounter any stubborn screws, consider using a rubber band for grip or needle-nosed pliers for better leverage.
Always power off the device first!
Do All Ring Doorbells Have the Same Screwdriver?
You might think all Ring doorbells use the same screwdriver, but that's not the case.
Most models require a T15 Torx security screwdriver, while some older ones need a T6.
It's essential to check which screws your specific model has.
The good news is that the Ring Video Doorbell tool replacement includes a versatile double-headed screwdriver that fits both types.
Conclusion
To sum up, opening your Ring Doorbell without tools is easier than you might think.
By using simple household items and following a few straightforward steps, you can access the battery quickly.
Isn't it satisfying to tackle tech challenges with everyday objects?
Remember, if you encounter any issues, don't hesitate to seek advice from the community or refer to official support.
With a little patience, you'll have your doorbell up and running in no time!