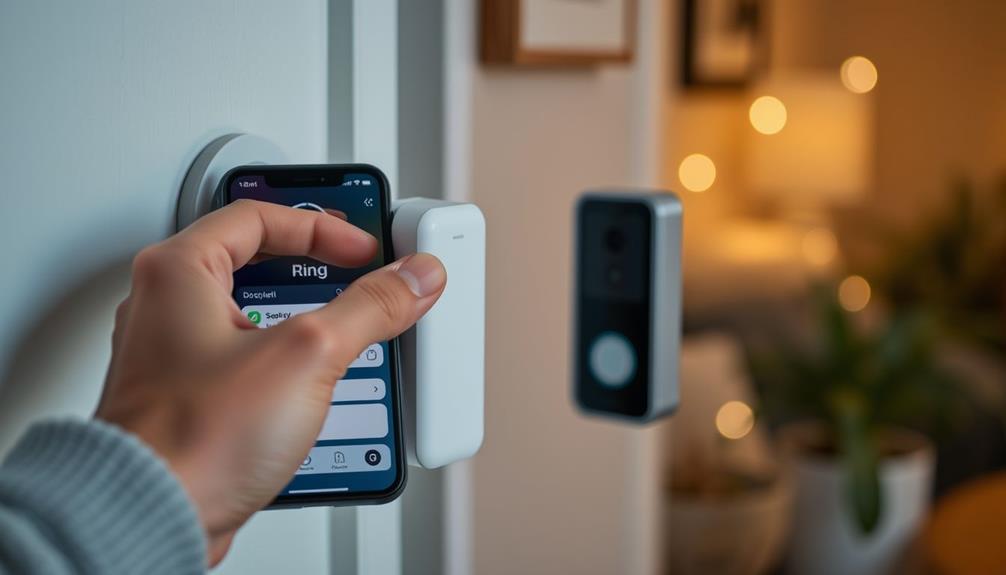
To make your Ring Doorbell 3 fit perfectly, first charge the battery using the included USB cable until you see the green light. Then, switch off the power at the circuit breaker and remove your current doorbell. Place the Ring doorbell at about 48 inches from the ground and make holes for mounting if needed. Securely fasten the doorbell with screws, connecting any wires to the terminals. Ensure the transformer’s voltage is correct and look for a solid white light to confirm proper wiring. Lastly, utilize the Ring app for setup and troubleshooting guidance to kick off the process. Installing your Ring Doorbell 3 is a simple procedure that can be done in just a few easy steps. The Ring app offers straightforward, detailed instructions for configuring your device and linking it to your home’s Wi-Fi network. Once it’s set up, you can personalize your doorbell’s settings like motion detection and alerts right from the app. In conclusion, setting up your Ring Doorbell 3 is a fantastic way to boost your home’s security and convenience. Start improving your home security today!
Key Takeaways
- Charge the battery with the orange USB cable until the solid green light appears before installation.
- Remove the old doorbell and ensure power is off at the circuit breaker.
- Position the Ring Doorbell at about 48 inches from the ground using a level tool for accuracy.
- Connect existing wall wires to the doorbell's screws, ensuring reliable connections with wire nuts.

Ring Doorbell Retrofit Kit — Compatible with Battery Doorbell, Plus and Pro (2nd Gen), Wired Doorbell, Plus (2nd Gen) and Pro (3rd Gen)
Doorbell Retrofit Kit lets you easily install a new Battery Doorbell (2nd Gen), Battery Doorbell Plus (2nd Gen),…
As an affiliate, we earn on qualifying purchases.
As an affiliate, we earn on qualifying purchases.
Installation Steps
To install your Ring Doorbell 3, start by charging the provided battery with the orange USB cable until a solid green light shows it's fully charged.
Once charged, you'll need to remove the existing doorbell. Make sure to shut off the power at the circuit breaker before disconnecting the wires. It's also wise to guarantee your home security is enhanced with modern technology, akin to how garage door openers can improve safety and convenience.
Now, it's time to prepare for mounting. Use the included level tool to position your Ring Doorbell about 48 inches from the ground. Mark the mounting hole positions with a pencil for accuracy. If you're installing on brick, concrete, or stucco, you'll need to drill holes for mounting.
After drilling, securely attach the doorbell using all four included screws, making certain the wires are fed into the wall. This step is essential for a stable installation.
Once everything's in place, you can continue with the setup process in the Ring app. Remember, securing the doorbell properly prevents any damage or disconnection later on. Following these steps will guarantee your Ring Doorbell is installed correctly and ready to function seamlessly.

Video Doorbell Key Removal Tool Compatible with Ring Battery Doorbell 2024 Release, Wired Doorbell Pro (N ewest Model), Wired Doorbell Plus (N ewest Model) 2PACK
COMPATIBILITY: compatible with Ring Battery Doorbell 2024 Release,Compatible with Wired Doorbell Pro (Newest Model), Wired Doorbell Plus (Newest…
As an affiliate, we earn on qualifying purchases.
As an affiliate, we earn on qualifying purchases.
Wiring and Connection

With your Ring Doorbell 3 securely mounted, it's time to focus on the wiring and connection process to guarantee it functions properly. You'll want to connect the existing wall wires to the screws on the doorbell. Remember, either wire can connect to either screw, so don't stress about the order.
To maintain the best air quality in your home while you're busy with installations, consider using air purifiers to eliminate allergens and maintain a healthy environment.
Here's what you'll need to secure a smooth connection:
- Wire extensions: Use these if your existing wires are too short.
- Wire nuts: These will help you secure connections.
Once you've made the connections, check for a solid white light on the doorbell. This indicates that your wiring is successful.
To finalize, secure the device with all four included screws, ensuring stability and proper operation. Remember, a strong connection is essential for your Ring Doorbell 3 to function effectively.

20Pcs Security Screws for Camera Doorbell Screws Replacement with Video Doorbell 2/3/4/Pro 2, CTYUKHS
Video Doorbell Screws: If you lost your original video doorbell screws, this will be the perfect replacement for…
As an affiliate, we earn on qualifying purchases.
As an affiliate, we earn on qualifying purchases.
Final Setup and Troubleshooting

Finalizing the setup of your Ring Doorbell 3 involves a few essential steps to confirm everything functions smoothly. First, make sure the battery is fully charged to avoid any discharge issues during the initial setup. After that, securely attach the faceplate and tighten the security screws using the provided star-shaped screwdriver bit. This prevents unauthorized removal. Next, carefully choose the mounting location for your Ring Doorbell 3, ensuring it is within the recommended range for optimal performance. Once you have selected the suitable spot, use the mounting ring doorbell kit to securely install the device. It is essential to follow the instructions in the manual to ensure the mounting is done correctly, providing a clear view of the area you want to monitor.
Next, verify the wiring by checking for a solid white light on the front of the Ring Video Doorbell 3, which indicates proper connection. Use the Ring app for additional setup guidance, including configuring features and connecting to Wi-Fi for peak performance.
If you run into power issues, troubleshoot by confirming that the device is properly hardwired if applicable and checking the battery status.
Here's a handy troubleshooting guide:
| Issue | Solution |
|---|---|
| No white light | Check wiring connections |
| App not connecting | Make sure Wi-Fi credentials are correct |
| Battery draining fast | Verify it's fully charged after setup |
Following these steps will help you confirm your Ring Doorbell 3 is set up correctly and ready to enhance your home security.
Video Doorbell Key Removal Tool Compatible with Ring Battery Doorbell 2024 Release, Wired Doorbell Pro (N ewest Model), Wired Doorbell Plus (N ewest Model) 2PACK
COMPATIBILITY: compatible with Ring Battery Doorbell 2024 Release,Compatible with Wired Doorbell Pro (Newest Model), Wired Doorbell Plus (Newest…
As an affiliate, we earn on qualifying purchases.
As an affiliate, we earn on qualifying purchases.
Frequently Asked Questions
How Do You Install Ring Doorbell 3 Without Drilling?
To install your device without drilling, start by cleaning the surface where you'll attach it.
Make certain it's dry for the best adhesion.
Use a high-quality adhesive mount designed for your device's weight.
Press it firmly onto the surface, confirming it's level.
For extra security, consider a temporary mounting plate that won't damage your wall.
How Do You Install a Ring on a 3 Doorbell?
To install a Ring Doorbell 3, you'll first charge the battery fully.
Next, turn off power at the circuit breaker and remove your old doorbell.
Connect the new doorbell's wires to the existing ones, ensuring you use a compatible transformer.
Use the level tool to mount it about 48 inches high.
If necessary, drill holes for secure installation.
What Height Should Ring 3 Be Installed?
Imagine standing at the perfect vantage point, where every face at your door is crystal clear.
For that ideal view, you should install your Ring Video Doorbell 3 at about 48 inches from the ground. This height captures visitors in sharp detail, avoiding the pitfalls of mounting it too high.
Don't forget to use the level tool to keep everything straight, and check local codes for any specific height requirements.
Your doorbell deserves the best!
Does Ring Doorbell 3 Require Hardwiring?
No, the Ring Doorbell 3 doesn't require hardwiring.
You can use it with a rechargeable battery, which gives you more flexibility in installation.
However, if you choose to hardwire it, you'll enjoy continuous power and the option to connect to an in-home chime.
If you opt for battery power, just make sure you fully charge it before installation for the best performance.
Conclusion
Once you've installed your Ring Doorbell 3, think of it as a vigilant guard standing sentinel at your doorstep.
Just like a loyal dog that barks to alert you of visitors, your doorbell keeps you connected and informed.
With a few simple steps, you've equipped your home with a modern watchman, ready to notify you of anyone approaching.
Enjoy the peace of mind that comes with knowing your home is always under watchful eyes!