Installing a Ring Doorbell in your apartment is easy, especially with a battery-powered model like the Ring 3. Start by charging the doorbell fully using the USB cable. Next, set up the device using the Ring app and verify you're close to your Wi-Fi router. Mount the bracket about 48 inches from the ground. You can use a no-drill option to avoid damaging walls, which is perfect for renters. Once the bracket is secure, attach the doorbell and tighten the screws. If you encounter any issues, stay tuned for tips on troubleshooting and maintaining your device. After the doorbell is securely mounted, test the live video feed and motion detection functions through the Ring app to ensure everything is working correctly. If you’re wondering how to install a Ring Doorbell on wall surfaces without using screws, adhesive mounting options or a no-drill mount can offer a renter-friendly solution. Regularly checking for firmware updates and cleaning the camera lens will help keep your device running smoothly and efficiently.
Key Takeaways
- Choose a battery-powered model like Ring 3 for easy installation without existing wiring, ideal for renters.
- Mount the doorbell bracket at approximately 48 inches high for optimal visibility and stability.
- Use no-drill mounting options to avoid wall damage, ensuring compatibility with your doorbell model.
- Regularly check battery levels, recharge when needed, and clean the camera lens for clear video quality.

Ring Battery Doorbell (newest model) — Retinal 2K with wide-angle video, up to 6x Enhanced Zoom, Two-Way Talk, and Built-In Battery, Speckled Gray
Capture it all with Retinal 2K video — From wide views to tighter focus, it’s easy to see…
As an affiliate, we earn on qualifying purchases.
As an affiliate, we earn on qualifying purchases.
Choosing the Right Doorbell
When choosing the right doorbell, consider battery-powered models like the Ring 3 that offer flexibility and ease of installation in rental apartments. Unlike wired doorbells, which often require existing wiring, the Ring Doorbell allows you to place it anywhere without the hassle of complex setups.
You'll appreciate the convenience of easy installation, making it ideal for renters who may move frequently. Additionally, guaranteeing good indoor air quality with an air purifier can enhance your overall living environment, especially if you have allergies or respiratory issues, as air purifiers reduce allergens.
In addition to flexibility, look for options that provide smart home integration capabilities. The Ring Doorbell, for instance, connects seamlessly with other smart devices, allowing you to monitor your front door from your smartphone or tablet. This user-friendly app interface enhances your overall experience, making it simple to manage notifications and live video feeds.
Other popular battery-powered models include Blink and Nest Doorbell (battery version), which also offer similar benefits. If you have an existing peephole, you might even explore specialty peephole cameras like the Ring Peephole Cam.
Ultimately, by choosing a battery-powered model with smart home integration, you'll guarantee a modern and convenient solution for your apartment that caters to your lifestyle.

Ring No-Drill Mount for Ring Video Doorbell 4, Battery Doorbell Plus (1st Gen), Battery Doorbell Pro (1st Gen) and Battery Doorbell (1st Gen)
Mount without worry — Attach a compatible Ring video doorbell to your home with the durable, weather-resistant, adhesive-backed…
As an affiliate, we earn on qualifying purchases.
As an affiliate, we earn on qualifying purchases.
Installation Preparation Steps

Now that you've chosen the right doorbell, it's time to prepare for installation to guarantee everything goes smoothly.
Start by charging your Ring Doorbell using the provided orange USB cable. Make sure to charge it until one LED light indicates a full charge.
Additionally, it's wise to familiarize yourself with the essential items for a home cleaning kit that may assist in tidying up the area around your doorbell installation.
Next, use the Ring app to set up your device. Follow the in-app instructions closely, and verify your Ring Doorbell is positioned near your Wi-Fi router to improve the Wi-Fi connection.
Once you've completed the setup, test the video functionality through the app to confirm everything's working correctly. This step is vital before you move on to physically installing your Ring.
For peak visibility, plan to mount the doorbell bracket approximately 48 inches (1.2 meters) from the ground.
If your existing wiring is higher than four feet, consider using a Wedge Kit to adjust the angle of the doorbell for better performance.

LOCKA Adhesive Mount for Ring/Other Battery Doorbell (2024 Release), No Drilling Camera Door Mounting Holder Bracket Accessories for Apartments Office Houses
Compatibility: Designed for the 𝐑𝐢𝐧𝐠 𝐁𝐚𝐭𝐭𝐞𝐫𝐲 𝐃𝐨𝐨𝐫𝐛𝐞𝐥𝐥 (𝟐𝟎𝟐𝟒 𝐑𝐞𝐥𝐞𝐚𝐬𝐞) , this mount guarantees a perfect fit and a…
As an affiliate, we earn on qualifying purchases.
As an affiliate, we earn on qualifying purchases.
Mounting the Doorbell

When it comes to mounting your Ring Doorbell, you'll want to verify it's at the right height for maximum visibility—about 48 inches off the ground is ideal.
Consider the unique cultural experiences you might encounter in your apartment building, as breathtaking destinations often inspire home decor.
There are no-drill mounting options available if you prefer an easier installation, but securing the bracket properly is key regardless of the method you choose.
Let's explore how to achieve a stable and effective setup.
Optimal Height Placement
Mounting your Ring Doorbell at approximately 48 inches from the ground guarantees excellent visibility and functionality.
This ideal height allows the camera to capture clear images of visitors while minimizing obstructions.
For those looking to enhance their home security, using an airless paint sprayer can help guarantee your doorbell blends seamlessly with its surroundings by providing a smooth finish airless paint sprayer benefits.
To get started, use the mounting bracket as a template to mark the screw holes on your wall.
This step is essential because it guarantees accurate placement and alignment of your doorbell.
Before attaching the device, make sure the bracket is securely aligned with your markings.
If you find that existing wiring is higher than four feet, consider using a Wedge Kit to adjust the angle of the doorbell for better visibility.
Once you've mounted the bracket and secured it with screws, double-check the stability of the mount.
A stable installation prevents the doorbell from wobbling or shifting, which could affect performance.
No-Drill Mounting Options
If you're renting or want to avoid damaging your walls, no-drill mounting options make it easy to install your Ring Doorbell securely. One popular choice is the Video Doorbell Holder for Apartment Door, which allows for hassle-free installation without any drilling.
This no-drill mount features a secure design that guarantees your doorbell camera stays in place while being easy to attach and remove. Plus, it won't leave any adhesive residue behind, keeping your walls intact.
Aromatherapy techniques can also enhance your home environment, creating a calming atmosphere around your entrance.
To achieve the best results, position the mount approximately 48 inches from the ground. Use the provided template to mark screw holes accurately, guaranteeing a stable installation.
For enhanced stability, consider the Doorbell Boa mount, which securely holds your Ring Doorbell without traditional drilling methods.
Before you proceed, double-check the compatibility of the mount with your doorbell model. Various brands, including Ring, Blink, and Aqara G4, can be accommodated with this no-drill solution.
This way, you can enjoy the benefits of your new doorbell camera without worrying about damaging your apartment walls.
Securing the Bracket
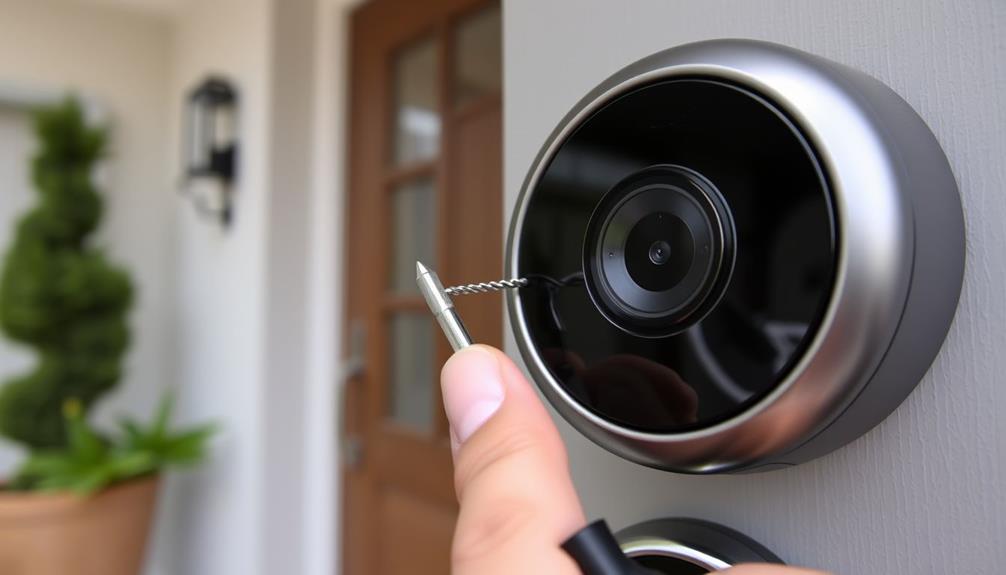
To secure the bracket, start by feeding the wires through the hole in the mounting bracket before attaching it to your door or wall. Make sure the bracket is properly aligned, as this guarantees your doorbell sits correctly. Using a Philips head screwdriver, drive the mounting screws until they're flush with the bracket for a secure fit.
After tightening the screws, gently pull on the bracket to check for stability. This step is crucial to confirm it can support the weight of your Ring Doorbell.
Once you're satisfied with the bracket's stability, it's time to attach the Ring Doorbell. Hook the rear slot onto the mounting bracket tab, then pivot it down until it sits flush. Finally, secure it with the included short security screws.
| Step | Action | Emotion Elicited |
|---|---|---|
| Feed the wires | Through the bracket hole | Anticipation |
| Align the bracket | Perfectly on the wall | Confidence |
| Tighten screws | Using a Philips head screwdriver | Satisfaction |
| Pull for stability | Confirm it's secure | Reassurance |
| Attach the doorbell | Complete your installation | Excitement |

Orbitell 1080p Wireless Wi-Fi Video Doorbell Camera with Two Way Audio, Night Vision, Cloud Storage, Smart AI Motion Detection, Support 2.4GHz Wi-Fi only
AI-Powered Smart Detection: Advanced AI technology accurately identifies people while filtering out vehicles and animals, so you only…
As an affiliate, we earn on qualifying purchases.
As an affiliate, we earn on qualifying purchases.
Securing the Mounting Bracket

Securing your bracket properly is vital for a stable and reliable installation of your Ring Doorbell. Start by using the mounting bracket as a template to accurately mark where you'll drill holes. This guarantees everything lines up perfectly, making the installation process smoother.
Once you've marked the spots, drill the holes carefully. As you prepare for this step, consider the significance of celebrating milestones together through quotes to inspire your home improvements.
Next, feed the wires through the hole in the mounting bracket. This step will help you maintain a clean and organized appearance. With the wires in place, position the bracket against the door, checking that it's level before proceeding. A level bracket is essential for preventing any instability once the doorbell is attached.
Using a Philips head screwdriver, drive the screws through the drilled holes into the door. Make sure to tighten them until they're flush with the mounting bracket for a secure fit.
Attaching the Doorbell

Start by hooking the rear slot of your Ring Doorbell onto the mounting bracket tab, positioning it at about 48 inches for the best visibility. Once you've got it hooked, pivot the Doorbell downwards until it sits flush against the mounting bracket. This step is essential for a secure fit.
Next, grab the included short security screws to finalize attaching the Doorbell. Using a star-shaped screwdriver, tighten the screws to guarantee everything is locked in place. It's important to make sure these screws are secure but avoid overtightening, as this could damage the device.
Before you wrap up, double-check that the Doorbell is properly aligned and stable. A misaligned Doorbell can affect its performance and security features. Also, be cautious to use only the correct screws provided with your device; using incorrect screws can lead to potential damage or hazards.
Once everything's tightened and aligned, you're all set! Your Ring Doorbell should now be securely attached, ready to enhance your apartment's security.
Troubleshooting Common Issues

Even with your Ring Doorbell securely installed, you might encounter some common issues that can affect its performance.
If you notice poor video quality, consider relocating your router closer to the doorbell or adding a Ring Chime Pro to boost Wi-Fi connectivity. To guarantee ideal operation, check if the battery is lit; a single lit LED means it's charged and ready for use.
If your doorbell isn't connecting to the Wi-Fi network, don't panic. You can refer to the Ring Help resources for troubleshooting articles specific to your device. If connectivity issues persist, you may need to reset the Ring Doorbell. Simply press and hold the setup button for 15 seconds, then reconfigure it through the Ring app.
For any unresolved problems after these steps, accessing customer support can provide you with tailored assistance and guidance.
Maintenance and Care Tips

To keep your Ring Doorbell running smoothly, it's important to focus on regular maintenance tasks.
Check the battery levels, clean the lens, and update the firmware to guarantee peak performance.
These simple steps can greatly enhance your device's functionality and longevity.
Battery Maintenance Guidelines
Regularly checking your Ring Doorbell's battery levels is essential for guaranteeing it operates at its finest. Following these battery maintenance guidelines will help you keep your device in top shape.
Aim to recharge the battery when the indicator shows only one LED light lit. Use the provided orange USB cable for charging, and make certain it reaches a full charge—indicated by all LED lights being lit—before you install it.
You'll want to charge the battery at least every few months. If you notice a dip in video quality or the battery level drops considerably, it's time to recharge it more often.
When charging, keep your Ring Doorbell close to the Wi-Fi router to maintain connectivity; this can prevent issues during the charging cycle.
After charging, always test the video functionality in the Ring app to confirm everything is working correctly. This guarantees your doorbell is ready to capture any activity at your door and provides peace of mind knowing your device is functioning as it should.
Keep these tips in mind for ideal battery performance.
Lens Cleaning Techniques
Keeping your Ring Doorbell's camera lens clean is essential for maintaining clear video quality and guaranteeing you capture every moment at your doorstep.
To effectively clean the lens, use a microfiber cloth, which is gentle and won't scratch the surface. Regularly wipe away dust and smudges to keep your video feed crisp.
For deeper cleaning, mix water with a few drops of mild dish soap. Dampen the microfiber cloth with this solution, but be careful not to saturate it. Never use harsh chemicals, as they can damage the lens.
Before you start cleaning, always turn off the device to prevent any electrical issues and guarantee safe handling.
Check and clean the lens every few weeks, especially if you live in an area with heavy pollen or dust. If you notice the lens appears foggy or unclear even after cleaning, inspect for moisture inside the camera housing. In that case, reach out to customer support for assistance.
Firmware Update Procedures
Updating your Ring Doorbell's firmware is vital for improving its performance and security features. Regularly check the Ring app for firmware updates to keep your video doorbell functioning at its best. To update, connect your doorbell to Wi-Fi and follow the prompts in the Ring app under device settings. Most updates are automatic, but enabling notifications in the app guarantees you stay informed.
Here's a quick guide to help you with firmware updates:
| Step | Action | Notes |
|---|---|---|
| 1. Check for Updates | Open the Ring app and navigate to settings | Look for firmware updates |
| 2. Connect to Wi-Fi | Verify your doorbell is connected | A stable connection is key |
| 3. Follow Prompts | Complete the update process | Confirm any user prompts |
| 4. Troubleshoot | Reset if issues occur post-update | Reconnect to Wi-Fi for clarity |
Keeping your firmware updated can enhance video quality, connectivity, and overall functionality. If you encounter issues after an update, consider resetting your doorbell to maintain peak performance.
Frequently Asked Questions
Can a Ring Doorbell Be Installed in an Apartment?
Yes, you can install a Ring Doorbell in your apartment!
Battery-powered models work best since they don't need traditional wiring.
You'll find no-drill mounts designed for renters, making installation easy and damage-free.
Just remember to place the doorbell around 48 inches from the ground for ideal visibility.
Plus, with these mounts, you'll enjoy the convenience of charging the battery without altering your apartment's structure.
It's a practical solution for any renter!
How to Set up a Ring Camera on an Apartment Door?
Setting up a Ring camera on your apartment door is like launching a high-tech fortress!
First, charge the built-in battery until one LED lights up.
Then, use the Ring app to connect it to your Wi-Fi.
Mount the camera about 48 inches high for the best view.
Secure everything tightly, ensuring it's aligned perfectly.
Can You Install a Ring Doorbell Without Drilling?
Yes, you can install a Ring Doorbell without drilling.
You'll want to use no-drill mounts, like the Doorbell Boa, which securely attach without damaging your door.
Specialty mounting tape, like outdoor Command Strips, is another option, though it might leave some residue when removed.
Just make sure you position the doorbell about 48 inches off the ground for the best visibility.
This way, you keep your space damage-free while enjoying added security.
Is There a Renter Friendly Way to Install Ring?
Did you know that about 30% of renters are hesitant to install smart home devices due to installation concerns?
If you're a renter, you can definitely install a Ring Doorbell without any hassle. Use a no-drill mount like the Doorbell Boa or the Video Doorbell Holder, which allows easy installation and removal.
Just remember to position it about 48 inches from the ground for the best visibility and check the battery regularly for peak performance!
Conclusion
Now that you've successfully installed your Ring doorbell, you can enjoy the peace of mind that comes with added security.
Remember, keeping an eye on your entrance has never been easier. Have you thought about how much more convenient your life will be with instant alerts right at your fingertips?
Regular maintenance will guarantee your doorbell functions at its best, so don't forget to check for updates and clean it periodically.
Happy monitoring!