
Installing a wired Ring doorbell is a straightforward task that can be completed in less than an hour. Begin by gathering your tools and switching off the power at the circuit breaker. Carefully remove the current doorbell, ensuring the wires are secure. Attach the jumper cable to bypass the chime, then securely connect the existing doorbell wires to the Ring device. Use the provided screws to mount the doorbell, ensuring it is securely in place but not overly tightened. Restore the power and test the doorbell to ensure it is functioning correctly. To ensure a smooth installation, there is more to learn about optimizing your setup. If you are interested in learning more about how to install hardwired doorbells, there are numerous online tutorials and instructional videos available. These resources offer detailed instructions, troubleshooting tips, and guidance on optimizing your Ring doorbell for enhanced security and convenience. Whether you are a DIY enthusiast or a beginner, armed with the right information, you can confidently take on this home improvement project.
Key Takeaways
- Gather necessary tools and hardware, including screws, anchors, and a voltage tester, before starting the installation process.
- Turn off power at the circuit breaker to ensure safety during removal and installation.
- Connect the jumper cable to the existing doorbell system's Front and Trans terminals if bypassing the chime.
- Securely mount the Ring doorbell using provided screws after marking screw hole locations on the wall.

Ring Spare Parts Kit – Compatible with Wired Doorbell (newest model)
Spare Parts Kit will help you safely install your Wired Doorbell (2nd Gen).
As an affiliate, we earn on qualifying purchases.
As an affiliate, we earn on qualifying purchases.
Installation Preparation
Before you plunge into installing your wired Ring doorbell, make certain you have all the necessary hardware and tools ready to go. Check the package for screws, anchors, and wires vital for the installation process. You'll want to have a screwdriver handy, too, to streamline your setup.
Additionally, consider reviewing your home cleaning routine as it may help you prepare the installation area better; a clean workspace guarantees you won't misplace tools or parts. Key Factors in Choosing a Home Cleaning Service can guide you in identifying any cleaning needs.
Next, prioritize safety by turning off the power at the circuit breaker. This step is essential to avoid any electrical hazards while you work. Familiarize yourself with local laws regarding electrical work; you may need permits for installation, depending on your area.
Take a moment to locate your existing doorbell chime. Listen for its sound to help determine whether you'll need a jumper cable during installation. Identifying the chime early will save you time and potential frustration later on.
With everything prepared, you'll be set for a smooth installation experience. Having your tools and hardware in order, alongside guaranteeing safety protocols, lays a solid foundation for the next steps in fitting your wired Ring doorbell.

Video Doorbell Key Replacement Tool, Doorbell Screwdriver Replacement Compatible with Battery Doorbell (2024), Doorbell Camera Opening Key Tool Video Doorbell Screwdriver
【Compatible Models】:Video Doorbell Key Replacement Tool Doorbell Screwdriver Replacement are compatible with Battery Doorbell (2024)
As an affiliate, we earn on qualifying purchases.
As an affiliate, we earn on qualifying purchases.
Removing the Existing Doorbell

To begin the removal process, turn off the power at the circuit breaker to guarantee your safety while working with electrical components, as neglecting electrical safety can lead to serious hazards.
Once that's done, you can start removing the existing doorbell. Carefully unscrew the doorbell button from the wall, ensuring the wires don't fall back inside. Keep a firm grip on them as you work.
Next, use a screwdriver to remove the faceplate of the existing doorbell. You might need to pull or push it a bit to detach it completely. Once you've got it off, take a moment to mark the screw hole locations on the wall using your new Ring doorbell as a template. This step's essential for ensuring proper alignment during installation, especially considering the importance of HVAC maintenance in maintaining home systems.
If your existing doorbell is secured with wall anchors, be sure to remove those as well. This will prepare the surface for your new wired Ring doorbell.

Klein Tools ET310 AC Circuit Breaker Finder, Electric and Voltage Tester with Integrated GFCI Outlet Tester
ACCURATE CIRCUIT BREAKER IDENTIFICATION: Quickly locate the correct breaker with precision using our circuit breaker finder, ensuring efficient…
As an affiliate, we earn on qualifying purchases.
As an affiliate, we earn on qualifying purchases.
Jumper Cable Connection

Connecting the Jumper Cable is fundamental for bypassing the existing chime and guaranteeing your new Ring doorbell operates correctly.
Start by locating the terminals on your existing doorbell system. Using the included Jumper Cable, connect one end to the Front terminal and the other to the Trans terminal on the Ring doorbell. This step is essential, as it allows the doorbell to function without the chime interfering.
It's important to verify that your installation adheres to local zoning laws and regulations to avoid any future issues.
Once you've made the connections, confirm the Jumper Cable is securely fastened by tightening the terminal screws. Loose connections can cause malfunctions, so double-check that everything is snug.
Before you make any connections, don't forget to prioritize safety—turn off the power at the circuit breaker to avoid any electrical hazards.
After you've connected the Jumper Cable and rechecked your work, restore the power and test the doorbell. If it powers on and lights up, you've successfully bypassed the chime.
You should also be able to hear it speak, confirming that your Jumper Cable connection was successful. This step is significant for making sure your Ring doorbell operates as intended.

Screwdriver Replacements and Security Mounting Screws Compatible with Google Nest Doorbell (Wired,3rd Gen)/(Wired, 2nd Gen),L Shape Screwdriver Doorbell Key Tool Easy to Intall, 4 Pack
【Compatible Model】:This screwdriver replacement is designed for Google Nest Doorbell (Wired,3rd Gen),Google Nest (Wired) Doorbell 2nd Gen,these screws…
As an affiliate, we earn on qualifying purchases.
As an affiliate, we earn on qualifying purchases.
Wiring the Ring Doorbell

When you're ready to wire your Ring Doorbell, you'll need a few essential tools and materials to get started.
It's important to guarantee your indoor air quality is ideal while working, as air purifiers reduce allergens that could affect your comfort during installation.
Make sure you follow proper wiring techniques to guarantee a safe and effective installation.
Let's go over what you'll need and how to connect everything correctly.
Required Tools and Materials
Gathering the right tools and materials is essential for a smooth installation of your wired Ring doorbell.
First, you'll need a screwdriver to secure the doorbell in place, along with wire nuts to connect the wires safely. A transformer rated between 8 to 24 volts AC is critical for powering the doorbell effectively, so make sure you have one compatible with your system.
To enhance your home security, consider exploring garage door openers that come with smart features for remote access.
You'll also benefit from having a voltage tester handy to verify that the power is off before you begin working on the existing doorbell wiring. This step is imperative for your safety.
If necessary, a drill may come in handy for mounting the doorbell, especially if you're working with a tough wall material.
Additionally, gather a pair of wire strippers to prepare the existing doorbell wires for a secure connection to the new device.
Don't forget that the installation kit should include screws and anchors, which are often required depending on your wall type.
Proper Wiring Techniques
Properly wiring your Ring Doorbell is essential for guaranteeing it functions effectively and safely. Start by confirming that your existing doorbell wiring operates within the required 8-24 volts AC range. Use the provided jumper cable to connect the Front and Trans terminals on the Ring Doorbell, bypassing the existing chime.
Next, loop one wire around each screw terminal on the back of the doorbell. Make sure to secure these connections by tightly fastening the terminal screws. If you have excess wiring, feed it into the wall for a clean installation, avoiding any loose wires.
Before you restore power at the circuit breaker, double-check that all connections are made and secure to prevent any electrical hazards. Below is a quick reference table to help you remember these steps:
| Step | Action | Notes |
|---|---|---|
| 1. Check Voltage | Guarantee it's 8-24 volts AC | Use a multimeter if needed |
| 2. Use Jumper Cable | Connect Front and Trans terminals | Bypasses existing chime |
| 3. Loop Wires | Wrap wires around terminals | Tighten screws securely |
| 4. Clean Up Excess Wiring | Feed any excess into the wall | Keep installation tidy |
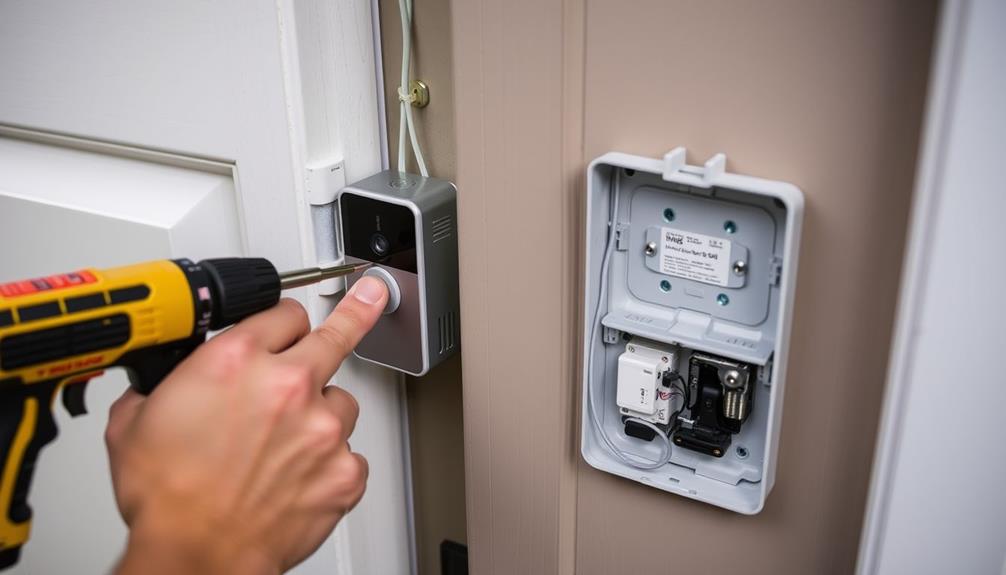
Mounting the Doorbell

To mount the doorbell, start by marking the screw hole locations on the wall using the Ring doorbell as a template for accurate alignment. This guarantees you'll have the perfect fit. Once the holes are marked, use a drill to create the necessary holes for the screws. Then, simply attach the doorbell securely to the wall using the provided screws. For a more in-depth installation process, be sure to refer to the hardwired installation guide included in the packaging. This will provide detailed instructions and tips for a professional and reliable installation. For a hardwired ring doorbell installation, it is crucial to ensure that the wires are properly connected and secured according to the manufacturer’s instructions. This may involve working with electrical wiring, so it is important to take necessary safety precautions and, if needed, consult with a professional electrician for assistance. Following the provided installation guide will help ensure that your hardwired ring doorbell is installed correctly and functions properly for years to come.
If you're working with a surface like stucco, brick, or concrete, you'll need to install wall anchors for secure mounting. These anchors provide extra support for the weight of the doorbell. In today's tech landscape, roles such as AI software engineers are critical in developing smart home devices, which include advanced features like those found in doorbells that enhance security and convenience (AI Software Engineer Jobs).
Next, align the doorbell with the marked holes and secure it with the provided mounting screws. Be careful not to over-tighten these screws, as that could damage the device.
Once the doorbell is mounted, connect the existing doorbell wires to the Video Doorbell Wired. Loop one wire around each screw terminal and tighten them securely to prevent any loose connections.
After everything is in place, reattach the faceplate. Don't forget to use the included security screw to guarantee the faceplate stays securely in place. This adds an extra layer of protection against tampering.
With these steps, your Ring doorbell will be mounted correctly and ready to enhance your home's security.
Power Restoration Steps

Now that you've mounted your wired Ring doorbell, it's time to restore power at the circuit breaker.
You'll need to confirm that the device powers on and functions correctly, so keep an eye out for its lights and sounds.
Remember to follow safety precautions during this process to guarantee everything goes smoothly.
Power Restoration Procedure
After securing all connections and verifying there are no loose wires, restore power at the circuit breaker to activate your wired Ring doorbell. This step is essential for power restoration and confirming the device operates correctly.
Once you've restored power, wait for the Video Doorbell Wired to power on. You'll know it's active when it lights up and provides audible prompts.
While you wait, keep these points in mind:
- Double-check that all connections are secure to prevent electrical hazards.
- Monitor functionality for any signs of malfunction, like failure to power on.
- Verify the doorbell connects to your Wi-Fi network without issues.
- Consult the Ring app for confirmation of your doorbell's performance.
Device Power Confirmation
Once you've restored power, verifying that your wired Ring doorbell is operational is the next step in the process. Start by observing the device for any signs of life. The doorbell should light up, and you might hear it speak, indicating that it's powered on. This is a good sign that your installation was successful.
Before moving forward, double-check that all wiring connections are secure and properly tightened. Loose connections can lead to power issues, so make sure everything is snug and safe. It's also vital that your doorbell is compatible with the recommended transformer specifications of 8-24 volts AC; this range is necessary for proper operation.
If your doorbell doesn't power on after restoring power, don't panic. Troubleshoot by revisiting the power supply and checking all connections again. Look for any discrepancies that could be causing the issue. Sometimes, it's just a matter of a loose wire or an incompatible transformer. By verifying that everything is in order, you can confirm that your wired Ring doorbell is ready to go.
Safety Precautions to Follow
Before restoring power, make certain you've turned off the circuit breaker to prevent any risk of electrical shock. Following safety precautions is vital for a smooth installation process.
Once you've double-checked that the power is off, confirm that all connections are secure before flipping the circuit breaker back on. This step is significant to avoid potential damage to your new device.
Here's a quick checklist to guide you:
- Turn off power at the circuit breaker.
- Confirm all wires are properly connected and stable.
- Restore power and watch for the device to light up and produce sound.
- Monitor the doorbell for any signs of malfunction, such as failure to power on or connect to Wi-Fi.
Testing Functionality

To guarantee everything's working correctly, you'll want to test the functionality of your wired Ring doorbell. Start by restoring power at the circuit breaker; your doorbell should light up and announce its activation.
Next, press the doorbell button to confirm that it sends notifications to your smartphone through the Ring app. This initial step is vital for effective testing functionality.
Now, check the live video feed by accessing the Ring app. Ascertain that the camera is operational and capturing clear images.
If everything looks good, test the two-way talk feature. Use the app to communicate with someone at your door. Make sure the audio is transmitted clearly in both directions, allowing for seamless interaction.
Lastly, conduct a motion test. Walk in front of the doorbell and confirm that motion detection alerts are sent to your device as expected.
This verifies that your doorbell is fully operational and ready to keep your home secure. By following these steps, you can confidently verify the functionality of your wired Ring doorbell.
Troubleshooting Common Issues

If your wired Ring doorbell isn't responding, it's essential to check the power supply first.
Make certain all connections are tight and verify that the Pro Power Kit is correctly installed.
If issues persist, restarting the device through the Ring app can often clear up temporary glitches.
Power Supply Check
Verifying your power supply is compatible is essential for the successful installation of a wired Ring doorbell. A proper power supply check involves confirming that your existing doorbell transformer outputs between 8 to 24 volts AC.
If your doorbell isn't responding post-installation, there are a few critical points you should review:
- Check the voltage: Verify the transformer is within the recommended voltage range.
- Inspect wire connections: Make sure all wires are securely connected to the terminal screws.
- Verify the circuit breaker: Confirm it's turned back on after installation for power restoration.
- Examine Pro Power Kit: If using one, check it's properly installed with the existing doorbell wiring.
Connection Verification
After confirming that your power supply is compatible, it's important to verify the connections to ascertain your wired Ring doorbell functions correctly.
First, check that the transformer provides the necessary 10-24 volts AC. If the voltage isn't right, the doorbell won't operate.
Next, you need to ascertain the wiring connections at the terminal screws are secure. It's essential that the wires are looped correctly around each screw to prevent any loose connections.
If your doorbell is unresponsive, verify that the transformer is indeed supplying power by checking the circuit breaker. Sometimes, power may not be restored immediately after installation.
Once you've confirmed power is flowing, use the Ring app to run a device health check. This can help identify any connectivity issues or power problems.
If problems still persist, refer to the wiring diagrams provided during installation. This will help you verify that the existing doorbell wiring matches the required configuration for your new device.
Device Restart Procedure
Restarting your wired Ring doorbell can often resolve various connectivity issues and restore its functionality. If you find that your doorbell isn't responding, follow these steps to restart it effectively:
- Disconnect the power at the circuit breaker.
- Wait for 30 seconds before restoring the power.
- Check the wiring connections to verify they're secure and properly attached to the terminal screws.
- Use the Ring app to restart the device if it's still connected to Wi-Fi.
- Look for indicators like lights and voice prompts to confirm that it has restarted successfully.
After completing the restart procedure, if your doorbell still has issues, it might be time to consult the wiring diagrams and troubleshooting articles for further guidance.
Optimizing Wi-Fi Connection

To enhance your Ring doorbell's Wi-Fi connection, position it within 20 to 30 feet of your router for the best signal strength. This distance guarantees a strong connection, allowing your doorbell to function effectively.
If your doorbell is located further away, consider using a Wi-Fi extender. This device can amplify signal strength and improve reliability, especially in larger homes.
Regularly test your Wi-Fi speed using online tools to confirm you meet the minimum requirement of 2 Mbps for ideal performance. If you notice slow speeds, it could affect your doorbell's functionality.
Keeping your router's firmware updated is also essential; this can boost performance and security, positively impacting your Ring doorbell's connectivity.
To minimize interference, place your router away from large metal objects, microwaves, and cordless phones. These can disrupt your Wi-Fi signal, leading to connectivity issues.
Utilizing the Ring App

Make the most of your Ring Doorbell by downloading the Ring app, which serves as your central hub for managing settings and monitoring activity. After setting up your wired doorbell, the app becomes essential for maximizing its features.
Here's what you can do with the Ring app:
- Connect to Wi-Fi: Follow in-app instructions to link your doorbell to your home network.
- Customize notification settings: Adjust alerts so you can receive instant notifications on your smartphone when someone rings the doorbell or when motion is detected.
- Access live video feeds: Monitor your front door in real-time and keep an eye on any activity.
- Review past events: Watch recorded clips directly through the app, ensuring you never miss important moments.
Using the Ring app to its fullest keeps you informed and connected, making your home safer and smarter. Don't overlook these features—take control of your home security today!
Frequently Asked Questions
Can You Install a Wired Ring Doorbell Yourself?
Yes, you can definitely install a wired Ring Doorbell yourself!
If you've got basic electrical knowledge and follow safety precautions, it's quite manageable.
Just make sure to turn off the power at the circuit breaker first.
The installation usually takes about 30 to 45 minutes.
You'll need some tools like a screwdriver, but everything else you need comes with the Ring package.
Plus, the app will help guide you through the setup process.
Do You Need an Electrician to Hardwire Ring Doorbell?
If you're like Sarah, who successfully hardwired her Ring doorbell without an electrician, you might feel confident tackling the job yourself.
You don't necessarily need an electrician, especially if you have basic electrical knowledge.
However, if you're unsure about compatibility with existing wiring or local codes, hiring one can provide peace of mind.
An electrician can guarantee a safe and proper installation, especially if you face complex wiring issues.
How Do I Hardwire My Ring Doorbell?
To hardwire your Ring Doorbell, start by ensuring you have a compatible transformer that supplies 8-24 volts AC.
Turn off the power at the circuit breaker for safety.
Use the Jumper Cable to connect the Front and Trans terminals if you're bypassing a chime.
Securely attach the doorbell wires to the terminal screws on the back, restore power, and check if the doorbell lights up and functions properly.
How Do You Install a Wired Ring Doorbell Without Drilling?
To install a wired Ring doorbell without drilling, you'll want to use outdoor-rated adhesive mounting tape.
First, make certain the existing doorbell wiring is accessible. If it doesn't reach the doorbell's terminals, employ a wire extension kit.
Confirm the adhesive can withstand various weather conditions and check the weight limits to keep the doorbell secure.
Following these steps will help you mount your doorbell effectively without damaging your walls.
Conclusion
By fitting your wired Ring doorbell, you're not just installing a device; you're opening a portal to your home's security.
Like a vigilant guardian, it keeps an eye on your doorstep, ensuring peace of mind.
With each press of the button, you connect to your loved ones and the world outside.
Embrace this new digital sentinel, and let it illuminate your home with safety and convenience, transforming your entryway into a welcoming embrace for all who arrive.