
TL;DR
A closet studio works best when you focus on reducing reflections, sealing gaps, and choosing the right placement. Moving your rig to a different room is the simplest, most effective fix. When in a closet, ventilation and door sealing are key to keep your gear cool and quiet.
Ever wondered how some creators get crystal-clear vocals or pristine AI inference without busting the bank on soundproofing? The secret isn’t just fancy foam—it’s smart placement, targeted treatment, and understanding the space. Your closet, often seen as a tiny echo chamber, can become a surprisingly effective studio with a few simple tweaks.
In this guide, you’ll learn how to optimize your closet setup by dampening reflections, sealing gaps, and choosing the right materials. Plus, we’ll explore the gold standard: moving your rig out of the room entirely. Whether you’re recording vocals or running a high-power AI rig, these tips will help you quiet your space without sacrificing performance.
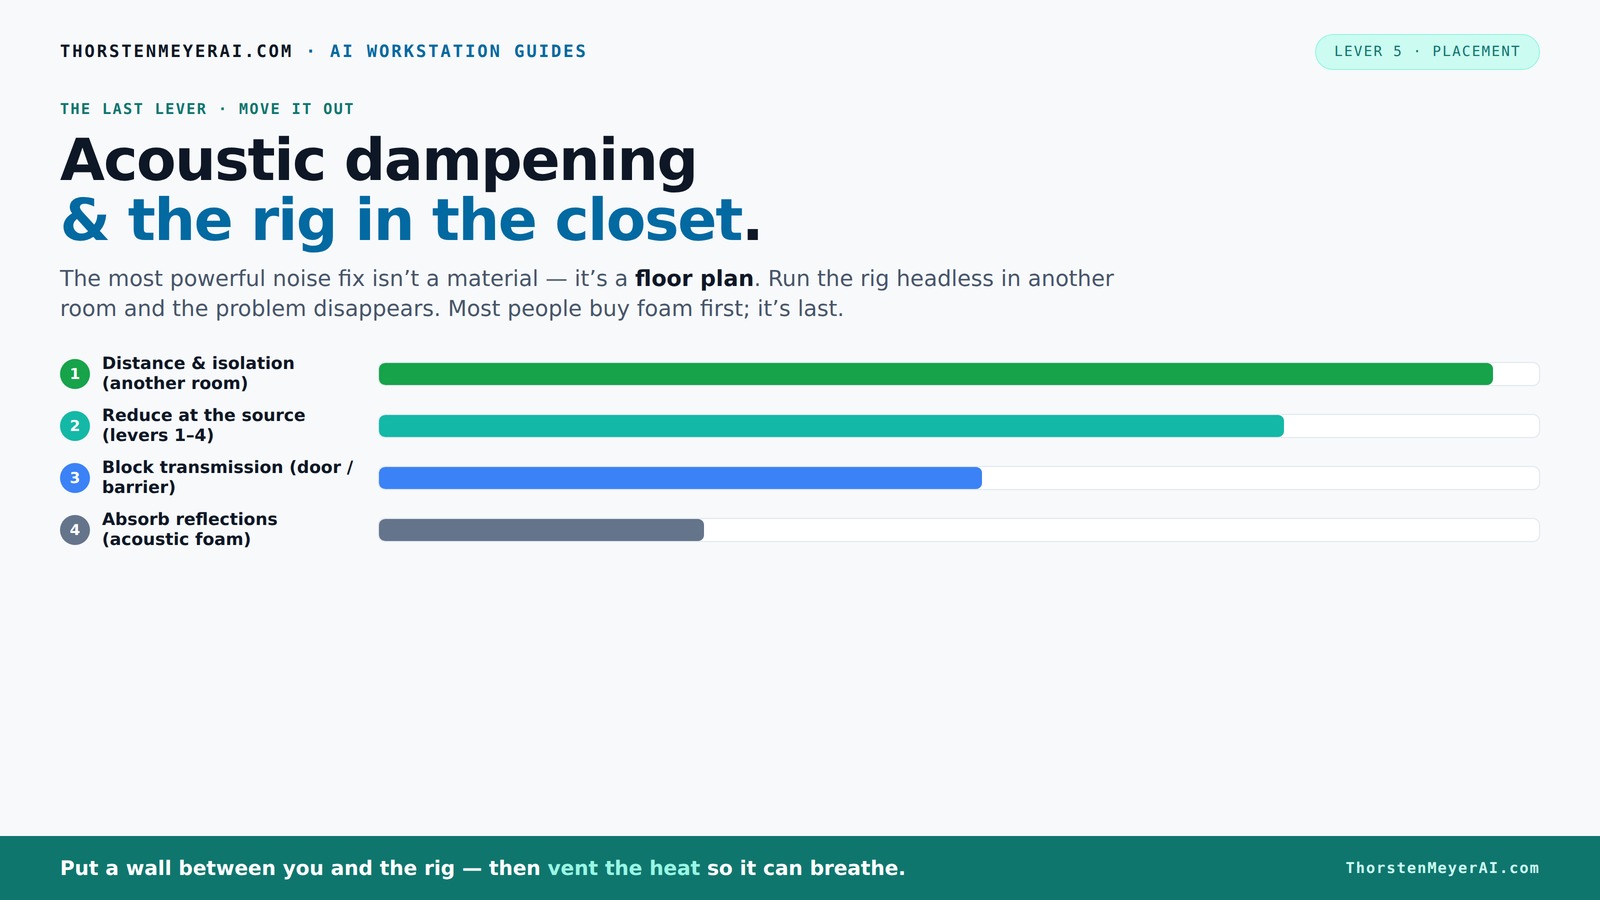
Acoustic dampening
& the rig in the closet.
The most powerful noise fix isn’t a material — it’s a floor plan. A rig you can’t hear because it’s in another room beats any amount of foam. Tap the approaches in Part 1 to see what actually works.
(another room)
(levers 1–4)
(door / barrier)
(acoustic foam)
Contain the noise, not the heat
Key Takeaways
- Prioritize moving your rig out of the room for the biggest noise reduction; it’s often the easiest fix.
- Target treatment at reflection points—behind the mic, ceiling, and side walls—rather than full coverage.
- Seal gaps around the door with weatherstripping or blankets to block sound leaks.
- Ensure proper ventilation when placing a rig in a closet to prevent overheating and noise from fans.
- Use a combination of passive vents, exhaust fans, and smart placement to keep your closet rig cool and quiet.
soundproofing foam panels for recording studio
As an affiliate, we earn on qualifying purchases.
As an affiliate, we earn on qualifying purchases.
Why Acoustic Dampening Isn’t the Same as Soundproofing — And Why That Matters
Acoustic dampening and soundproofing are two sides of the same coin, but they serve different purposes. Dampening reduces the echoes and reflections inside your closet — making your voice sound clear and warm. Soundproofing, on the other hand, blocks sound from leaking out or coming in.
Understanding this distinction is crucial because many assume foam panels will silence their entire room. In reality, they improve the clarity of your recordings by controlling internal reflections, but they do little to prevent noise from escaping or external noise from entering. This means if you’re in a noisy environment, dampening alone won’t keep your neighbors from hearing you or block outside sounds. Conversely, true soundproofing involves adding mass, barriers, and sealing gaps, which can be costly and complex.
The tradeoff here is simplicity versus effectiveness: dampening is easier, cheaper, and improves sound quality within the space, but it doesn’t isolate noise. Recognizing what you need—better internal acoustics or actual noise isolation—guides your choices and budget.
closet acoustic treatment kit
As an affiliate, we earn on qualifying purchases.
As an affiliate, we earn on qualifying purchases.
The Secret to Better Sound: Targeted Treatment Over Full Coverage
Instead of covering every inch of your closet with foam, focus on the main reflection points—these are the surfaces where sound bounces directly into your microphone. By targeting these spots, you effectively reduce echo and clarity issues without unnecessary clutter or expense. The reason this works is because reflections are what create the reverberant, muddy sound that makes recordings less professional.
For example, placing a few foam panels behind your mic traps the early reflections coming from the wall behind you, which are often the most problematic. Similarly, treating the ceiling directly above your head prevents sound from bouncing down into the mic from above, while side wall treatment reduces lateral reflections that can color your recording. These targeted spots matter because they influence the sound that your microphone picks up directly, affecting clarity and warmth.
The tradeoff is efficiency: strategic placement delivers significant improvements with fewer materials, saving money and space. Less coverage means less clutter, easier setup, and quicker adjustments, making your studio more flexible and less overwhelming for beginners.
room soundproofing door seal
As an affiliate, we earn on qualifying purchases.
As an affiliate, we earn on qualifying purchases.
Where to Put Acoustic Panels for the Best Results
Placement of acoustic panels isn’t just about sticking foam everywhere—it’s about understanding how sound interacts with your space. Proper placement targets the primary reflection points, which are typically behind the microphone, the ceiling directly above, and the side walls where sound bounces into the mic. By absorbing sound at these critical spots, you prevent reflections from reaching your mic and muddying your recordings.
For instance, if your microphone faces a wall, place a panel directly behind it to absorb the reflections bouncing from the wall. Similarly, placing a panel on the ceiling above your head intercepts upward reflections that can cause comb-filtering and coloration. Sealing gaps around the door with weatherstripping or heavy blankets prevents sound leaks, ensuring external noise doesn’t intrude and internal sound doesn’t escape. Learn more about sealing gaps. This sealing is as important as the panels themselves because even the best absorption is ineffective if sound leaks around the edges.
The key is to think critically about where sound bounces in your specific setup and target those areas for treatment. This strategic approach maximizes effectiveness while minimizing clutter and cost, making your space both functional and professional-sounding.
portable vocal booth for small spaces
As an affiliate, we earn on qualifying purchases.
As an affiliate, we earn on qualifying purchases.
How to Use the 'Rig in the Closet' Setup Without Overheating
Placing your high-powered rig inside a closet is a game-changer for noise reduction, but heat management is critical. Without proper ventilation, your equipment can overheat, leading to thermal throttling that reduces performance and can cause hardware failures. Additionally, overheating fans can increase noise levels, defeating the purpose of the setup.
To mitigate this, incorporate passive vents or exhaust fans that gently pull hot air out while drawing in cooler, outside air. For example, installing a quiet 120mm fan on an exhaust vent can maintain a steady airflow without adding significant noise. Using materials like perforated panels or vented doors allows air to circulate while maintaining acoustic isolation. It’s essential to balance airflow with noise control; too much airflow can introduce noise, while too little risks overheating.
Some DIY solutions include hanging blankets with small gaps for airflow or using specialized soundproof cabinets with built-in ventilation systems designed to handle heat dissipation effectively. The goal is to create a continuous, gentle airflow that keeps your hardware cool and quiet, preventing thermal issues and fan noise from undermining your acoustic efforts.
The Essential Ventilation Setup for a Closet Studio
Ventilation is the heartbeat of a closet rig—without it, heat can turn into a silent killer for your hardware. The simplest solution involves installing a small, quiet exhaust fan on the ceiling or wall, venting outside or into a duct system designed to minimize noise transfer. This setup ensures continuous airflow, removing hot air and bringing in cooler air, which is vital for keeping your equipment operating optimally.
For example, a 120mm fan running at low RPM can move enough air to prevent overheating without introducing noticeable noise. Pairing this with a passive intake vent on the opposite side creates a cross-flow that efficiently cycles air through the closet. Advanced options include thermostatic controls that activate fans only when internal temperatures exceed safe thresholds, reducing unnecessary noise and power consumption. This approach maintains a stable, cool environment, prolonging hardware lifespan and ensuring consistent performance.
Proper ventilation isn’t just about comfort—it’s about protecting your investment and maintaining a quiet workspace. Combining passive and active ventilation strategies tailored to your space’s size and heat output will give you the best results.
Learn more about reducing heat and noise in AI workstations.Sealing the Door and Gaps — Your First Line of Defense
The biggest weak point in a closet studio is often the door gap. Sound leaks through even tiny cracks, ruining your quiet space. Seal gaps with weatherstripping, draft stoppers, or heavy blankets hanging over the door. Proper sealing prevents external noise from entering and internal sound from escaping, dramatically improving your room’s acoustic isolation.
Applying weatherstripping around the door frame creates a tight seal that can reduce sound leaks by up to 80%. If you prefer temporary solutions, hanging thick blankets or quilts flush against the door can block a significant amount of sound. For maximum effectiveness, combine sealing techniques with strategic placement of absorption materials around the room to prevent sound from bouncing around and leaking through any remaining gaps. This combination ensures your space remains as quiet as possible, giving your recordings a professional edge.
Remember, even small cracks can undermine your entire setup. Investing a little time and effort into sealing will pay dividends in sound isolation, making your closet a much more effective studio environment.
Small Closet, Big Results: How to Maximize Your Space
Size matters when it comes to acoustic treatment. Small closets require a focused approach—targeting key reflection points and sealing gaps—because overloading the space with materials can reduce room to move and make adjustments difficult. Lighter, strategic treatment like a few panels on the main reflection points and door seals can dramatically improve sound quality without cluttering the space.
In contrast, larger closets or dedicated booth spaces can accommodate thicker panels, bass traps in corners, and multiple layers of absorption. This comprehensive approach is necessary because larger spaces tend to have more complex reflection patterns and standing waves, especially at low frequencies. The key is to start small—identify the critical reflection points and seal leaks—and then expand treatment as needed. This incremental approach prevents overspending and keeps your setup manageable.
Adjust your treatment strategy based on your closet’s size, budget, and specific acoustic challenges. The goal is to optimize sound quality while maintaining usability and comfort in a confined space.
Frequently Asked Questions
Does acoustic foam actually soundproof a closet?
No, acoustic foam mainly reduces reflections and echoes inside the space. It does not block sound transmission through walls or doors. For true soundproofing, sealing gaps and adding barriers are necessary.Where should I put acoustic panels in a closet studio?
Focus on the main reflection points: behind the mic, the ceiling directly above, and side walls near the mic. Sealing gaps around the door also helps keep sound from leaking out.Do I need bass traps in a closet?
Only if you notice low-frequency buildup or boominess. Small closets often don’t need heavy bass treatment unless you’re recording bass-heavy instruments or vocals.How much wall coverage do I need?
Typically, 20–30% coverage of reflective surfaces reduces echo effectively. Larger, more reflective spaces might need closer to full coverage or corner bass traps.Is a moving blanket enough?
Moving blankets help control reflections and door leaks but don’t fully soundproof. They’re a good start but work best when combined with sealing and proper placement.Conclusion
Turning your closet into a recording or AI workspace isn’t about stuffing it with foam. It’s about smart placement, sealing leaks, and managing heat. When you treat the right spots and keep your hardware cool, your space transforms into a quiet, professional-quality studio.
Remember, the best fix is often to move your rig somewhere else—distance is the most effective soundproofing tool. But if that’s not possible, a little planning and some simple tweaks will make your closet into a surprisingly capable studio.