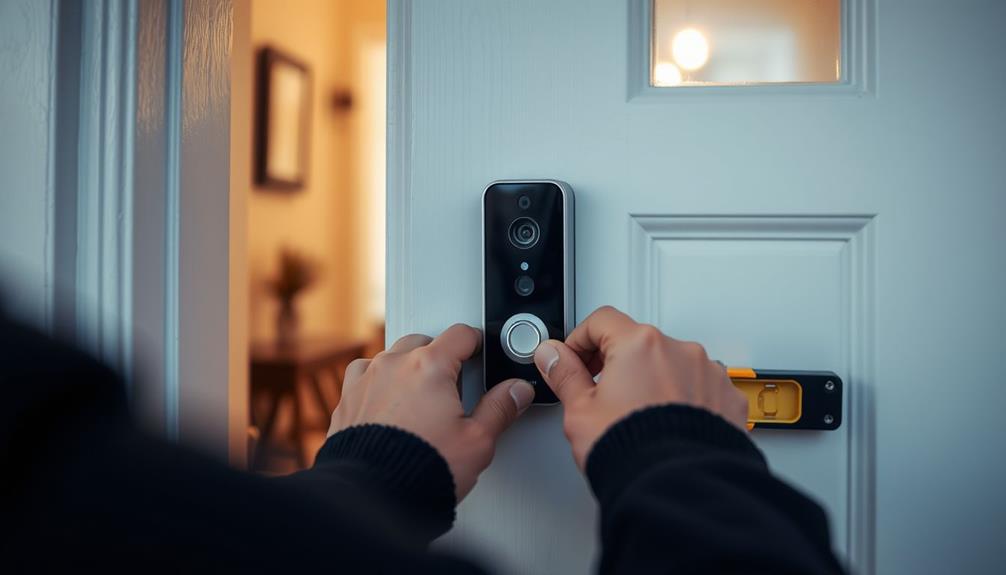

To take out the battery from your Ring Doorbell, begin by using a star-shaped screwdriver to loosen the security screw. Then, gently lift upwards from the bottom to separate the faceplate. After removing the faceplate, press the black release tab to remove the battery. If you encounter any resistance, check for any screws that may be too tight and ensure the mounting surface is flat. It’s also important to monitor your battery life using the Ring app, which will alert you when it’s running low. If you’re interested in troubleshooting tips or how to maintain your device, there is more helpful information to explore.
Key Takeaways
- Use a star-shaped screwdriver to remove the security screw securing the faceplate of the Ring Doorbell.
- Gently push upwards from the bottom to detach the faceplate for battery access.
- Press the black release tab to remove the battery once the faceplate is off.
- If the battery feels stuck, ensure sufficient pressure on the release tab and check for tight screws.

Ring Spare Parts Kit for Battery Doorbell
- Complete setup kit: Includes all necessary components
- Easy installation: Setup in just a few minutes
- Includes mounting accessories: Anchors, screws, wall mount plate
As an affiliate, we earn on qualifying purchases.
As an affiliate, we earn on qualifying purchases.
Understanding Battery Removal Challenges
Removing the battery from your Ring Video Doorbell can be tricky, especially if the PUSH tab malfunctions and the battery sticks in place. Many users find themselves frustrated with this challenge, as they attempt to remove the battery for charging. A warped mounting surface can further complicate the battery removal process, making it even harder to access the battery compartment.
To prevent issues like blockages and guarantee smooth operation, consider airless paint sprayer maintenance techniques that offer insights into effective cleaning practices.
If you're struggling, you're not alone. Customer service representatives often recommend unscrewing the doorbell to gain better access. However, you mightn't need to remove it entirely. Loosening the screws can sometimes provide enough wiggle room to detach the battery without taking the whole unit down.
It's essential to confirm that the mounting bracket is properly aligned. Misalignment can lead to additional complications when you attempt battery removal. By paying attention to this detail, you can greatly improve your chances of a smooth battery extraction.
A little patience and the right approach can make all the difference when dealing with battery removal challenges in your Ring Video Doorbell.

Video Doorbell Key Removal Tool Compatible with Ring Battery Doorbell 2024 Release, Wired Doorbell Pro (N ewest Model), Wired Doorbell Plus (N ewest Model) 2PACK
- Compatibility: Works with various Ring doorbells
- Durable Construction: Made from premium-grade, break-resistant material
- Ergonomic Design: Comfortable grip for easy use
As an affiliate, we earn on qualifying purchases.
As an affiliate, we earn on qualifying purchases.
User Experiences With Battery Issues

Many users have found themselves frustrated with the challenges of accessing the battery in their Ring Video Doorbell, often sharing their experiences in community forums.
You might find that the battery needs attention, but the process can be a hassle. Many report issues with a stuck battery, often caused by a malfunctioning push tab or tight security screws. This can make removal difficult without disassembling the whole device. Proper maintenance, similar to ensuring the right best soil for plants, can help mitigate some of these issues over time.
Alternatives like loosening screws instead of fully removing the doorbell have become common practices among users trying to access a charged battery. However, these workarounds can still lead to complications, leaving you feeling stuck and dissatisfied. The non-removable battery design has sparked conversations about switching providers altogether, as users express a collective sentiment of frustration.
Even when you reach out to customer support for battery removal techniques, the solutions often don't hit the mark. Many users still struggle to find effective methods, further contributing to the perception that support services may be inadequate.
If you're dealing with battery issues, you're not alone in this challenge.

Ring Doorbell Screws Replacement, Blue Double-Ended T6 T15 Screwdriver with 20Pcs/5Set Security Screws – Battery Change & WiFi Setup for Video Doorbell Camera Replacement Kits
- Universal Compatibility: Suitable for doorbell and electronics repair
- 20 High-Quality Screws: Includes 20 screws in five types and sizes
- Double-Ended Screwdriver: T6 and T15 bits for versatile use
As an affiliate, we earn on qualifying purchases.
As an affiliate, we earn on qualifying purchases.
Customer Support Recommendations

To successfully access the battery in your Ring Doorbell, customer support recommends using a star-shaped screwdriver to remove the security screw first. This step is essential for safely accessing the battery compartment.
Once the screw is removed, gently push upwards from the bottom of the faceplate. This action will help you detach it and reveal the battery.
For those interested in maintaining their devices effectively, understanding essential kitchen gadgets can also play a role in guaranteeing your tools are well cared for.
If you're facing difficulty with battery replacement, customer support suggests checking the tightness of the screws. Over-tightening can prevent the battery from being released properly. If the battery feels stuck, consider unscrewing the doorbell to make it easier to remove the battery.
Additionally, regularly monitoring the condition of the battery compartment is important. Confirm that the mounting surface is even, as this can prevent future access issues.
If you find yourself struggling with any of these steps, don't hesitate to reach out to customer support for further recommendations. They're there to assist you and guarantee that your Ring Doorbell operates smoothly.
Following these guidelines will make your battery replacement process hassle-free, allowing you to maintain your device effectively.
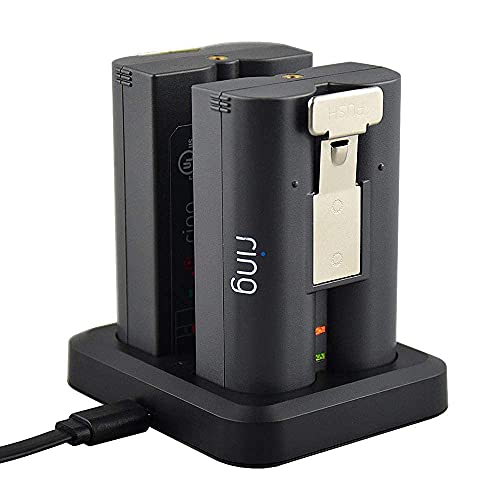
Battery Charger for Ring Rechargeable Battery,Dual Ring Battery Charger Station for Ring Spotlight Cam Battery,Ring Video Doorbell 2/3/4,Ring Stick Up Cam Battery (Ring Batteries NOT Included)
- Dual Battery Charging: Charges two batteries simultaneously
- LED Charging Indicators: Displays charging status clearly
- Multiple Power Options: USB, car, and power bank compatible
As an affiliate, we earn on qualifying purchases.
As an affiliate, we earn on qualifying purchases.
Effective Solutions for Battery Access

Utilizing the right tools and techniques can make accessing the battery in your Ring Doorbell a straightforward process. By following these effective solutions, you'll find it easier to remove the battery when needed.
- Use the Right Screwdriver: Start by loosening the screws that secure the faceplate of your doorbell. A star-shaped screwdriver is ideal for this task, as it allows for better battery access without fully removing the screws.
- Release the Battery: After removing the faceplate, press the black release tab located at the top of the battery compartment. This action will help you easily remove the battery from its slot.
- Check for Sticking Issues: If you encounter resistance when trying to remove the battery, gently unscrew the doorbell from the wall. This can relieve pressure that may be causing the battery to stick, making it easier to access.
Community Engagement Resources

The Ring Community offers a vibrant platform where users can connect, share tips, and find solutions for battery removal and other issues. By creating a Ring account, you can immerse yourself in discussions that cover everything from troubleshooting to best practices for battery access. This resource is invaluable, especially if you're facing challenges or have questions about your Ring Doorbell.
Engaging with the community allows you to tap into a wealth of collective knowledge. Many members share their personal tips and tricks, which can help you successfully remove your doorbell's battery.
Plus, by participating in discussions, you contribute to a shared knowledge base that benefits everyone. Feedback from the community plays an essential role in influencing product support and design improvements. When users share their experiences, it helps the Ring team understand what's working and what could be better.
Battery Specifications and Features

When it comes to your Ring Doorbell, understanding the battery specifications and features is essential for ideal performance.
You'll want to know about the battery capacity and lifespan, how the charging process works, and what your replacement options are if needed.
This knowledge will help you keep your doorbell running smoothly and avoid unexpected downtime.
Battery Capacity and Lifespan
Understanding the battery capacity and lifespan of your Ring Doorbell can help you manage its performance and charging needs effectively. Your Ring Doorbell is equipped with a 6,000mAh rechargeable lithium-ion battery, offering a lifespan that varies based on how you use the device.
Here are three key factors to evaluate:
- Usage Patterns: If you frequently utilize motion detection and audio/video features, expect your battery life to decrease, requiring more frequent recharges.
- Battery Life Range: Typically, you can anticipate a battery life of 6 to 12 months. Monitoring this range allows you to plan ahead for recharging.
- Monitoring Tools: Use the Ring app's Device Health section to check your battery capacity. This feature provides real-time updates on your battery percentage, helping you stay informed.
Charging Process Overview
Charging your Ring Doorbell's battery is a straightforward process that guarantees your device stays powered and ready to go.
This doorbell is equipped with a 6,000mAh rechargeable lithium-ion battery, designed to last between 6 to 12 months, depending on how often you use features like motion detection.
To begin the charging process, you'll need to remove the battery by unscrewing the front plate with the provided star-shaped screwdriver. Once the plate is off, press the black tab to release the battery.
The charging typically takes around 5 to 10 hours, and you'll find a USB cable included with your device for this purpose.
It's vital to keep an eye on your battery life. The Ring app will send you low battery notifications, reminding you to recharge the battery before it runs out completely.
Regular maintenance and timely charging are essential since a depleted battery can affect your doorbell's functionality.
Replacement Considerations and Options
The Ring Video Doorbell 2nd Generation features a powerful 6,000mAh rechargeable lithium-ion battery, designed to provide reliable performance for up to 12 months based on your usage.
However, keep in mind that the battery is non-removable, meaning you won't be able to swap it out easily. Instead, you'll have to charge it using the provided USB cable.
Here are some replacement considerations to keep in mind:
- Battery Life: Frequent motion detection and video usage can considerably reduce battery life, requiring you to recharge more often.
- Charging Alerts: The Ring app will notify you when the battery is running low, so you won't be caught off guard.
- Easy Access: You can access the battery by removing the front plate with a star-shaped screwdriver and pressing the black tab at the top to release it.
Steps for Battery Replacement

To replace the battery in your Ring Video Doorbell 2nd Generation, start by removing the security screw at the bottom of the faceplate with the included star-shaped screwdriver.
Once the screw is out, gently push upwards from the bottom of the faceplate to detach it. Be careful not to force it to avoid any damage.
After you've removed the faceplate, locate the black tab at the top of the battery compartment and press it to release the battery.
When the battery is free, you can now remove it for charging. Use the included USB cable to recharge your battery. Make certain it's properly seated in the compartment once it's fully charged.
Before reattaching the faceplate, double-check that the battery is secure.
Finally, replace the faceplate by aligning it properly and pushing it back into place. Don't forget to replace the security screw to guarantee everything stays intact.
Regularly check the battery health in the Ring app, as it'll notify you when the battery is low and needs charging. This will help keep your doorbell functioning smoothly.
Common Troubleshooting Tips

If you're having trouble removing the battery from your Ring Doorbell, check for any tight screws that might be hindering access. A few common issues can make the battery removal process more complicated than it should be. Here are some troubleshooting tips to assist you out:
- Tight Screws: Verify that the security screw at the bottom is properly loosened. Using the provided star-shaped screwdriver can help you avoid stripping the screw head.
- Faceplate Attachment: After unscrewing, if the faceplate doesn't come off easily, gently push upwards from the bottom. Sometimes, the faceplate can be a bit stubborn due to installation snugness.
- Battery Release Tab: When you press the black tab at the top of the battery to release it, make sure you're applying enough pressure. If it feels stuck, double-check that the battery is seated correctly before attempting to remove it again.
Future Battery Considerations

Addressing battery removal challenges today could pave the way for notable advancements in future Ring Doorbell models. As user feedback highlights the need for better battery accessibility, manufacturers may prioritize designs that allow for easy battery swaps. You might find that future models incorporate user-replaceable batteries, greatly enhancing convenience and reducing waste from discarded devices.
Anticipated improvements in battery life will also play an essential role in enhancing your experience. Innovations in battery technology could mean longer intervals between recharges, alleviating the hassle of constant monitoring and maintenance. Quicker charging capabilities may further streamline your routine.
As manufacturers continue to innovate, expect advancements in battery management systems that optimize performance and durability. These changes not only address current frustrations but also provide you with a more sustainable option for powering your Ring Doorbell. By focusing on user needs, future models could significantly improve your satisfaction, ensuring your doorbell remains a reliable component of your home security system.
Keep an eye out for these exciting developments, as they promise to make your experience even better.
Frequently Asked Questions
How Do I Get the Battery Out of My Ring Doorbell?
To get the battery out of your Ring Doorbell, start by powering down the device.
Use the provided star-shaped screwdriver to unscrew the security screw at the bottom.
Next, push the faceplate upwards to remove it.
Press the black tab at the top of the battery compartment to release the battery.
If it feels stuck, check the screws and confirm the mounting surface is even to avoid binding.
Is the Battery Removable on a Ring Doorbell?
Is the battery removable on a Ring Doorbell?
Well, if you're hoping for a quick and easy swap, brace yourself for a wild ride!
The 2nd Generation battery isn't designed to be user-friendly. Instead of a simple pop-out, you'll need to channel your inner mechanic.
You've got to charge it via USB, and if you're feeling adventurous, disassembling it might just be your next DIY project—good luck with those security screws!
How Do You Remove a Ring Doorbell Battery Cover?
To remove your Ring doorbell battery cover, start by grabbing the star-shaped screwdriver included with your device. Next, locate the two star-shaped screws on the bottom of the device. Use the screwdriver to carefully unscrew these screws and set them aside. Once the screws are removed, you can gently lift off the battery cover to access the rechargeable battery inside. Be cautious when removing the battery from your Ring Doorbell 1 to avoid damaging the device.
Use it to unscrew the security screw at the bottom of the doorbell.
Then, push upward gently on the faceplate from the bottom to detach it.
After that, find the black tab at the top of the battery compartment, press it, and the battery will release, allowing you to proceed with your tasks.
How Do You Open a Ring Doorbell to Charge a Battery?
To open your Ring Doorbell for charging, start by using the star-shaped screwdriver to take out the security screw on the faceplate.
Once that's done, gently push the bottom of the faceplate upwards to detach it.
Next, press the black tab at the top to release the battery.
You can then charge the battery with the included USB cable.
Conclusion
In the grand scheme of things, knowing how to remove the battery from your Ring doorbell can save you a lot of hassle down the line.
By following the steps we've outlined, you'll be well-equipped to tackle any battery-related issues that come your way.
Don't forget to keep an eye on battery specifications and troubleshooting tips to guarantee everything runs smoothly.
With a little preparation, you'll keep your home secure without missing a beat!