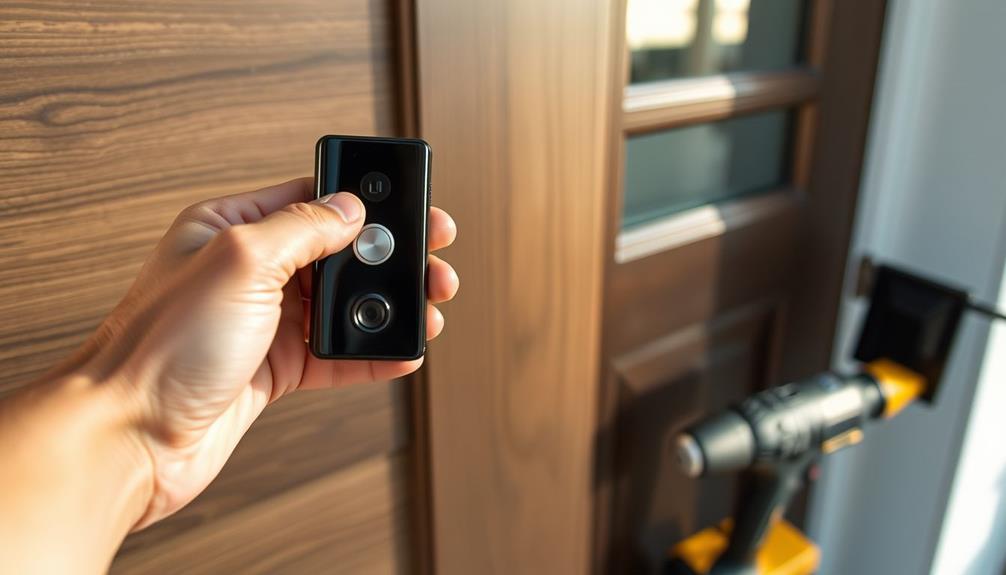
To remove the cover of your Ring Doorbell 2, you will need a star-shaped screwdriver and a flat object such as a butter knife. Begin by locating the security screw at the bottom of the faceplate and unscrewing it. Then, push up from the bottom of the faceplate with your thumbs to loosen it. If it is stuck, gently pry it away with the flat object. Once the cover is off, you can access the battery if necessary. Remember to securely reattach everything once you are finished, and for more tips and tricks for a smooth process, refer to the instruction manual.
When replacing the cover, make sure to tighten the security screw back in place to ensure the doorbell is secure. If you encounter any difficulties during the cover ring doorbell removal process, consult the instruction manual for further guidance. Handle the cover and Ring Doorbell 2 with care to prevent any damage. Be mindful of the surrounding area when removing the Ring Doorbell 2 cover, as there may be delicate wiring that requires careful handling. It is recommended to turn off the power to the doorbell before attempting removal to avoid potential electrical hazards. Taking your time and being patient with the process will help ensure a safe removal of the cover without causing damage to the doorbell or its components.
Following these steps and guidelines will make removing the Ring Doorbell 2 cover a smooth and successful task. After removing the cover, you can clean any debris or dirt that may have accumulated inside the device. It is important to carefully follow the cover ring doorbell removal steps to prevent accidents. Additionally, remember to store the screws and cover in a safe place while working on the device to prevent loss or damage. By adhering to these guidelines and staying conscious of the cover ring doorbell removal steps, you can ensure a safe and effective process.
Key Takeaways
- Locate and unscrew the security screw at the bottom of the faceplate using a star-shaped screwdriver or T6 torx-head screwdriver.
- Gently push up from the bottom of the faceplate with your thumbs to loosen it.
- Use a flat, skinny object to assist in prying off the cover if needed.
- Place the removed faceplate in a secure location to avoid losing it.

Ring Doorbell Screws Replacement, Blue Double-Ended T6 T15 Screwdriver with 20Pcs/5Set Security Screws – Battery Change & WiFi Setup for Video Doorbell Camera Replacement Kits
Compatible with: Our universal screwdriver works for multiple scenarios (doorbell maintenance, small electronics repair), while the matching screws…
As an affiliate, we earn on qualifying purchases.
As an affiliate, we earn on qualifying purchases.
Tools Needed for Removal
To remove the cover of your Ring Doorbell 2, you'll need a special star-shaped screwdriver or a T6 torx-head screwdriver. These tools are vital for unscrewing the security screw located at the bottom of the faceplate. If you don’t have the necessary tools, you can purchase them online or at a local hardware store. Once you have the screwdriver, you can easily remove the cover of your Ring Doorbell 2 to access the battery or make any necessary adjustments. Additionally, the process for ring doorbell 3 cover removal is very similar, so these tools will also come in handy for that model.
The process can be similar to other DIY tasks that require a careful approach, as minor errors in handling tools can lead to significant issues later on, such as small mistakes resulting in damage. Make certain you've got one of these screwdrivers handy before starting the removal process.
If the cover feels stuck, you might find it helpful to have a flat and skinny object, like a butter knife or a paint scraper. This can assist you in gently prying the cover off without damaging the device.
You'll want to verify you have a clean workspace, as small parts like screws can easily get lost during the removal.
Once you've got your tools ready, focus on the security screw first. Fully unscrew it to detach the faceplate from the cover.
If you've misplaced the original screwdriver, don't worry. You can order a replacement through customer service or online.
Having the right tools is vital for an efficient and secure removal of your Ring Doorbell 2 cover.

Video Doorbell Screwdriver, Double-Ended T6 T15 Screw Driver Tool for Camera Video Doorbell Replacement, Battery Change, Wifi Password Reset
DOORBELL SCREWDRIVER: This video camera screwdriver is used for Wifi password reset access, battery replacement, charging and secure…
As an affiliate, we earn on qualifying purchases.
As an affiliate, we earn on qualifying purchases.
Preparing for Faceplate Removal

Having gathered your tools, you're now ready to prepare for the faceplate removal process. Before diving in, take a moment to set up your workspace. A clean and organized area will help you avoid losing small parts, like the significant security screw. As you prepare, consider the importance of family bonds during home improvements, reminding yourself to share the experience with loved ones celebrating family love.
As you prepare, keep the following in mind:
- A special star-shaped screwdriver or a T6 torx-head screwdriver
- The security screw location at the bottom of the faceplate
- A flat, skinny object, like a butter knife, for prying gently
To begin, locate the security screw at the bottom of the faceplate. You'll need to loosen it by turning it counterclockwise. This step is essential because it secures the faceplate to the device.
Once the screw is removed, you can use your thumbs to push up from the bottom of the faceplate, gently loosening it from the doorbell body. Just be cautious as you pry off the faceplate; you want to avoid any damage.
Preparing properly guarantees a smooth removal process, helping you maintain your Ring Doorbell 2 effectively.

Video Doorbell Key Removal Tool Compatible with Ring Battery Doorbell 2024 Release, Wired Doorbell Pro (N ewest Model), Wired Doorbell Plus (N ewest Model) 2PACK
COMPATIBILITY: compatible with Ring Battery Doorbell 2024 Release,Compatible with Wired Doorbell Pro (Newest Model), Wired Doorbell Plus (Newest…
As an affiliate, we earn on qualifying purchases.
As an affiliate, we earn on qualifying purchases.
Step-by-Step Faceplate Removal

How do you begin the faceplate removal process for your Ring Doorbell 2? Start by locating the security screw at the bottom of the device. Using the provided star-shaped screwdriver, carefully unscrew it.
Once the screw is removed, you can push up from the bottom of the faceplate with your thumbs. This action will help to loosen it from the device. It's important to handle your Ring Doorbell 2 with care, as improper handling can lead to damage and additional maintenance needs. For tips on maintaining your home electronics, consider checking out what to expect from a home cleaning service.
If you find it difficult to detach the faceplate, don't hesitate to use a flat object, like a butter knife. Gently pry the faceplate away from the doorbell to make the removal easier.
As the faceplate loosens, support the front with your fingers and lift it away to completely detach it. Make sure to handle it with care to avoid any damage.
After removing the faceplate, be sure to place it in a secure location for safekeeping until you're ready for the next steps. Following these straightforward steps will guarantee your faceplate removal goes smoothly, allowing you to perform any necessary maintenance on your Ring Doorbell 2 without any hassle.

Ring Spare Parts Kit for Battery Doorbell
Everything you need to setup your Ring Battery Doorbell in just a few minutes.
As an affiliate, we earn on qualifying purchases.
As an affiliate, we earn on qualifying purchases.
Accessing the Battery

Once you've removed the faceplate, you can easily find the battery compartment inside your Ring Doorbell 2.
To safely remove the battery, just press down on the black tab and pull it out.
Make sure the device is powered off before you start to avoid any electrical issues.
Battery Compartment Location
To access the battery compartment of the Ring Doorbell 2, you'll first need to remove the faceplate by unscrewing the security screw at the bottom.
Once that's done, push up with your thumbs to loosen the faceplate and take it off completely.
Inside, you'll find the battery compartment, which is designed for easy access. Here's what you should look for:
- Black tab: This tab is located at the bottom of the battery.
- Battery: The removable battery sits snugly in the compartment.
- Click sound: You'll hear a satisfying click when the battery is secure.
Before you detach the battery, make certain the Ring Doorbell 2 is powered off for safety.
After pulling the battery out for charging or replacement, simply push it back into the compartment until you hear that click again.
This process guarantees your device stays powered and ready for action.
Safe Battery Removal Steps
Before removing the battery, verify your Ring Doorbell 2 is powered off to avoid any electrical issues.
Start by removing the faceplate. You'll need to unscrew the security screw located at the bottom of the device. Once that's done, gently push up from the bottom using your thumbs to loosen the faceplate and take it off.
After you've removed the faceplate, locate the battery compartment at the bottom of the device. To detach the battery, press down on the black tab while pulling the battery out towards the bottom. Handle it carefully to avoid dropping or damaging it.
If you're planning to charge the battery or replace it, confirm you check the charge level before reinserting it back into the compartment.
Once you've finished your maintenance or charging, slide the battery back into place until it clicks securely.
Battery Replacement Process

You can easily replace the battery in your Ring Doorbell 2 by first removing the faceplate. Start by unscrewing the security screw located at the bottom, then push the faceplate upward using your thumbs. With the faceplate off, you'll see the battery compartment.
Here's how to replace the battery:
- Locate the black tab on the battery.
- Press down on the tab while pulling the battery out towards the bottom.
- Before detaching, make sure the device is powered off to avoid damage.
It's essential to check that the new battery is adequately charged before reinserting it. This guarantees peak performance for your Ring Doorbell 2. After confirming the battery is in and charged, you're all set to reattach the faceplate.
Reattaching the Faceplate

Reattaching the faceplate of your Ring Doorbell 2 is straightforward if you follow some key techniques.
You'll want to guarantee proper alignment and secure fastening for a snug fit, plus you can even customize it with different colors.
Let's break down the steps to make it easy for you to get it back on right.
Proper Alignment Techniques
Aligning the faceplate with the device's body at a 45-degree angle guarantees a secure fit when reattaching it. To verify proper alignment, follow these steps:
- Position the top hook of the faceplate above the corresponding hole on the device.
- Hold the faceplate steady while you tilt it down toward the device's body.
- Gently snap the bottom edge of the faceplate into place.
Once you've completed these steps, don't forget to replace the security screw at the bottom of the faceplate. This screw is essential for preventing accidental removal of the faceplate, verifying your device remains secure.
By focusing on proper alignment, you can easily avoid any issues that may arise during reattachment. Remember, a secure fit not only enhances the aesthetics of your Ring Doorbell 2 but also contributes to its overall functionality.
Secure Fastening Methods
Confirming a tight fit for the faceplate on your Ring Doorbell 2 is important for both security and functionality.
To reattach the faceplate after you've removed it, start by aligning the top hook at a 45-degree angle with the corresponding hole on the device. This angle makes it easier to align the faceplate correctly. Once you've got it aligned, gently push down the bottom of the faceplate until you hear it snap into place.
After snapping the faceplate back into position, it's essential to secure it firmly. Replace the security screw at the bottom of the faceplate and tighten it fully with the provided screwdriver. This step is significant to guarantee that the faceplate remains securely attached.
Before finalizing your installation, double-check that the faceplate is firmly in place and that there are no gaps. If you happen to lose a security screw during this process, don't worry—replacement packs of at least two screws can be found online or through customer service.
Following these methods will keep your Ring Doorbell 2 secure and functional.
Color Customization Options
Switching out the faceplate on your Ring Doorbell 2 lets you personalize its look while maintaining functionality. With a variety of colors available, you can easily replace the standard faceplate to match your home's aesthetic.
Here's how to do it:
- Classic Black for a sleek, modern vibe
- Bright Red to make a bold statement
- Soft Blue for a calming touch
To reattach the faceplate, align the top hook with the corresponding hole, holding the cover at a 45-degree angle for better alignment. Once you've got it lined up, simply snap the bottom back into place firmly to guarantee it's securely attached.
For even more customization, consider using silicone skins that fit over your doorbell, adding extra protection while giving it a fresh look. Whether you want to change it with the seasons or just feel like giving your home a quick update, customizing your Ring Doorbell 2 is a simple yet effective way to express your style.
Securing the Faceplate

To secure the faceplate of your Ring Doorbell 2, first position the top hook into the corresponding hole before snapping the bottom into place. Holding the faceplate at a 45-degree angle can help you align the components more easily during reassembly.
Once you've confirmed the faceplate is properly attached, it's essential to replace the security screw at the bottom. Use the provided screwdriver to tighten the screw fully, securing the faceplate firmly in place.
If you happen to lose the security screw, don't worry. You can order replacement packs containing at least two screws either online or through customer service. Remember, it's important to maintain a secure attachment to avoid any potential issues with the doorbell's performance.
Additionally, the versatility of different colored faceplates allows for easy customization without compromising the security of the attachment. You can switch colors whenever you like, but always verify that the faceplate is securely fastened to prevent it from coming loose.
Troubleshooting Common Issues

When removing your Ring Doorbell 2, you might run into a few installation challenges.
It's important to know effective removal techniques to make the process smoother.
Let's explore some common issues and how to tackle them.
Installation Challenges Faced
Many users encounter frustrating challenges while trying to remove the cover of their Ring Doorbell 2, often due to hard-to-reach security screws and the potential for non-removable faceplates. These removal challenges can make the installation process feel intimidating.
To tackle these issues effectively, consider the following:
- Identify your model: Verify you know whether your doorbell has a removable faceplate.
- Use the right tools: Standard screwdrivers may not suffice; think about alternatives like a paint scraper.
- Grip properly: Hold the doorbell and mounting bracket separately for better leverage.
Effective Removal Techniques
Although removing the cover of your Ring Doorbell 2 can be tricky, employing the right techniques will make the process smoother and more efficient.
Start by ensuring the security screw at the bottom of the faceplate is fully loosened. If it feels stuck, don't worry; you can use a flat object like a paint scraper or a butter knife to gently pry it off.
To effectively remove the cover, apply upward pressure with your thumbs while pulling down on the mounting bracket. This approach gives you better leverage and helps separate the doorbell from its base. Remember to support the front of the faceplate with your fingers during this process to prevent dropping it.
If you encounter resistance, exercise patience. Some force may be necessary to detach the cover, especially if it's been secured tightly. Keep applying upward pressure while maintaining support; persistence will pay off.
Community Support Resources

Engaging with the Ring Community provides valuable support for troubleshooting and installation challenges related to the Doorbell 2. When you log in or create an account, you'll find a space filled with discussions where users share their experiences and solutions. This collective knowledge can be a game-changer when you encounter issues or need guidance.
Here's what you can expect from the community:
- Shared Experiences: Users discuss their installation hurdles, giving you insights into what worked for them.
- Practical Solutions: Many members share tips and tricks that can simplify your troubleshooting process.
- Diverse Perspectives: You'll gain access to various viewpoints and methods that might resonate with your situation.
Additional Help and Tips

To make the process of removing your Ring Doorbell 2 cover smoother, gather a few essential tools and prepare your workspace in advance.
You'll need the provided star-shaped screwdriver to unscrew the security screw located at the bottom of the faceplate. Once you've loosened the screw, use your thumbs to push up from the bottom, detaching the cover. If you struggle, grab a flat object like a butter knife for extra leverage.
It's crucial to maintain a clean workspace to avoid losing the small screw or damaging the faceplate. As you remove the cover, place it in a secure spot. If you're having difficulty, try gripping the bracket and doorbell separately. Pull up on the doorbell while pushing down on the bracket to gain better leverage.
If you still encounter issues, don't hesitate to seek assistance. Video tutorials can provide visual guidance, and contacting Ring's customer service can help troubleshoot any problems you might face.
Make sure to charge your doorbell as needed to keep it functioning properly. Following these tips will make your removal process efficient and hassle-free.
Frequently Asked Questions
How to Remove Ring Doorbell 2 Faceplate?
To remove your Ring Doorbell 2 faceplate, start by finding the security screw at the bottom.
Use the star-shaped screwdriver to unscrew it.
Once you've removed the screw, push up from the bottom of the faceplate with your thumbs to loosen it.
If it's stubborn, gently insert a flat object to pry it away.
Support the front with your fingers while applying upward pressure to detach it completely.
Store the faceplate safely afterward.
How to Take the Back off a Ring Doorbell 2?
To take the back off your Ring Doorbell 2, you'll need to first remove the faceplate by unscrewing the security screw at the bottom.
After that, push the faceplate up gently and detach it.
Once the faceplate is off, locate the screws securing the back cover.
Unscrew them carefully.
With all screws removed, you can pull the back off, gaining access to the internal components for any necessary maintenance or adjustments.
How to Remove Door Bell Cover?
Removing a doorbell cover can feel like unwrapping a gift, revealing the treasures inside.
To start, look for any screws or clips holding it in place.
Once you've identified them, use the appropriate tool—like a screwdriver—to gently loosen them.
If the cover seems stubborn, apply gentle pressure with your fingers to lift it off.
Just remember to handle it carefully, ensuring you don't damage the delicate components beneath.
How Do You Remove the Battery From a 2nd Generation Ring Doorbell?
To remove the battery from your 2nd generation Ring Doorbell, start by unscrewing the security screw at the bottom and pushing up from the base to detach the faceplate.
Once you've done that, locate the battery compartment inside.
Press down on the black tab at the bottom of the battery and gently pull it out.
Always make certain your device is powered off before working on it to guarantee safety.
Conclusion
In summary, removing the cover from your Ring Doorbell 2 doesn't have to be intimidating.
By gathering the right tools, preparing carefully, and following the steps methodically, you can access the battery with ease.
Whether you're replacing the battery, securing the faceplate, or troubleshooting issues, remember that you're not alone.
With community support and helpful resources, you can guarantee your Ring Doorbell 2 remains functional and reliable while enhancing your home's security.