To install the Ring Doorbell 3, start by charging the battery until the green light appears. Verify you turn off the power at the circuit breaker for safety. Use the included level tool to mark a spot about 48 inches from the ground. Drill holes at the marked positions and mount the doorbell securely. Connect the wall wires to the device, verifying solid connections. After mounting, install the faceplate. Finally, use the Ring app to connect to Wi-Fi and check for a solid white light for successful setup. There's so much more to explore about troubleshooting and maintenance to keep your doorbell running smoothly. For additional guidance on how to install Ring Doorbell, refer to the instruction manual provided or consult online tutorials. It’s essential to periodically clean the camera lens and check for firmware updates through the Ring app to ensure optimal performance. Regularly inspecting your Wi-Fi connection and the condition of the device will help avoid common issues like delayed notifications or disconnections. If you ever experience connectivity issues, a simple restart of your router or doorbell device can often resolve the problem. Additionally, brushing up on **how to install Ring Doorbell** using online resources or revisiting the initial setup guide may provide insights into resolving common malfunctions. Whether you’re troubleshooting or learning **how to install Ring Doorbell**, staying informed will contribute to the longevity and reliability of your device.
Key Takeaways
- Charge the Ring Video Doorbell 3 battery fully before starting the installation process for optimal performance.
- Ensure the installation area is clean and safe, and turn off power at the circuit breaker to prevent electrical hazards.
- Mount the doorbell at approximately 48 inches from the ground using the included level tool for proper alignment and stability.
- Connect the wall wires to the device, securing it with the provided screws, and install the faceplate for added protection.

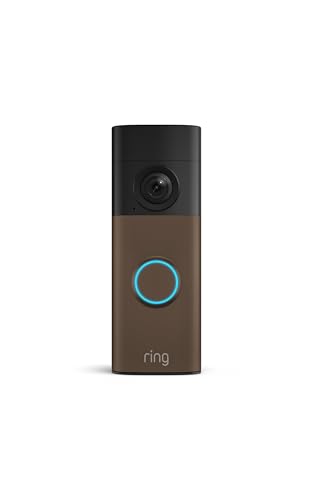
Ring Battery Doorbell (newest model) — Retinal 2K with wide-angle video, up to 6x Enhanced Zoom, Two-Way Talk, and Built-In Battery, Speckled Gray
- Video Resolution: Retinal 2K with wide-angle view
- Zoom Capability: Up to 6x Enhanced Zoom
- Two-Way Communication: Real-time audio and video
As an affiliate, we earn on qualifying purchases.
Installation Preparation
Before you begin the installation, make certain you're fully prepared by charging the Ring Video Doorbell 3 battery and checking your power supply. Use the provided orange USB cable to charge the battery until the small light glows green, which indicates it's fully charged.
To guarantee a clean and safe working environment, consider using essential items from a home cleaning kit to tidy up the area around your front door.
Next, you'll want to shut off the power at the circuit breaker to avoid any electrical hazards when dealing with your existing doorbell. Confirm that your transformer supplies 8-24 VAC with a maximum of 40VA, verifying it can properly power your new device.
Once you've established a secure power source, grab the included level tool. Position the doorbell at approximately 48 inches from the ground, which is the ideal height for viewing.
Before drilling, mark the mounting hole positions with a pencil to confirm accurate placement. This step is vital, as precise alignment will make your installation process smoother.
After marking, you'll be ready to drill the holes for mounting the doorbell. Taking the time to prepare will help guarantee a successful installation, so follow these steps carefully.

Ring Battery Doorbell (newest model), Matte Mocha with Indoor Cam Plus, Black
- Home Security Bundle: Battery Doorbell, Indoor Cam Plus, Matte Mocha, Black
- 2K Retinal Video: Clear, detailed footage with 6x zoom
- Color Night Vision: See in true color even in low light
As an affiliate, we earn on qualifying purchases.
Physical Installation Steps

Start by drilling holes at the marked positions, using plastic anchors for brick, concrete, or stucco, while simply using the provided screws for wood or vinyl siding.
After your holes are drilled, it's time to mount the Ring Video Doorbell 3. It's important to guarantee that the area around the installation site is well-ventilated, as this can improve overall air quality in your home, especially if you're using devices like air purifiers to enhance your indoor environment.
Connect the wall wires to the screws on the device; it doesn't matter which wire goes to which screw, so don't stress about that.
Once the wires are connected, align the doorbell with the wall and secure it using all four included screws. This guarantees the device stays firmly in place.
After the doorbell is securely attached, install the faceplate by slotting it in at the top and clicking it into place. Make sure it fits snugly to keep everything protected.

Ring Wired Doorbell Pro (newest model), Home or business security, Retinal 4K with wide-angle video, 10x Enhanced Zoom, and Low-Light Sight, Deep Silver
- 4K Retinal Video: Ultra-clear 4K resolution for detailed footage
- 10x Enhanced Zoom: Magnify distant details up to 10 times
- Two-Way Audio: See, hear, and speak to visitors remotely
As an affiliate, we earn on qualifying purchases.
Finalizing Setup and Troubleshooting

After securing the faceplate, you can finalize the setup by using the Ring app to connect your doorbell to Wi-Fi and adjust your notification settings. Begin by confirming the level tool is removed to maintain proper alignment. Next, verify wiring by checking for a solid white light on the front of the device, indicating a successful connection.
Here's a quick reference table for troubleshooting:
| Issue | Solution | Notes |
|---|---|---|
| No solid white light | Verify wiring and check connections | Recheck wiring if needed |
| Can't connect to Wi-Fi | Confirm you're entering the correct password | Restart your router if necessary |
| Battery not holding charge | Check battery status in the Ring app | Recharge battery as necessary |
| Notifications not working | Adjust settings in the Ring app | Confirm notifications are enabled |
Regularly check your battery status in the Ring app to avoid disruptions. If the battery runs low, recharge it to confirm your device remains functional. By following these steps, you'll finalize setup and troubleshoot effectively, confirming your Ring Doorbell 3 functions smoothly.
Ring Battery Doorbell (newest model) — Retinal 2K with wide-angle video, up to 6x Enhanced Zoom, Two-Way Talk, and Built-In Battery, Matte Mocha
- Video Resolution: Retinal 2K wide-angle video
- Zoom Capability: Up to 6x Enhanced Zoom
- Two-Way Communication: Real-time see, hear, speak
As an affiliate, we earn on qualifying purchases.
Frequently Asked Questions
How to Connect Ring Doorbell 3 to Wifi?
To connect your Ring Doorbell 3 to Wi-Fi, open the Ring app and select "Set Up Device," then choose "Doorbell."
Make sure your device's powered on and in setup mode, indicated by a spinning white light.
Connect your smartphone to the temporary Wi-Fi network created by the doorbell.
Return to the app, select your home Wi-Fi, and enter the password.
Once connected, a solid white light confirms the successful connection.
How Do You Install a Ring on a 3 Doorbell?
Did you know that over 20 million Ring devices have been sold, making home security more accessible?
To install your Ring Doorbell 3, start by charging the battery fully.
Use the level tool to position it about 48 inches high, marking the spots for screws.
If you're on brick or concrete, drill and anchor as needed.
Connect the wall wires, ensuring a solid white light, then attach the faceplate securely.
How Do You Install Ring Doorbell 3 Without Drilling?
To install your Ring Doorbell 3 without drilling, start by using adhesive mounting strips designed for outdoor use.
Make certain the surface is clean and dry to guarantee the best adhesion.
Next, check that your doorbell's within Wi-Fi range for peak performance.
Before mounting, fully charge the battery for power.
You might also consider an adjustable bracket that securely holds the doorbell without screws, making sure it withstands weather conditions over time.
How Do I Connect My Ring Doorbell 3 to Power?
To connect your Ring Doorbell 3 to power, you'll need a compatible transformer that outputs 8-24 VAC and a maximum of 40VA.
First, turn off the power at the circuit breaker for safety.
Use wire extensions and wire nuts if necessary to connect the wall wires to the screws on the doorbell.
When you see a solid white light, it means your wiring is correct and the doorbell's receiving power.
Conclusion
Now that your Ring Doorbell 3 is installed, you can enjoy the peace of mind it brings while staying connected to your home.
You've transformed your entryway with technology, blending security and convenience seamlessly.
While the installation was straightforward, troubleshooting guarantees everything runs smoothly.
Embrace the comfort of knowing who's at your door, and take pride in your new setup.
With each notification, you'll appreciate the balance between modern living and safety, making your home truly yours.