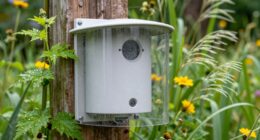
When attaching a Ring doorbell to a uPVC frame, you can opt for self-tapping screws or no-drill mounts to minimize harm. Self-tapping screws provide solid security, while adhesive mounts protect the frame without the need for drilling. Regardless of the method you select, ensure the doorbell is installed at approximately 1.2 meters (4 feet) for optimal viewing. If you are wiring the doorbell, check the power supply and consider using a multimeter to ensure compatibility. After installation, maintain cleanliness in the area and regularly inspect the connection to ensure everything remains secure. Looking to enhance the effectiveness of your setup? There’s more to discover! When securing your Ring doorbell, think about adding a protective cover to shield it from the elements and potential tampering. Additionally, updating the device’s software regularly will guarantee it has the latest security features. And explore additional accessories, like a solar charger or a chime, to enhance the overall functionality of your Ring doorbell setup. By taking these extra steps, you can fully optimize the security and convenience of your Ring doorbell system.
Key Takeaways
- Use self-tapping screws for a secure installation without pilot holes, minimizing the risk of damage to the uPVC frame.
- Opt for strong, weather-resistant adhesive mounts to avoid drilling and maintain frame integrity.
- Ensure the doorbell is installed at approximately 1.2 meters (4 feet) for optimal camera visibility.
- Verify power supply compatibility with the Ring model, choosing between hardwired or battery-operated options as needed.

Ring No-Drill Mount for Ring Video Doorbell 4, Battery Doorbell Plus (1st Gen), Battery Doorbell Pro (1st Gen) and Battery Doorbell (1st Gen)
Mount without worry — Attach a compatible Ring video doorbell to your home with the durable, weather-resistant, adhesive-backed…
As an affiliate, we earn on qualifying purchases.
As an affiliate, we earn on qualifying purchases.
Installation Methods
When installing a Ring doorbell on a uPVC frame, you can choose from various methods that assure both security and aesthetics. One of the most effective ways is to use self-tapping screws, which allow you to securely attach the doorbell without needing pilot holes. This method is particularly advantageous since drilling directly into the uPVC frame can cause damage.
Additionally, it's important to verify that the installation process doesn't compromise the plumbing systems in your home, as improper installation can lead to issues similar to clogging remedies in your plumbing. If you prefer to avoid drilling altogether, consider using adhesive mounts that are specifically designed for uPVC surfaces. These options help maintain the integrity of your frame while still allowing you to install the doorbell effectively.
When you install the doorbell, confirm it's at a suitable height of about 1.2 meters (4 feet) from the ground for the best camera view. If drilling is necessary, adjust the length of the screws to prevent interference with the door's operation.
You can also explore no-drill mounts available on the Ring website, which cater to aesthetic concerns while confirming a secure installation. By carefully selecting your installation method, you can achieve a functional and visually appealing setup for your Ring doorbell.

RIOVO Adjustable 30 to 55 Degree Doorbell Angle Mount Compatible with Ring/Blink Video Doorbell/Battery Doorbell, Replacement Angle Adjustment Adapter Mounting Bracket Wedge Kit
Compatible Model: This angle mount compatible with RlNG Battery Doorbell (2024 Release) / Video Doorbell 2 / Video…
As an affiliate, we earn on qualifying purchases.
As an affiliate, we earn on qualifying purchases.
Power Supply Considerations

Power supply is a crucial element to take into account when installing your Ring doorbell, as it typically requires a 24V connection for best performance. You have a couple of options for providing this power supply: you can use a plug-in transformer or rely on an existing bell transformer, provided it's intact and functional.
Maintaining a clean indoor environment with the help of an air purifier can also enhance the overall performance of your home devices by reducing allergens and dust.
If you opt for hardwiring, this can enhance the battery life and reliability of your Ring doorbell, reducing maintenance needs and ensuring consistent functionality. However, if you decide to go with a battery-operated version, like the Ring Battery Pro, keep in mind that it offers flexibility in placement but may require frequent recharging based on how often you use it.
Before starting the installation, make sure to verify the compatibility of the power supply with your specific Ring model, particularly when shifting from battery to hardwired options. A multimeter can be a handy tool for checking the existing wiring functionality, ensuring it meets your doorbell's requirements.
This way, you can feel confident that your Ring doorbell will perform at its best once it's installed.
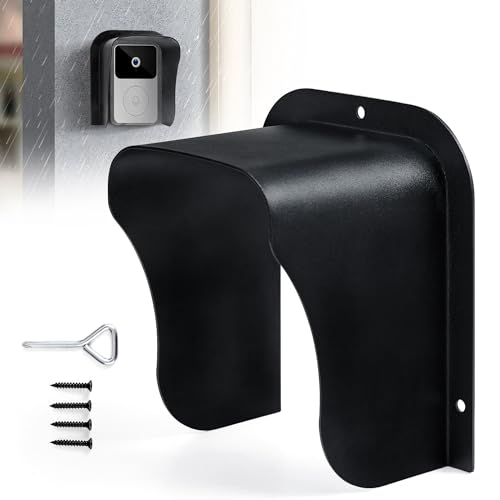
Ring Doorbell Cover Weatherproof, Large Metal Ring Doorbell Protector, Access Control Rain Cover, Outdoor Keypad Cover Protector, Ring Video Doorbell Waterproof Cover, Camera Doorbell Cover Black
🌟[Ring Doorbell Protector] Inclement weather conditions including rain, snow, humidity, or exposure to the sun can cause ring…
As an affiliate, we earn on qualifying purchases.
As an affiliate, we earn on qualifying purchases.
Wiring Challenges

First, you'll need to extend existing bell wire, guaranteeing it reaches the desired location without damaging the integrity of the UPVC door frame.
If you run into issues during this process, consider using surface-mounted trunking for cable management. However, keep in mind that this option can detract from the aesthetics of your installation. To maintain a clean look, look for hidden pathways to run your cables.
It's also wise to ascertain the installation meets any relevant legal requirements for starting a home cleaning business if you're planning on offering installation services professionally.
If structural layouts complicate the wiring, inspection cameras can be invaluable for locating suitable pathways under floors or through walls.
You must also verify the functionality of any existing doorbell wiring with a multimeter before using it for your Ring doorbell. This step guarantees compatibility and safety during installation.
For more complex wiring situations, particularly in older homes or when faced with challenging layouts, it may be best to consult professional electricians. Their expertise can help you navigate any difficulties and guarantee a smooth installation process, ultimately saving you time and potential headaches.

Ring Solar Charger for Battery Doorbell (1st Gen)
Solar charge your doorbell — Extend the battery life of your Ring Battery Doorbell with the help of…
As an affiliate, we earn on qualifying purchases.
As an affiliate, we earn on qualifying purchases.
User Experiences

Many users have navigated various challenges while installing their Ring doorbells on uPVC frames, sharing a range of experiences and solutions that can help others in similar situations.
Many have found that using self-tapping screws provides a secure attachment, while others caution against relying solely on alternative mounting methods due to security concerns. Engaging with professionals can also enhance the installation process, particularly through comprehensive professional services that cater to unique project needs.
Here are some common insights from the community:
- Tight Fits: Users often struggle with tight fits, making it essential to measure and plan before installation.
- Battery vs. Mains: Some prefer battery-powered Ring doorbells for easier setups, while others appreciate the reliability of mains-powered models.
- Engagement: Joining online forums can lead to valuable tips from those who've faced similar installation challenges.
Engaging with this community has proven helpful, as sharing experiences often leads to practical solutions for a successful Ring Doorbell on uPVC installation.
Product Recommendations

When you're ready to install your Ring doorbell, you'll need the right materials and tools to guarantee a secure fit.
Start with self-drilling screws specifically designed for uPVC frames, and don't forget to check the power supply requirements for your model.
Additionally, using well-draining soil can improve the overall health of your plants, creating a more inviting atmosphere for your outdoor setup.
Having a multimeter on hand can help you confirm that your existing wiring is functional before you get started.
Recommended Installation Materials
To securely attach your Ring doorbell to a uPVC frame, consider using self-tapping screws like EasyDrive self-drilling pan head screws for the best results. These screws are designed to penetrate the uPVC material effectively, guaranteeing a strong and stable installation.
For enhanced security, you might also explore options like garage door openers that include modern technology to complement your home's security system.
If you're looking for a no-drill mount option, Ring offers specialized mounts designed specifically for uPVC installations, which can help preserve the integrity of your door frame.
Here are some recommended installation materials:
- Self-tapping screws: Guarantee a secure fit without damaging the uPVC.
- Double-sided tape: A non-invasive alternative for temporary setups, but be cautious of potential paint damage.
- Silicone adhesive: This can provide a strong bond, though it's best for more permanent installations.
Essential Tools Needed
Gathering the right tools is vital for a successful installation of your Ring doorbell on a uPVC frame. You'll want to make certain you have everything at your fingertips to make the process smooth and efficient.
Here's a handy table of essential tools you'll need:
| Tool | Purpose | Recommended Product |
|---|---|---|
| Self-Tapping Screws | Securely attaches the doorbell without pilot holes | [Self-Tapping Screws](#) |
| T6 Screwdriver | Required for installing and securing screws | [T6 Screwdriver](#) |
| Drill with 1.7 mm Bit | Create pilot holes if needed | [Drill and Bit Set](#) |
A level is also important to make sure your doorbell is mounted straight for ideal functionality and aesthetics. If you're opting for a wired setup, a multimeter can verify existing wiring compatibility. In colder climates, consider using silicone adhesive for added waterproofing, but avoid applying it directly to the device. With these tools in hand, you're well on your way to a successful installation!
Adhesive and Silicone Usage

Using adhesive methods is often the best approach for mounting a Ring doorbell on a uPVC frame, as it preserves the frame's aesthetics without the need for drilling. Before you start, make certain to thoroughly clean the surface to guarantee a strong bond; this helps prevent any damage to the paint when you remove the adhesive later.
Here are some key points to keep in mind:
- Choose the right adhesive: Look for strong, weather-resistant adhesives suitable for exterior use.
- Consider silicone for cold climates: Silicone remains flexible and waterproof, making it ideal for installations in rainy areas.
- Optimal conditions matter: Apply adhesive in warm, dry weather for the best results.
Community Engagement

Engaging with the Ring Community not only enhances your installation experience but also connects you with others who share valuable insights and solutions for mounting your doorbell on a uPVC frame. By joining discussions, you can gain knowledge from various users who've faced similar challenges and found successful methods.
Here's a quick table highlighting key areas of discussion within the community:
| Topic | Description | Benefits |
|---|---|---|
| Installation Tips | Share techniques for securing Ring on uPVC | Learn practical solutions |
| Common Issues | Discuss frequent problems faced | Troubleshoot with community help |
| Image Sharing | Post photos of your installation | Get feedback and advice |
| Best Practices | Learn from experienced users | Improve your installation process |
| Q&A Sessions | Ask questions about specific concerns | Gain insights from experts |
Installation Options for Security

When it comes to securing your Ring doorbell to a uPVC frame, several installation options can enhance both safety and aesthetic appeal. The most reliable method involves using self-tapping screws, which provide a robust solution minimizing the risk of theft. It's crucial to select the right screw length to avoid interference with the door's operation while guaranteeing a tight fit.
If aesthetics are a priority, consider alternatives like no-drill mounts or adhesive options, though they mightn't offer the same security level as screws.
Here are some tips to keep in mind:
- Install the doorbell at about 1.2 meters (4 feet) for best camera visibility.
- Research community-shared installation techniques to find the best fit for your uPVC frame.
- Regularly check and maintain the doorbell to guarantee it remains securely in place.
Frequently Asked Questions
Can You Attach a Ring Doorbell to Upvc?
Yes, you can attach a Ring Doorbell to a uPVC frame.
Use self-tapping screws for a secure fit while minimizing damage.
However, consider the width of your frame, as it might limit your mounting options.
If you need to drill, do so carefully to protect the frame's integrity.
Alternatively, check for no-drill mounts on the Ring website to maintain the aesthetics of your door frame while ensuring peak performance.
Can You Drill Through an Upvc Door Frame for a Doorbell?
Drilling through a uPVC door frame can feel like tempting fate; you might just crack the surface and ruin its beauty. You can, but it's risky.
If you choose to drill, use a drill bit designed for plastic and tread carefully.
Consider alternatives like self-tapping screws or adhesive methods that won't compromise the frame's integrity.
Always check local regulations first to avoid any nasty surprises down the line.
Safety first!
How Do You Install a Ring Doorbell on Plastic Siding?
To install a Ring Doorbell on plastic siding, start by using self-tapping screws that work well with the material.
Aim for a height of about 1.2 meters (4 feet) for the best camera angle.
If you need to drill, choose a drill bit suitable for plastic and avoid making large holes.
Alternatively, you can opt for adhesive mounts, but be cautious as they might damage the paint when removed.
Confirm it's securely fastened for added security.
How to Mount a Ring Doorbell Without Drilling?
To mount your Ring doorbell without drilling, consider using no-drill mounting options available online or strong outdoor adhesive strips.
You can also apply silicone adhesive for a secure bond on flat surfaces.
If you need flexibility, explore mounting brackets that attach to nearby walls.
These methods provide convenience, maintain aesthetics, and guarantee your doorbell remains securely in place without compromising your door frame.
Enjoy the ease and security without the hassle of drilling!
Conclusion
Now that you've navigated the ins and outs of fixing your Ring doorbell to a UPVC frame, you're ready to transform your entryway into a fortress of security.
Like a watchful guardian, your doorbell will stand ready to greet visitors and deter unwanted guests.
With the right tools and a dash of creativity, you're not just installing a device; you're crafting peace of mind.
So, go ahead—let your home shine with safety and style!