
Installing a Ring Doorbell on a composite door is a simple task. First, make sure you have the necessary tools: a T6 screwdriver, a drill with a 1.7 mm bit, and a level. You can choose to use self-tapping screws for a secure installation or no-drill adhesive strips. Determine the ideal camera height by marking a spot approximately 48 inches from the ground. Clean the surface and then attach the doorbell using your preferred method. Once installed, test it to ensure it is functioning properly. For additional tips or troubleshooting advice, there is a wealth of information available to assist you. If you encounter any difficulties during the ring doorbell installation, consult the instruction manual or online tutorials for guidance. It is crucial to secure the doorbell properly and align it correctly for optimal video coverage. Additionally, consider setting up the companion app to personalize settings and notifications for a smooth user experience.
Key Takeaways
- Choose between drilling with self-tapping screws or using adhesive methods designed for composite doors for a secure installation.
- Mount the doorbell at approximately 48 inches from the ground for optimal video and motion detection.
- Ensure the installation kit is compatible with composite materials to maintain door integrity during installation.
- Clean the installation surface thoroughly before applying adhesive to ensure maximum bond strength.

eufy Security Video Doorbell Pro, No Subscription, Dual Cameras, 2K FHD,Head-to-Toe View, Doorbell Camera Wireless & Wired, Color Night Vision, Two-Way Talk, AI Motion/Package Detection, Built-in 8GB
𝐃𝐮𝐚𝐥 𝐂𝐚𝐦𝐞𝐫𝐚𝐬, 𝐃𝐨𝐮𝐛𝐥𝐞 𝐒𝐞𝐜𝐮𝐫𝐢𝐭𝐲 | Dual cameras work seamlessly together. The front camera captures visitors head-to-toe, while the...
As an affiliate, we earn on qualifying purchases.
Installation Methods Overview
When fitting a Ring Doorbell, you can choose between drilling with screws or using adhesive methods tailored for composite doors.
If you opt for the self-tapping screw method, make certain you drill carefully to avoid damaging the door's internal structure. Self-tapping screws are designed to create their own hole, making installation straightforward on composite materials. Additionally, consider exploring modern security options that enhance your home security. Mounting the doorbell at about 48 inches from the ground guarantees the best video and motion detection.
Alternatively, if you prefer a non-invasive approach, adhesive solutions are available. These products are specifically designed for composite doors and can provide a secure hold. Before applying any adhesive, verify that the surface is clean and dry to maximize bond strength. This is especially important given that weather conditions can affect adhesion.
Regardless of the method you choose to install the Doorbell, always check the compatibility of the doorbell with your composite door material. This guarantees you won't compromise the door's integrity during installation.
Plan ahead to avoid any pitfalls, and you'll have your Ring Doorbell securely installed in no time, ready to enhance your home security.
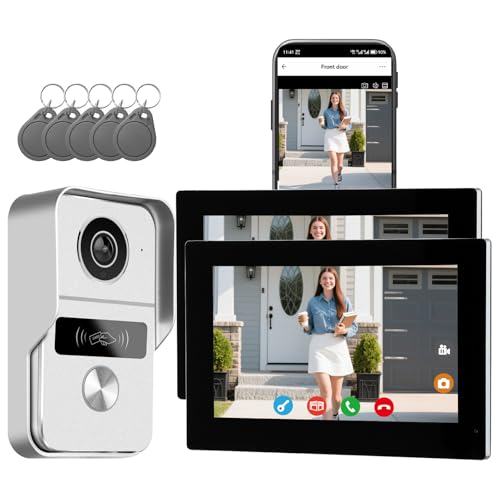
Wired Video Doorbell Apartment Intercom System, 1080P Doorbell Camera, 7-inch Touch Screen, Night Vision, Remote Unlock, Two-Way Intercom for Villa, Home, Office, with 1 Camera and 2 Monitors
2-Wire Installation & 2-Monitor Video Intercom system for home -The outdoor doorbell camera connects via a two-wire cable...
As an affiliate, we earn on qualifying purchases.
Tools and Equipment Needed

To fit your Ring doorbell, you'll need a few essential tools and materials.
Start by gathering a T6 screwdriver, a drill with a 1.7 mm bit, and a level to guarantee everything's aligned properly.
Consider also that proper air quality in your home can enhance your overall well-being; you might want to check out air quality indicators if you plan to install additional devices.
Don't forget a pencil for marking, and consider adhesive strips if you want a no-drill option.
Required Tools
Installing a Ring Doorbell requires a few essential tools, including a T6 screwdriver, a drill, and a level for precise alignment. Having the right tools makes the installation process smoother and guarantees your doorbell is securely mounted. Additionally, confirming that you have a range of services offered, such as different mounting options, can enhance your overall experience with the installation process key factors in choosing a home cleaning service.
Here's a list of the tools you'll need:
- T6 screwdriver: Specifically designed for the screws in the installation kit.
- Drill: Necessary for drilling into the composite door if using screws.
- Level: Guarantees your doorbell is straight and properly aligned.
- Pencil: For marking the position of your doorbell before drilling.
If you prefer an adhesive installation, consider having double-sided adhesive strips or a no-drill mount on hand as an alternative.
Additionally, if you're securing the doorbell with screws, a drill bit suitable for composite materials is vital. You might also want a hammer if you need to use wall anchors or adjust the mounting bracket during installation.
With these tools ready, you're on your way to a successful Ring Doorbell installation.
Installation Materials Needed
Gathering the right installation materials is essential for a smooth and successful Ring doorbell setup. You'll want to make certain you have everything needed to secure your doorbell effectively. Below is a list of key materials to gather before you begin your installation.
| Material | Purpose |
|---|---|
| Installation Kit | Contains mounting bracket and adhesive |
| Self-Tapping Screws | Provides secure attachment to the composite door |
| Drill | Creates pilot holes for the screws |
| T6 Screwdriver | Tightens the screws for a secure fit |
| Level | Guarantees proper alignment of the doorbell |
Having a pencil handy is also advisable for marking the installation height, ideally around 48 inches from the ground for the best camera angle. Additionally, consider using silicone for weatherproofing, especially if your door is in a moisture-prone area. With these materials in hand, you're ready to move forward with your Ring doorbell installation, making sure it's done correctly and securely.

Blink Video Doorbell (newest model) – Head-to-toe HD view, two-year battery life, and simple setup. Sync Module Core included – System (Black)
Video Doorbell is our second-generation smart security doorbell with up to two years of battery life, an expanded...
As an affiliate, we earn on qualifying purchases.
Step-by-Step Installation Guide

Now that you have your tools ready, let's get into the step-by-step installation process.
You'll learn about the different mounting techniques to guarantee your Ring Doorbell is secure and functional.
To enhance your home with a touch of rustic charm, consider incorporating elements like a farmhouse front door that can complement your doorbell setup.
Follow these instructions carefully to achieve a successful setup.
Installation Tools Needed
To successfully fit your Ring Doorbell, you'll need a few essential tools, including a screwdriver, drill, level, and a hammer, along with the installation kit that contains T6 screws and a mounting bracket. Having the right installation tools needed is vital for a smooth process when installing a Ring Doorbell.
Additionally, making sure that your doorbell is installed correctly can improve its functionality and longevity, especially if you consider well-draining soil for plants nearby that may need watering.
Here's a quick list of the tools you'll want to gather:
- Screwdriver: For securing screws into the door.
- Drill: Optional, but useful if you prefer using screws.
- Level: To make certain your Doorbell on the wall is straight.
- Pencil: For marking installation height.
Before you start, consider a no-drill mount if you want to avoid any damage to your composite door.
Make sure to mark the desired installation height, ideally around 48 inches from the ground. If you choose screws, use self-tapping screws suitable for composite materials, making sure they're tightened well to prevent wobbling.
Following these steps will help you prepare for the next phase of your installation.
Mounting Techniques Explained
With your tools ready and installation height marked, you're set to explore effective mounting techniques for your Ring Doorbell. Start by choosing the right method for your composite door. Do you have a solid or hollow core door? Solid doors usually require a professional to install the doorbell, as it may be difficult to do it yourself. However, if you have a hollow core door, you can typically use anchors and screws to mount the doorbell. If you need a replacement ring doorbell, be sure to follow the same mounting techniques to ensure it is secure and functions properly.
If drilling is an option, use self-tapping screws that are appropriately sized to guarantee secure attachment without damaging the door material. Aim for a height of about 48 inches from the ground for ideal camera view.
For those looking to enhance their home's security, integrating a Ring Doorbell can be an essential part of your overall home maintenance strategy, especially DIY Kitchen Wall Decor that adds personal flair.
If you prefer a no-drill solution, consider a no-drill mount with double-sided adhesive specifically designed for the weight and dimensions of the Ring Doorbell. Before applying the adhesive, make certain to clean the surface of your composite door thoroughly. This step enhances bonding and prevents future peeling.
Once you've secured the Ring Doorbell, it's vital to test its functionality. Check the video feed to confirm it's working properly and verify that the motion detection is correctly set up.

Arlo Video Doorbell 2K (2nd Gen, Latest Release), Wireless or Wired Option, 2-Way Audio, Night Vision, Head to Toe Video View, Package Detection, Person & Vehicle Recognition, 1-Month Secure Plan
Reliable Indoor & Outdoor Video Doorbell Wired/Wireless: Watch, listen and talk. Monitor your home, property and keep your...
As an affiliate, we earn on qualifying purchases.
Troubleshooting Common Issues

Troubleshooting common issues with your Ring Doorbell can often lead to quick fixes that restore its functionality. If your device is acting up after installation, here are some steps to ponder:
- Check Wi-Fi connectivity: Make sure your Ring is connected to a stable network. Poor connectivity can cause it to be unresponsive.
- Inspect the battery: For battery-operated models, verify the battery is fully charged and correctly inserted. A low battery may lead to problems.
- Review installation: Double-check the installation instructions to confirm all components are securely attached and the doorbell is at the recommended height of around 48 inches.
- Reset the device: If issues persist, try resetting your Ring by pressing and holding the setup button for at least 15 seconds. This restores factory settings.
User Experiences and Tips

Many users have shared their experiences and tips for installing Ring Doorbells on composite doors, highlighting both challenges and effective solutions.
One key takeaway is the importance of using self-tapping screws for doorbell installation. Many have found that adhesive solutions often fail to hold securely on composite surfaces, leading to frustration.
Make sure to check the installation kit for compatibility with your door's materials, as specialized equipment may be necessary for a proper fit.
User experiences also emphasize the significance of the installation height. Adjusting the doorbell to around 48 inches can enhance the camera's field of view, making it more effective in capturing activity at your entrance.
If you're facing difficulties, engaging with the Ring community can be incredibly valuable. Many users have shared insights and tips that can help you overcome common hurdles associated with installing on a uPVC frame.
Lastly, don't hesitate to reach out for support if needed. With the right approach, you'll find that fitting a Ring Doorbell to your composite door can be a straightforward process. Happy installing! If you are unsure of how to install the Ring Doorbell, there are plenty of resources available to guide you through the process. You can find step-by-step installation guides on the Ring website, as well as instructional videos on platforms like YouTube. Don’t be afraid to seek out these resources to ensure that your installation is successful. How to install ring doorbell is a common search query, so you are definitely not alone in wanting some extra guidance.
Safety and Security Considerations

Installing a Ring Doorbell on a composite door requires careful attention to safety and security to protect both your investment and your home. To guarantee a successful installation, keep these considerations in mind:
- Use self-tapping screws or specialized adhesive solutions to secure the doorbell without damaging the door's integrity.
- Choose a mounting position that allows for ideal camera visibility while complying with local privacy regulations.
- Regularly check and update the doorbell's security features, including software and privacy settings, to maintain robust home security.
- If needed, consider a wedge mount to adjust the angle for better motion detection and video clarity.
Community Support and Engagement

Engaging with the Ring Community can provide you with valuable insights and shared experiences that make fitting your Ring Doorbell to composite doors easier and more effective. By creating a Ring account, you gain access to a wealth of community support focused on installation challenges and solutions.
In the community, you can browse numerous discussions where users share their installation experiences specific to composite doors. You'll find tips on the best mounting techniques and the types of screws or anchors that work best. These discussions often highlight common pitfalls and how to avoid them, empowering you to tackle your installation with confidence.
Moreover, connecting with other users can introduce you to innovative methods or products that enhance the overall functionality of your Ring Doorbell. You might discover new ways to securely install your device that you hadn't considered before.
Alternative Installation Options

Exploring alternative installation options for your Ring Doorbell can enhance your experience, especially if traditional methods aren't suitable for your composite door. Here are some effective methods to take into account: For instance, using a no-drill mount can be a great solution for renters or those who don’t want to damage their door. Additionally, outdoor adhesive strips or specialized mounts can securely fix Ring Doorbell on composite door surfaces without compromising the door’s integrity. Be sure to choose an option that provides a firm hold while ensuring easy removal if necessary. Another option is to use a wedge or corner kit, which allows you to adjust the viewing angle of the doorbell for better motion detection and overall visibility. To ensure a smooth and proper installation, research **how to install a Ring Doorbell** based on your specific door material, as installation techniques can vary. By carefully selecting the right method, you can securely mount your Ring Doorbell without causing any permanent alterations to your composite door.
- Self-tapping screws: These can securely attach your doorbell without needing to pre-drill pilot holes.
- No-drill mount: If you'd rather not drill, a no-drill mount with double-sided adhesive is a great choice. Just make sure the adhesive is outdoor-rated and compatible with your composite door.
- Mounting bracket: Using a mounting bracket allows you to adjust the angle for better visibility, ensuring your camera and motion sensors work effectively.
- Height placement: Aim to install the doorbell approximately 48 inches from the ground for ideal line of sight.
Frequently Asked Questions
Can I Attach a Ring Doorbell to a Composite Door?
Yes, you can attach a Ring Doorbell to a composite door.
You'll want to choose the right installation method, like adhesive mounts for flat surfaces or self-tapping screws if your door allows it.
Make certain to clean the area before applying any adhesive to guarantee a strong bond.
For the best camera view, install it about 48 inches from the ground.
Always check your installation kit for any specific tools or components needed.
How to Attach Ring Doorbell to Plastic Door?
To attach your Ring Doorbell to a plastic door, start with the no-drill mount included in the box.
Make certain you press it firmly for two minutes to guarantee it sticks well.
Position the doorbell at about 48 inches off the ground for the best view.
If you prefer screws, use self-tapping ones to avoid pilot holes.
Clean the surface beforehand for better adhesion, and consider silicone for added support in colder weather.
How Do You Attach a Ring Doorbell to a Door Without Drilling?
To attach a Ring Doorbell to a door without drilling, you'll want to use the no-drill mount that comes in the box.
Start by cleaning the door surface thoroughly to guarantee a strong bond.
Position the mount about 48 inches from the ground for the best camera view.
Firmly press the adhesive mount against the door for two minutes before attaching the Ring unit.
When it's time to remove it, pull the adhesive strips gently to avoid damage.
How to Attach a Ring Doorbell to the Front Door?
So, you want to attach a Ring Doorbell to your front door? That's a shocker!
First, gather your tools and follow the instructions.
Mark the height at about 48 inches for ideal viewing.
If you're feeling adventurous, use self-tapping screws for an easy install.
After you've securely mounted it, connect the doorbell to the Ring app.
Who knew home security could be this straightforward?
Enjoy watching your visitors without even opening the door!
Conclusion
Fitting your Ring doorbell to a composite door can feel as satisfying as solving a tricky puzzle.
By following the steps outlined, you'll not only enhance your home's security but also enjoy the convenience of modern technology at your fingertips.
Remember, if you run into any bumps along the way, troubleshooting and community support can help ease the process.
So, grab your tools and get started—your doorbell will be up and running in no time!