Setting up your Ring Doorbell is a straightforward process. Begin by collecting your tools from the kit and allowing the battery to charge for 4-6 hours. Prior to installation, ensure to turn off the power at the breaker box for safety precautions and then remove your old doorbell. Install the new Ring Doorbell by aligning it with the previous screw holes, double-checking that it is level before drilling. Follow the wiring instructions, being mindful of turning off the power, and remember to include the diode if you have a digital chime. Lastly, download the Ring app on your smartphone to personalize your settings and receive notifications. There is much more to discover about enhancing your setup!
Key Takeaways
- Charge the Ring Doorbell battery for 4-6 hours until the green light indicates a full charge before installation.
- Carefully remove the old doorbell, ensuring to keep the wiring intact and avoid damage.
- Mount the new Ring Doorbell by leveling the bracket and marking screw holes before drilling.
- Connect the existing wiring to the new doorbell, ensuring power is off and using a diode if necessary.

Ring Spare Parts Kit for Video Doorbell (2nd Generation)
Replace any lost or misplaced parts for your Ring Video Doorbell (2nd Generation).
As an affiliate, we earn on qualifying purchases.
As an affiliate, we earn on qualifying purchases.
Installation Preparation
Before you begin installation, gather all the tools from your Ring doorbell kit and make sure the battery is fully charged for peak performance. This includes screws, a screwdriver, and a charging cable. If you're using a battery-operated Ring doorbell, charge the battery for four to six hours until the green light indicates a full charge. It's also wise to reflect on your doorbell placement in relation to the surrounding decor, making sure it complements your home's style, much like choosing the perfect farmhouse sink can enhance a kitchen's aesthetic.
Next, confirm your safety by shutting off power to the existing doorbell at the breaker box. This step is vital to avoid any electrical hazards during the installation. If you're replacing an old doorbell, carefully remove it by unscrewing and detaching the power wires without damaging anything.
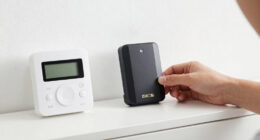
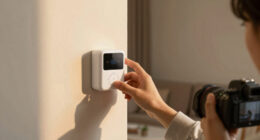
Now, it's time for installation preparation. Use a pencil to mark screw hole locations for the mounting bracket. This will guarantee a secure fit when you install your Ring. Before you drill, check the alignment for the video angle using the Ring app. This way, you'll capture the best view of your entryway.

Ring Battery Doorbell, Home or business security with Head-to-Toe video, Live View with Two-Way Talk, and Motion Detection & Alerts, Satin Nickel
See more at your home or business — Get 66% more vertical coverage with the latest version of…
As an affiliate, we earn on qualifying purchases.
As an affiliate, we earn on qualifying purchases.
Removing the Old Doorbell

Now that you've prepared for installation, it's time to remove the old doorbell to make way for your new Ring Doorbell. Follow these steps to guarantee a smooth changeover while keeping everything intact. It's important to be cautious during this process, as damaging the wiring can lead to issues later on, just like how proper equipment is essential for maintaining a clean home, as highlighted in what to look for in a home cleaning service.
- Detach the Faceplate: Use a screwdriver or box cutter to carefully detach the faceplate. This exposes the screws holding the old doorbell in place.
- Unscrew the Old Doorbell: Carefully unscrew the old doorbell from the wall, paying close attention to avoid damaging the power wires connected to it.
- Remove the Power Wires: Gently pull out the old doorbell, ensuring the wires remain intact. Loosen the screws that secure the power wires and detach them completely.

Video Doorbell Key Removal Tool Compatible with Ring Battery Doorbell 2024 Release, Wired Doorbell Pro (N ewest Model), Wired Doorbell Plus (N ewest Model) 2PACK
COMPATIBILITY: compatible with Ring Battery Doorbell 2024 Release,Compatible with Wired Doorbell Pro (Newest Model), Wired Doorbell Plus (Newest…
As an affiliate, we earn on qualifying purchases.
As an affiliate, we earn on qualifying purchases.
Mounting the New Doorbell

To mount your new Ring Doorbell, position it over the hole left by the old doorbell, ensuring it's aligned for the best viewing angle using the Ring app. Once you've found the ideal viewing angle, use a pencil to mark the screw hole locations on the wall. Make sure the mounting bracket is level and straight before drilling.
| Surface Type | Required Tools | Additional Steps |
|---|---|---|
| Brick or Stucco | Masonry bit, anchors | Create pilot holes |
| Wood or Vinyl | Standard drill | Typically no anchors |
| All Surfaces | Screwdriver | Attach doorbell wires |
For brick or stucco surfaces, use a masonry bit for drilling holes and install anchors. For wood or vinyl, you usually won't need anchors. Attach the doorbell wires to the mounting bracket by loosening the screws, wrapping the wires around, and ensuring they don't touch each other for safety. Finally, press down firmly on the Ring Video Doorbell until you hear a click, confirming it's securely in place.

KIMILAR Anti-Theft Video Doorbell Mount Compatible with Ring/Blink Wireless Video Doorbell, Adjustable Mounting Bracket Accessories for Houses, Apartments, Businesses, Not for Blink 2nd Gen
Anti-theft Design: By a group of excellent designers racking their brains to design the anti-theft doorbell bracket, with…
As an affiliate, we earn on qualifying purchases.
As an affiliate, we earn on qualifying purchases.
Connecting to Power

It's vital to guarantee power is disconnected at the breaker before you start connecting the Ring Doorbell to existing wiring. This step safeguards your safety during the installation process.
The Ring Doorbell requires a compatible power supply of 8 to 24 VAC, so avoid connecting it to DC transformers or lighting transformers.
Additionally, maintaining clean air in your environment can enhance overall well-being, making it easier to focus on tasks like installation air purifiers can help.
Here's what you need to do:
- Prepare the Wires: Loosen the screws on the mounting bracket. Wrap the existing wiring around the screws, making sure the wires don't touch each other to maintain safety.
- Add a Diode: If you're using a digital chime, remember to include a diode as instructed. This prevents any damage to your device during operation.
- Restore Power: Once your connections are secure, go back to the circuit breaker and restore power.
After that, test the Ring Doorbell to verify its functionality. Following these steps guarantees a safe and effective installation, allowing your new doorbell to operate as intended.
Configuring the Ring App

Configuring the Ring app is vital for setting up your Ring Doorbell and managing its features effectively.
Start by downloading the Ring app from the App Store or Google Play. If you don't have an account, create one, or simply log in to your existing account. Once you're in, follow the in-app instructions to set up a device. Select "Set Up a Device" and choose your Ring Doorbell from the list.
Next, connect your Ring Doorbell to your Wi-Fi network. Select your network and enter the password when prompted. This step is essential for guaranteeing your doorbell operates smoothly.
After connecting, customize your notification preferences in the app settings. This allows you to receive alerts for motion detection or when someone rings the doorbell, keeping you informed in real-time.
Lastly, don't forget to regularly check for app updates. Keeping the Ring app updated guarantees you have the latest features and security enhancements for peak performance of your Ring Doorbell.
Frequently Asked Questions
How Do You Set up a Ring Doorbell for the First Time?
To set up your Ring Doorbell for the first time, start by charging its built-in battery for 4 to 6 hours using the orange cable.
Once charged, turn off the power at the breaker for safety.
Use the Ring app to connect it to your Wi-Fi.
Mount the doorbell about four feet high, secure it with screws, and finally, restore power to test its functionality and customize settings.
How Do You Install a Ring Doorbell by Yourself?
Installing a Ring Doorbell by yourself can feel like assembling a piece of modern art.
First, charge the battery for about 4 to 6 hours.
Next, turn off the power and remove the old doorbell.
Position the mounting bracket at about four feet, mark the screw holes, and drill as needed.
Connect the wires, snap the doorbell into place, restore power, and test it with the app.
You've just upgraded your home's security!
How Do You Set up a Second Hand Ring Doorbell?
To set up a second-hand Ring Doorbell, first, make sure the previous owner's removed it from their account.
Charge the battery for 4 to 6 hours using the orange cable.
Next, download the Ring app and log into your account.
Follow the in-app instructions to put the doorbell in setup mode by pressing the setup button until the light flashes, then connect it to your Wi-Fi network for full functionality.
How Do I Set up an Existing Ring Doorbell?
To set up your existing Ring Doorbell, start by ensuring it's charged or hardwired. If necessary, turn off the power at the breaker.
Open the Ring app to log in or create an account, then select "Set Up a Device" and choose your model.
Follow the prompts to connect to your Wi-Fi, making sure you're near your router.
Conclusion
Once you've got your Ring Doorbell set up, you'll be part of the 30% of homeowners who've upgraded to a smart doorbell, enhancing security and convenience.
You'll love the peace of mind it brings, letting you monitor your front door from anywhere.
Plus, with easy access to video footage, you won't miss a thing.
So, enjoy your new device, and remember to explore all its features to get the most out of your investment!