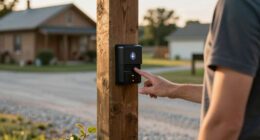
You can easily fix your Ring Doorbell without screws by using a no-drill mount with strong double-sided adhesive, perfect for renters or temporary setups. First, clean the surface with isopropyl alcohol to guarantee ideal adhesion. After the surface dries, press the mount firmly against the wall for several minutes. Allow the adhesive to set for a few hours before attaching the doorbell. Make sure everything's aligned and level for the best results. Remember to periodically check the mount for stability. If you want to explore more installation tips and alternatives, there's plenty to discover next.
Key Takeaways
- Use a No-Drill Mount with strong double-sided adhesive for a screw-free installation, ideal for renters and temporary situations.
- Ensure the surface is clean and dry before installation to enhance the adhesive bond and ensure optimal grip.
- Press the No-Drill Mount firmly against the wall for several minutes and allow the adhesive to set for a few hours.
- Regularly check the mount for secure attachment, especially after severe weather, and clean the surface every few months.

Ring Alarm 14-Piece Kit (newest model), Wireless smart home or business security system, expandable, easy setup, Mobile App Control, 24/7 Professional Monitoring, Alexa Compatible
A great fit for 2-4 bedroom homes, this Alarm Kit includes one Base Station, two Keypads, eight Contact...
As an affiliate, we earn on qualifying purchases.
Overview of No-Drill Options
If you're looking for a hassle-free way to install your Ring Video Doorbell without damaging your walls, the No-Drill Mount is an excellent option.
Designed specifically for the Ring Video Doorbell (2nd Generation), this mount utilizes a strong double-sided adhesive, allowing you to set it up without any screws. This is particularly beneficial if you're renting or in a temporary living situation, as it preserves the integrity of your walls by avoiding holes.
Additionally, the No-Drill Mount is similar to user-friendly options found in family-friendly environments at indoor water parks, where convenience and ease of use are prioritized.
Measuring 12.8cm x 6.2cm, the No-Drill Mount works best on even, smooth surfaces to guarantee prime adhesion.
The adhesive is waterproof and can withstand various weather conditions, making it durable and reliable for outdoor use. Plus, if you ever need to reposition your doorbell, the mount includes extra adhesive strips for easy reinstallation.
With the No-Drill Mount, you can enjoy the convenience of your Ring Video Doorbell without the stress of traditional installation methods.
This solution not only simplifies the process but also keeps your walls looking pristine.

Ring Alarm 8-Piece Kit (newest model), Home or business security system with optional 24/7 professional monitoring
A great fit for 1-2 bedroom homes, this kit includes one base station, one keypad, four contact sensors,...
As an affiliate, we earn on qualifying purchases.
Preparing the Installation Surface

Before you install your Ring Doorbell, make certain the surface is clean and dry.
A smooth, even surface like painted drywall or smooth wood works best for the adhesive.
To guarantee the best adhesion, you might consider using a home cleaning service to properly clean the area beforehand.
Avoid rough or porous materials to guarantee a strong hold and ideal performance.
Surface Cleaning Importance
Cleaning the installation surface is essential for guaranteeing the No-Drill Mount adheres properly and stays secure over time. When you take the time to do effective surface cleaning, you set the stage for a strong bond between the adhesive tape and the wall.
Additionally, maintaining good indoor air quality is important for your health, as air purifiers greatly improve indoor air by reducing allergens and harmful particles.
Here are some key steps to keep in mind:
- Use Isopropyl Alcohol: This effectively removes oils and grime.
- Mild Cleaning Solution: For general dirt, a gentle solution will do.
- Check for Moisture: Confirm the surface is completely dry before applying the mount.
- Smooth Surfaces Only: Aim for even surfaces to maximize adhesion.
Surface Type Considerations
Choosing the right surface type is essential for guaranteeing that your Ring No-Drill Mount adheres properly and functions effectively. You'll want to focus on even and smooth surfaces, as these allow for ideal adhesion of the adhesive tape used in the mount. Before installation, make sure to clean the surface thoroughly to remove any dust or grease that could hinder the adhesive's grip.
Here's a quick reference table to guide you:
| Surface Type | Suitability | Notes |
|---|---|---|
| Painted Walls | Excellent | Provides even and smooth surfaces. |
| Drywall | Good | Ensure it's clean and dry. |
| Glass | Poor | Adhesive may not bond securely. |
| Textured Surfaces | Poor | Reduces adhesive effectiveness. |
| Shingles | Not Recommended | Adhesive won't adhere properly. |
Avoid using the No-Drill Mount on surfaces like shingles or rough stucco. Remember, the adhesive is waterproof, making it suitable for outdoor use, but always check the surface texture for the best results.

tolviviov Alarm System for Home Security, Door Alarm Systems, App Alerts, 15Piece Kit, No Monthly fee, WiFi Alarm, Door Window Motion Sensor, for Home Security and Kids Safety
Control your home security system with ease using the app remote control feature, giving you peace of mind...
As an affiliate, we earn on qualifying purchases.
Step-by-Step Installation Guide

Start by thoroughly cleaning the wall surface to confirm the No-Drill Mount adheres properly. This guarantees ideal adhesion for your installation.
It's also helpful to reflect on the importance of user consent in any home security setup, as it assures privacy and compliance.
Next, follow these steps for a successful setup of your Ring Video Doorbell:
- Firmly press the No-Drill Mount against the wall for several minutes. This activates the double-sided adhesive tape.
- Allow the adhesive to set for at least a few hours. Patience here is key for a secure hold.
- Attach the Ring Video Doorbell to the mounted plate. Make sure it fits snugly and securely.
- Tighten the doorbell without using any screws in the wall. This method is convenient and efficient.

eufy Security Video Doorbell, No Subscription, Dual Cameras, 2K FHD,Head-to-Toe View, Doorbell Camera Wireless & Wired, Color Night Vision, Two-Way Talk, AI Motion/Package Detection, Built-in 8GB
𝐃𝐮𝐚𝐥 𝐂𝐚𝐦𝐞𝐫𝐚𝐬, 𝐃𝐨𝐮𝐛𝐥𝐞 𝐒𝐞𝐜𝐮𝐫𝐢𝐭𝐲 | Dual cameras work seamlessly together. The front camera captures visitors head-to-toe, while the...
As an affiliate, we earn on qualifying purchases.
Recommended Adhesive Products

When it comes to securing your Ring Video Doorbell, selecting the right adhesive product is essential for ensuring a reliable installation. The Ring No-Drill Mount is specifically designed with double-sided adhesive tape that provides a tool-free method for mounting. This adhesive is waterproof, allowing your doorbell to stay securely attached in various weather conditions.
To enhance the bond on smooth surfaces, you might also consider using additional products like Gorilla Tape. Just remember, the adhesive used in the No-Drill Mount is a one-time use product, so placement is vital.
Here's a quick comparison of recommended adhesive products:
| Product | Key Features |
|---|---|
| Ring No-Drill Mount | Double-sided, waterproof, tool-free installation |
| Gorilla Tape | Strong bond, ideal for smooth surfaces |
| Command Strips | Removable, damage-free, versatile |
| 3M VHB Tape | Heavy-duty, excellent for outdoor use |
Ensuring Proper Alignment

Proper alignment of your Ring No-Drill Mount is key to guaranteeing your doorbell functions efficiently and looks great on your wall. To achieve this, follow these essential steps:
- Use a Level Tool: Always check that your No-Drill Mount is straight before applying the adhesive. Guaranteeing the mount is level not only enhances its appearance but also contributes to the overall functionality and effectiveness of the doorbell, similar to how <a target="_blank" href="https://2minutesread.com">personal attributes linked to signs may enhance overall allure</a>.
- Measure Height: Determine the desired height for the doorbell from the ground and mark it on the wall to guarantee accurate placement.
- Clean the Surface: Make sure the wall is clean and free of debris, as this helps facilitate proper alignment and adhesion.
- Allow Adhesive to Set: After installing the mount, wait a few hours before attaching the Ring Doorbell to guarantee stability and alignment.
Troubleshooting Common Issues

If you're running into problems with your Ring Doorbell, it's important to pinpoint the issue quickly to get everything back on track.
Start by checking if your No-Drill Mount is securely attached. If the doorbell has detached, remove the mount and let the adhesive set for a few hours before trying again. Make certain you apply firm pressure during installation to enhance adhesion.
Additionally, just like achieving an even finish in painting, ascertain that the surface you're mounting on is clean and smooth to maximize adhesion optimal use and cleanup.
If your doorbell isn't functioning properly, confirm that it's still firmly attached to the mount. Sometimes, the adhesive may fail, especially in extreme weather conditions. To improve stability, consider using additional adhesive, like Gorilla Tape, along with the provided strips.
Regularly inspect the attachment of your No-Drill Mount, particularly after severe weather events. A smooth and clean wall surface is essential for maximum adhesion; rough or textured surfaces can compromise the mounting effectiveness.
Evaluating Surface Compatibility

When you're installing your Ring Doorbell, it's essential to evaluate the surface you're working with.
Ideal surfaces, like smooth painted drywall, guarantee better adhesion, while rough or porous materials can compromise stability.
Properly preparing the surface by cleaning it will also enhance the bond and prevent future issues.
Ideal Surface Types
Evaluating the surface compatibility for your Ring Doorbell is essential to guarantee a secure and lasting installation.
Using the No-Drill Mount, you can easily avoid screws, but it's vital to choose ideal surface types for maximum adhesion. Here's what works best:
- Smooth, even surfaces: Painted drywall or smooth wood are perfect for the No-Drill Mount.
- Clean surfaces: Make sure to clean the area before applying adhesive tape for better bonding.
- Water-resistant surfaces: Since the adhesive is waterproof, it performs well in various weather conditions when applied correctly.
- Avoid textured surfaces: Materials like brick, stucco, or shingles can hinder the adhesive's grip.
Surface Preparation Importance
Proper surface preparation is essential for ensuring that your Ring Doorbell's No-Drill Mount adheres securely and lasts through various weather conditions.
To achieve ideal adhesion, you need to focus on the condition of the wall surface. Smooth surfaces are perfect for the double-sided adhesive, as they enhance the effectiveness of the adhesive bond.
Before you install the mount, take the time to thoroughly clean the wall. Remove any dust, dirt, or grease that could compromise the adhesive bond. A clean and dry surface is vital, especially since the adhesive is waterproof but requires proper preparation for durability outdoors.
Keep in mind that the No-Drill Mount isn't effective on textured materials like brick, stucco, or shingles. Evaluating the wall's condition before application helps you avoid potential issues with adhesion failure, especially in variable weather conditions.
Maintenance and Checks

Regular maintenance of your Ring doorbell guarantees it stays securely mounted and functions properly over time. By regularly checking and caring for your device, you can prevent issues before they arise. Here are some essential maintenance tips:
- Check the adhesive mount: Look for any signs of loosening or detachment, especially after extreme weather.
- Clean the wall surface: Do this at least once every few months to maintain ideal adhesion and prevent dirt buildup.
- Perform a visual inspection: Verify the doorbell is functioning properly and that the camera lens is free from obstructions or dirt.
- Reapply adhesive strips as needed: If the mount loses grip, consider using a new adhesive strip from the extra set provided.
Customer Experiences and Reviews

Many users praise the Ring No-Drill Mount for its simple installation process, often highlighting how easily they set it up without tools or screws. Customer experiences reveal that the adhesive tape included with the No-Drill Mount can be effective, especially when applied to clean surfaces with proper pressure. However, some users faced challenges that typically stemmed from surface conditions.
| User Type | Experience |
|---|---|
| Renters | Love it for easy removal without damage |
| Homeowners | Appreciate the convenience of no screws |
| Weather Areas | Recommend additional adhesive for security |
| General Feedback | Mixed results based on wall surfaces |
Alternatives to No-Drill Methods

If you're looking for ways to install your Ring Doorbell without drilling, several effective alternatives can help you achieve a secure setup. These methods are particularly useful for renters or anyone wanting a temporary solution. Here are some great options:
- Adjustable Mounting Bracket: This No-Drill Mount can hold your doorbell securely on various surfaces without the need for screws.
- Adhesive Tape: Use industrial-strength Velcro or removable putty for a strong, temporary hold that allows for repositioning.
- Magnetic Doorbell Mount: If your doorbell model supports it, this option lets you attach and detach your doorbell quickly.
- Doorbell Hanging Hook: Suspend your doorbell from an existing structure like a porch or eave, providing a no-drill solution.
With these alternatives, you can confidently install your Ring Doorbell without any drilling, making it a hassle-free experience!
Frequently Asked Questions
Can You Mount a Ring Doorbell Without Screws?
Yes, you can definitely mount a Ring Doorbell without screws.
You'll just need the Ring No-Drill Mount, which uses strong double-sided adhesive for secure attachment.
It's designed for various models and requires no power tools—simply press it against a smooth surface.
The waterproof adhesive guarantees it withstands outdoor conditions, but remember it's a one-time use application and may not stick well to rough surfaces.
Enjoy hassle-free installation!
Can I Glue a Ring Doorbell?
Did you know that over 10 million Ring devices have been sold worldwide?
If you're wondering if you can glue a Ring Doorbell, it's not the best idea.
Glue mightn't securely hold it and could end up damaging both the device and your wall.
Instead, consider using the Ring No-Drill Mount with its strong, waterproof adhesive.
It's designed to keep your doorbell secure without the risk of damage.
How Do You Remove a Ring Doorbell Without a Security Screw?
To remove your Ring Doorbell without a security screw, gently pull it upwards to disengage it from the mounting bracket.
Apply even pressure to avoid damaging the doorbell or the adhesive. If it feels stuck, use a thin plastic card to carefully pry it away.
Once removed, detach the adhesive tape by pulling both ends upwards.
Always turn off the power for safety before you start the removal process.
Can You Mount a Ring Doorbell With Command Strips?
Imagine your Ring Doorbell dangling precariously from your wall, held only by flimsy Command strips. You might wonder if it's a viable option, but it's not the best choice.
Command strips can't support the device's weight and functionality. Instead, consider using the Ring No-Drill Mount, which features waterproof adhesive designed for security and stability.
Make certain the surface is clean for maximum adhesion, and your doorbell will stay put, rain or shine.
Conclusion
In summary, fixing your Ring doorbell without screws can be as seamless as sticking a stamp on an envelope.
Just like that stamp guarantees your message reaches its destination, using quality adhesive can secure your doorbell for years to come.
Remember to regularly check its alignment and surface compatibility, so you don't miss a visitor at your doorstep.
With a little care and the right products, your doorbell will be as reliable as your trusty mail carrier.