To charge your Ring Doorbell battery, start by checking your model. For the 1st and 2nd Generation, remove the unit to access the battery and use a micro-USB cable to charge it for about 5-10 hours. Newer models feature Quick Release Battery Packs, making charging easier. If your device is hardwired, it offers a trickle charge but will still need regular charging. Check your battery status in the Ring app to monitor and manage usage effectively. With a few more tips, you can maximize your battery's lifespan and performance.
Key Takeaways
- For 1st and 2nd Generation models, remove the unit to access the battery and charge using a micro-USB cable.
- Newer Ring Doorbell models feature Quick Release Battery Packs for easier charging without full unit removal.
- Charging typically takes between 5 to 10 hours; ensure you use a reliable power source for optimal performance.
- Monitor battery status through the Ring app under "Devices" to check charge percentage and ensure proper functionality.
Help Resources
For thorough help with charging your Ring doorbell, you can turn to the Ring Help Home, which offers detailed guidance tailored to various models. You'll find clear instructions on the charging procedures specific to your Ring Video Doorbell.
If you own the 1st or 2nd Generation model, you'll need to remove the entire unit to connect a micro-USB cable for charging. Additionally, the presence of security systems, such as those from Ring, enhances home safety and peace of mind, as noted in community feedback on the value of home security systems.
For other models, simply unscrew the faceplate to access the battery and plug in the micro-USB cable. The indicator lights will show the charging status, so you'll know when it's ready to go.
Additionally, you can browse installation articles that guide you through the setup process or troubleshoot any issues you might encounter during battery charging.
If you have questions that the articles don't answer, customer support is readily available to assist you with battery maintenance and any other inquiries.
Charging Procedures
Charging your Ring doorbell battery is a straightforward process that varies slightly depending on the model you own. Most Ring doorbells come with a removable battery that can be easily charged using a micro-USB cable. To learn **how to charge Ring doorbell**, you typically need to remove the device from its mounting bracket, connect it to a power source, and wait for the battery to reach full charge. Once fully charged, reattach the battery or the entire unit, depending on the specific model.
First, if you have a 1st or 2nd Generation Ring Doorbell, you'll need to remove the entire unit to access the battery. Once you've done that, connect a common micro-USB cable to the battery and plug it into a power source. Expect a charging time of 5-10 hours, depending on the source's power. For enhanced air quality while waiting for your device to charge, consider using air purifiers to enhance indoor air in your home.
If your Ring model features Quick Release Battery Packs, the process is even simpler. Just unscrew the faceplate, pop out the battery, and use the micro-USB cable to charge it.
For hardwired devices, they receive a trickle charge, but keep in mind that you'll still need to charge the battery periodically to maintain peak performance.
As you charge, pay attention to the battery status indicated by the LED lights. A lit blue LED means the battery is fully charged, while red and green lights show that charging is in progress. Following these charging procedures will guarantee your Ring doorbell remains functional and reliable.
Battery Charging by Model

Understanding the specific charging methods for each Ring doorbell model guarantees you keep your device powered and ready for use.
For the 1st and 2nd Generation Ring Doorbells, you'll need to remove the entire unit to charge the battery using a micro-USB cable. This process usually takes about 5-10 hours for a fully charged battery. It's important to verify that the charging environment is quiet and free from distractions, as this aligns with creating a serene workspace, akin to Cottagecore home office inspiration.
On the other hand, newer Ring models come equipped with a Quick Release Battery Pack, allowing you to access the battery easily by unscrewing the faceplate instead of taking out the whole device. When charging, pay attention to the LED light; a lit blue light indicates your battery is fully charged, while red and green lights show the charging status.
If your Ring Doorbell is hardwired, remember that it might still require charging. Hardwired devices provide only a trickle charge, so you'll need to charge the battery separately to verify it's at full capacity. After charging, make sure to securely reinstall the battery to reset the battery percentage and maintain peak performance.
Checking Battery Status
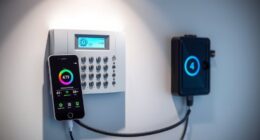
After confirming your Ring Doorbell is charged, checking the battery status is straightforward and can be done easily through the Ring app.
Start by opening the app and directing yourself to the menu. Select "Devices" and choose your specific doorbell. You'll find the battery level displayed under the "Power Settings" section, which indicates the current charge percentage.
Regularly monitoring battery status is essential, as it allows you to identify patterns of fast-draining batteries, similar to how AI analytics improve resource management in various applications.
To better manage your device's energy consumption, you can use the "Power Usage" feature within the app. This shows which specific features are consuming battery power, helping you adjust settings to extend battery life.
After charging or reinstalling the battery, always check the app for an updated battery status. This confirms your Ring Doorbell is functioning correctly and helps you maintain peak performance.
Troubleshooting Tips

If you're facing battery issues with your Ring Doorbell, you're not alone.
Common problems can arise from a weak Wi-Fi connection or improper battery installation, both of which can affect performance.
Additionally, ensuring that your device is securely mounted and free from obstructions can enhance functionality, much like how modern technology in garage door openers improves home security.
Let's explore some troubleshooting tips to help you resolve these issues quickly.
Common Battery Issues
Your Ring doorbell's battery can sometimes drain faster than expected, but there are several troubleshooting tips to help identify and resolve common issues.
First, check the Ring app for features that may consume excessive power, such as high motion sensitivity or frequent live view access. If you notice rapid battery drain, adjusting these settings can improve power efficiency. Additionally, consider the impact of home appliances on your overall energy consumption; for instance, energy-efficient devices can help reduce phantom load, indirectly benefiting your Ring doorbell's performance by guaranteeing a more stable power source energy consumption of appliances.
Next, verify the battery is correctly installed and secured. Improper installation can lead to connectivity issues and contribute to battery drain. Also, monitor your Wi-Fi connection strength; a weak signal forces your doorbell to work harder to maintain connectivity, which can deplete the battery more quickly.
Don't forget to regularly check for firmware updates in the Ring app. These updates often include enhancements that boost battery efficiency and overall performance.
If your battery still seems to drain unusually fast, try temporarily removing and reinstalling it. This simple step can reset the device and may resolve unexpected issues.
Wi-Fi Connection Impact
How does your Wi-Fi connection impact the performance of your Ring Doorbell? A stable Wi-Fi connection is crucial for your doorbell to receive live video feeds and notifications.
If your Wi-Fi signal strength is weak, you might experience connectivity issues, leading to delays or missed alerts. Effective clustering of your home network can also enhance the overall performance of connected devices.
To improve the Wi-Fi connection, make certain your router is close to the doorbell, minimizing interference from walls or other obstacles.
Using a 2.4 GHz network is often recommended over a 5 GHz network, as it offers better coverage and penetration through obstacles.
If you're still facing connectivity problems, consider using Wi-Fi extenders or mesh networks to enhance your coverage. This way, you'll maintain a strong signal for your Ring Doorbell, making sure it functions properly.
Power Management Solutions
Managing the power effectively for your Ring Doorbell can greatly enhance its performance and longevity. To guarantee your battery stays charged, use a common micro-USB cable connected to a reliable power source. Remember that the charging status is indicated by lights on your device: a solid blue LED shows a full charge, while red and green lights display different states.
Even if your Ring Doorbell is hardwired, it's crucial to recognize that it may only provide a trickle charge, which might not keep the battery fully charged. Regularly check your battery status via the Ring app to optimize battery life by adjusting settings that drain power.
Here's a quick reference table to help you manage your Ring Doorbell's power effectively:
| Action | Indicator Lights | Notes |
|---|---|---|
| Full Charge | Solid Blue | Battery is fully charged |
| Charging | Flashing Blue | Battery is currently charging |
| Low Battery | Flashing Red | Battery needs immediate attention |
| Trickle Charge | Solid Green | Hardwired but not fully charged |
| Check Status | Ring App | Monitor and optimize battery usage |
Frequently Asked Questions
How Do I Charge My Ring Doorbell Battery?
To charge your Ring Doorbell battery, you'll need a micro-USB cable.
First, remove the doorbell from the wall to access the battery.
Plug the cable into the battery and a power source; it usually takes 5-10 hours to fully charge.
Keep an eye on the indicator lights—red means it's charging, and green means it's ready.
Once charged, securely reinstall the battery and test the doorbell to guarantee everything's working properly.
What Are the Lights on the Ring Battery When Charging?
Have you ever wondered what those lights on your Ring battery really mean?
When you charge it, a red light shows the battery's charging, but if it blinks red, there's likely an issue.
Once fully charged, a solid green light appears, indicating readiness, while a brief blue LED flash signals completion.
Remember to unplug it after charging to prevent overcharging, which can shorten the battery's lifespan.
Keep an eye on those indicators!
Does the Ring Doorbell Need to Be Charged?
Yes, the Ring Doorbell does need to be charged if it operates on a battery.
Over time, the battery will deplete with regular use.
Depending on the model, you might need to remove it completely for charging or simply swap out the battery with a Quick Release Battery Pack.
Keep an eye on the battery status through the Ring app to guarantee it's always powered up and ready to go.
How Long Do Ring Doorbell Batteries Last?
You might worry about constantly recharging your device, but Ring Doorbell batteries typically last between 6 to 12 months.
This lifespan hinges on your usage patterns, like how often you check live view or receive motion alerts.
Environmental conditions, especially cold weather, can drain your battery faster.
Conclusion
So, there you have it! Charging your Ring doorbell's battery isn't rocket science—unless, of course, you forget where you left the charger.
Just remember to check the battery status regularly, or you might end up with a doorbell that's as useful as a chocolate teapot.
With a little care and attention, you can keep your home secure and your neighbors wondering why you're so obsessed with a device that just wants to be plugged in!