To attach your Ring doorbell to stucco, start by marking a height of 48 inches and ensuring there's no obstruction behind the wall. Use a power drill with a masonry bit to create pilot holes and insert plastic anchors. Secure the doorbell with screws and double-check with a level for straightness. Consider using molly fasteners for added support and apply construction adhesive for extra stability. Finish by sealing around the screws with silicone caulk to prevent moisture. If you want to explore more tips and tricks to make the process smoother, there's plenty more useful information ahead.
Key Takeaways
- Position the mounting plate 48 inches from the ground and mark the location before drilling.
- Use a power drill with a masonry bit to create pilot holes into the stucco.
- Secure the doorbell with plastic anchors and screws designed for stucco applications.
- Apply silicone caulk around screw holes to prevent moisture intrusion and ensure stability.

Ring Battery Doorbell, Home or business security with Head-to-Toe video, Live View with Two-Way Talk, and Motion Detection & Alerts, Satin Nickel
See more at your home or business — Get 66% more vertical coverage with the latest version of...
As an affiliate, we earn on qualifying purchases.
Preparing for Installation
Before you start the installation, take a moment to assess the stucco surface and check for any rigid foam insulation behind it, as this can affect your anchoring methods. If you find rigid foam, you'll need to adjust your approach to guarantee a secure fit for the doorbell.
It's also wise to take into account the environmental factors that may affect the longevity of your installation, as well as the importance of using quality tools for the job, which can enhance your overall experience with home projects like essential items for a home cleaning kit.
You'll want to position the mounting plate at a height of 48 inches from the ground, which is recommended for peak function.
Next, mark the position of the mounting plate on the stucco with a pencil. When you're ready, select the appropriate drill bit for the anchors you plan to use. If you're using molly fasteners, drill pilot holes to accommodate them properly. This step is vital, especially with rigid foam insulation, as it helps create a secure fit.
Make sure to check for any obstructions behind the stucco before drilling. This will help you avoid damaging any hidden wiring or plumbing.
Once you've prepared the area and confirmed it's clear, you can confidently move on to installing the doorbell. Remember, taking the time to prepare now will save you trouble later.

Arlo Video Doorbell 2K (2nd Gen, Latest Release), Wireless or Wired Option, 2-Way Audio, Night Vision, Head to Toe Video View, Package Detection, Person & Vehicle Recognition, 1-Month Secure Plan
Reliable Indoor & Outdoor Video Doorbell Wired/Wireless: Watch, listen and talk. Monitor your home, property and keep your...
As an affiliate, we earn on qualifying purchases.
Tools and Materials Needed
Before you start the installation, gather the right tools and materials to make the job easier.
You'll need a drill, screws, anchors, and a level, along with some recommended adhesives for added stability.
It's also helpful to reflect on the safety features of your doorbell to enhance home security.
Let's go over the essential checklist so you're fully prepared for a successful installation.
Tools Required for Installation
To successfully attach your Ring doorbell to stucco, you'll need a few essential tools and materials.
First and foremost, a power drill with a masonry bit is vital for drilling through the stucco to create secure pilot holes for the plastic anchors. These anchors, along with screws, usually come included with your Ring Video Doorbell package and are necessary for a firm attachment.
Additionally, guaranteeing a safe and stable environment during installation is important, as certain environmental factors can affect the performance of devices like doorbells; for instance, understanding toxicity to cats can help protect your pets if they're nearby during installation.
You'll also want to have a level tool on hand. This will help you verify that your doorbell is mounted straight and at the recommended height of 48 inches from the ground.
If the plastic anchors don't easily fit into the drilled holes, a hammer can be helpful for gently tapping them in.
While not mandatory, optional tools like a star-shaped screwdriver bit can assist in securing the faceplate of your Ring doorbell, making sure it's snug and secure.
If you plan to apply silicone caulk around the installation area for added weather resistance, a caulk gun will come in handy.
With these tools ready, you'll be well-equipped for a successful installation.
Essential Materials Checklist
Gathering the right materials is vital for a successful installation of your Ring doorbell on stucco. Start with a drill equipped with a masonry bit to create the necessary holes in the stucco surface.
You'll also need screws and anchors specifically designed for stucco applications to guarantee a secure fit. For those concerned about indoor air quality during installation, confirming good air circulation with an air purifier can be beneficial, especially if the work creates dust and debris improve indoor air quality.
A level tool is essential for making certain your doorbell is mounted straight and at the recommended height of 48 inches from the ground.
Don't forget a hammer, as you'll use it to tap in the plastic anchors that secure the mounting screws. For added security, have a star-shaped screwdriver bit on hand to tighten the provided security screw for the faceplate of your Ring doorbell.
Lastly, consider using liquid nails or a similar adhesive to fill any drilled holes. This will enhance the stability of your installation and improve the overall durability of your home improvement project.
With these materials ready, you'll be well-equipped to successfully attach your Ring doorbell to stucco, guaranteeing both functionality and security.
Recommended Adhesives and Anchors
When attaching your Ring doorbell to stucco, using the right adhesives and anchors is essential for ensuring a secure installation.
Exploring options that are both effective and environmentally conscious can enhance your project outcome, similar to the prioritization of sustainability in coffee sourcing seen in innovative coffee trends.
Here are some recommended materials to take into account:
- Liquid Nails for EIFS Systems: This adhesive is specially formulated to fill anchor holes without dissolving foam insulation, making it ideal for stucco.
- Construction Adhesive: Enhance the grip of your screws with construction adhesive. This additional layer of stability will help keep your Ring doorbell securely in place.
Always allow any adhesive to fully cure before attaching your Ring doorbell. This step is vital for a secure and stable installation.
Avoid using stucco patch for repairs, as it may not support the weight of the doorbell, leading to installation issues.
Following these recommendations can help you achieve a successful installation while adhering to your privacy policy.

eufy Security Video Doorbell, No Subscription, Dual Cameras, 2K FHD,Head-to-Toe View, Doorbell Camera Wireless & Wired, Color Night Vision, Two-Way Talk, AI Motion/Package Detection, Built-in 8GB
𝐃𝐮𝐚𝐥 𝐂𝐚𝐦𝐞𝐫𝐚𝐬, 𝐃𝐨𝐮𝐛𝐥𝐞 𝐒𝐞𝐜𝐮𝐫𝐢𝐭𝐲 | Dual cameras work seamlessly together. The front camera captures visitors head-to-toe, while the...
As an affiliate, we earn on qualifying purchases.
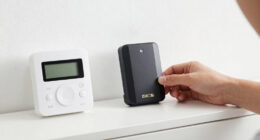
Step-by-Step Installation Process

Start by charging the provided battery with the Micro-USB cable until the orange light turns off. Once it's fully charged, insert the battery into the Video Doorbell 4 until it clicks into place.
For a seamless installation experience, consider creating a cozy environment that mirrors the calm of a modern farmhouse bedroom while you work.
Next, grab the included level tool and position the doorbell 48 inches from the ground. Use a pencil to mark the mounting hole positions.
Now, it's time to drill pilot holes into the stucco. Make sure to use the provided plastic anchors, embedding them securely to support the weight of the doorbell.
After that, slot your chosen faceplate into the top of the Video Doorbell 4 and click it into place. Secure the faceplate using the provided security screw and the star-shaped screwdriver bit.

Blink Video Doorbell (newest model) – Head-to-toe HD view, two-year battery life, and simple setup. Sync Module Core included – System (Black)
Video Doorbell is our second-generation smart security doorbell with up to two years of battery life, an expanded...
As an affiliate, we earn on qualifying purchases.
Mounting Considerations for Stucco
When you're mounting your Ring doorbell to stucco, evaluating anchor stability is key to a secure installation.
It's also important to take into account the impact of environmental factors, such as temperature fluctuations that can affect the adhesive's performance.
You'll need to choose the right adhesive and take into account weatherproofing techniques to protect your device from the elements, especially since heat pump performance can be strained by extreme weather.
Anchor Stability Assessment
Evaluating anchor stability is crucial for guaranteeing your Ring Doorbell remains securely mounted on stucco, so drilling pilot holes to check the core material behind the surface is essential. This process helps you identify if there's solid backing, like plywood, to support your installation.
It's important to verify that the installation area is free from any environmental factors that might weaken the fixture, such as strong scents that deter cats, which could indirectly affect the stability of outdoor setups.
Here are some key considerations for anchor stability:
- Use the Right Anchors: Opt for molly fasteners, as they expand behind the wall and provide better support than standard screws.
- Check Anchor Tightness: Regularly inspect the anchors, since the doorbell's movement can cause them to loosen over time.
Avoid using ready-mix stucco patches for securing anchors, as they often lack the firmness needed and can jeopardize the installation's integrity.
Adhesive Selection Guidelines
Choosing the right adhesive is vital for securely mounting your Ring Doorbell to stucco, guaranteeing it withstands outdoor conditions without compromising the material's integrity. Here are some guidelines for selecting the most suitable adhesives:
| Adhesive Type | Notes |
|---|---|
| Construction Adhesive | Provides strong support and enhances screw grip. |
| Liquid Nails | Ideal for filling holes before using anchors; strong bond. |
| Stucco Patch | Not recommended; lacks anchoring strength. |
| Waterproof Adhesive | Guarantees durability in wet conditions. |
| Compatibility Check | Confirm the adhesive works with stucco and underlying materials. |
When mounting, avoid using stucco patch, as it may lead to installation issues. Instead, consider construction adhesive to enhance stability. Remember to allow adequate drying time for the adhesive, as a proper set is vital for the doorbell's long-term security. By following these guidelines, you'll guarantee that your Ring Doorbell stays firmly in place, providing reliable performance for years to come.
Weatherproofing Techniques Recommended
To guarantee your Ring Doorbell stays protected from the elements, it's essential to implement effective weatherproofing techniques during installation on stucco surfaces. Start by using silicone caulk around screw holes to prevent moisture intrusion, which can damage your device and its wiring. This simple step can save you from costly repairs down the line.
Additionally, investing in a home security system can enhance the overall safety of your property, as studies show that homes equipped with security features are less likely to be targeted by burglars increased safety and peace of mind.
Consider the following tips to enhance your installation:
- Use plastic anchors designed for stucco: These anchors distribute stress effectively, reducing the risk of cracking or crumbling.
- Install a mounting plate: A mounting plate helps create a level surface, shielding your doorbell from direct rain and snow exposure.
Assessing Core Material

When you're ready to assess the core material behind the stucco, start by drilling pilot holes to check for plywood or other solid backing. This step is vital as it'll help you determine how best to secure the screws for your Ring Doorbell.
Use long, thin nails to measure the depth behind the stucco without causing damage to the surface. This will also help you identify if there's accessible sheathing behind the stucco layer. It's important to take into account the impact of improper items in your home's plumbing, as clogging remedies can save you from future issues.
It's important to note the thickness of any rigid foam insulation present. Knowing this will guide you in selecting the proper screw length, particularly if you need to penetrate beyond the foam into the structural material.
If you find that screws can reach the plywood, you may not need anchors, making your installation process easier.
Throughout this assessment, take care not to damage the stucco, as this can result in both aesthetic issues and potential structural weaknesses. A careful approach guarantees you can securely attach your doorbell while maintaining the integrity of your home's exterior.
Recommended Fastening Techniques
Understanding the core material you've uncovered will guide you in selecting the best fastening techniques for securely attaching your Ring Doorbell to stucco. Here are some recommended methods to guarantee a solid installation:
- Drill Pilot Holes: Start by drilling pilot holes into the stucco. This method helps you identify the core material behind the stucco, guaranteeing your anchors go in securely.
- Utilize Molly Fasteners: For enhanced engagement, especially if there's rigid foam insulation, use molly fasteners. They expand behind the stucco, providing a more stable hold.
Additionally, if you're dealing with areas that have rigid foam insulation, embedding a wooden block into the wall can offer extra support.
Don't forget to repair any stucco damage around your installation to maintain its aesthetic appeal.
Best Practices for Stability

Guaranteeing a stable installation of your Ring Doorbell involves using the right anchors and regularly checking their integrity. To achieve this, opt for appropriate anchors like molly fasteners or plastic anchors designed specifically for stucco. These will provide a secure hold against the wall's surface.
Before drilling, take the time to drill pilot holes to assess the core material behind the stucco. This step is essential in determining the best screw length and anchor needed for ideal stability.
Additionally, consider using construction adhesive or liquid nails along with screws. This combination enhances grip and stability, especially if your stucco is over rigid foam insulation. It's wise to routinely check the stability of your installation. Over time, especially if you frequently remove the doorbell for battery charging, it can loosen.
Lastly, don't forget about weatherproofing. Applying silicone caulk around the screws can help prevent moisture from compromising the integrity of your installation.
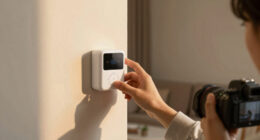
Faceplate Installation Tips
Installing the faceplate on your Ring Doorbell 4 is a straightforward process that secures the device and enhances its appearance. Start by selecting one of the provided faceplates and aligning it with the top of the doorbell. Press down firmly to slot it in place.
Next, it's essential to tighten the faceplate using the security screw. Here are some tips to guarantee a successful installation:
- Use the right tool: Utilize the star-shaped screwdriver bit included in the package to fasten the security screw effectively.
- Check for gaps: Double-check that the faceplate is flush against the doorbell to prevent moisture intrusion. Any gaps can lead to potential damage.
Once you've tightened the screw, verify it's secure and that the faceplate is firmly attached. Following these steps will help guarantee your Ring Doorbell 4 remains both functional and visually appealing.
Troubleshooting Common Issues

Even with the faceplate securely installed, you might encounter some common issues with your Ring Doorbell on stucco that require troubleshooting.
First, check the anchors you've used. If they're plastic, they may loosen over time. If you notice any signs of instability, consider using liquid nails to reinforce the anchors before re-mounting the doorbell.
Next, make sure you've drilled pilot holes properly. This helps you identify the underlying material and guarantees your screws penetrate deeply enough for a secure fit, preventing any damage to the stucco. Regularly inspect the installation, as stucco can crumble over time, which might compromise your doorbell's stability.
If you face issues with power or connectivity, don't hesitate to refer to the Ring app. It offers troubleshooting guidance tailored to your setup. The app will help you resolve problems efficiently, guaranteeing your Ring Doorbell functions as intended. Additionally, the app provides step-by-step instructions on **how to change wifi Ring Doorbell**, ensuring a seamless transition if you switch networks. Whether you’re moving to a new home or upgrading your internet, the process is straightforward with the app’s clear guidance. For further support, Ring’s customer service is always available to assist with any complex technical issues.
Frequently Asked Questions
Can a Ring Doorbell Be Installed on Stucco?
Yes, you can install a Ring Doorbell on stucco!
Just make sure you choose the right mounting method for a secure fit.
You'll want to drill pilot holes and use the appropriate anchors, like plastic or molly fasteners, to keep it stable.
If you plan to remove it often, those anchors will help.
Don't forget to patch any holes and consider weatherproofing with silicone to protect against moisture.
How to Attach Something to Stucco Without Drilling?
Ever wondered how to attach something to stucco without drilling? You can use heavy-duty adhesive products like construction adhesive or liquid nails for a strong bond.
First, make sure the stucco surface is clean and dry.
Consider adhesive-backed mounting strips designed for outdoor use, as they're effective and easy to apply.
For extra support, embed a wooden block or metal plate behind the stucco to enhance stability.
Just check the weight limits before proceeding!
Is There a Way to Install Ring Doorbell Without Drilling?
Yes, you can install a Ring doorbell without drilling. Consider using strong adhesive solutions like construction adhesive or liquid nails.
Make sure the surface is clean and dry before applying the adhesive generously for a strong bond.
You might also use a mounting plate that adheres to the wall, allowing you to attach the doorbell securely.
Just remember, adhesive methods may not be as secure as traditional drilling, so evaluate your situation carefully.
How to Mount a Security Camera on a Stucco Wall?
To mount a security camera on a stucco wall, start by drilling pilot holes to assess the underlying material.
Use masonry screws and expansion anchors designed for stucco to secure the camera mount firmly.
After installation, apply silicone caulk around the holes to prevent moisture intrusion.
Position the camera at a height of 7 to 10 feet for ideal viewing, and regularly check that it remains secure, especially after bad weather.
Conclusion
By following these steps, you'll have your Ring Doorbell securely attached to stucco in no time—it's easier than pie!
Remember to double-check your mounting techniques and verify everything's stable, so you can enjoy peace of mind knowing your home's security is first-rate.
If you run into any issues, don't hesitate to revisit the troubleshooting tips.
With your doorbell installed, you'll feel like you've conquered the world of home security!