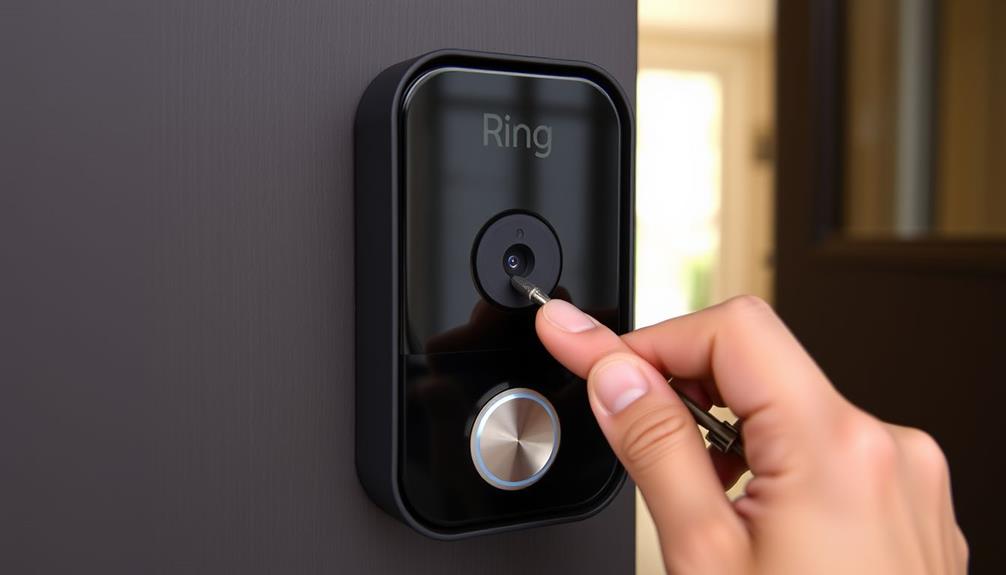
In order to uninstall the faceplate from your Ring Doorbell 2, you will require a star-shaped screwdriver and a flat tool such as a butter knife. Begin by locating and unscrewing the security screw positioned at the bottom of the faceplate. Once the screw is removed, gently push upwards with your thumbs while holding the bottom for support. If it seems stuck, use the flat tool to carefully pry it off. Take your time to avoid causing any damage. Once the faceplate is removed, you will be able to access the battery or perform maintenance with ease. For additional tips and tricks to enhance your experience, continue exploring further.
Key Takeaways
- Locate the security screw at the bottom of the faceplate and use the included star-shaped screwdriver to remove it.
- Apply upward pressure with your thumbs while supporting the faceplate with your fingers to detach it.
- If the faceplate is stuck, gently use a flat object like a paint scraper to pry it away.
- Ensure the device is powered off before accessing or replacing the battery located behind the faceplate.
Tools Needed for Removal
To remove the faceplate from your Ring Doorbell 2, you'll need a few essential tools.
First and foremost, grab the special star-shaped screwdriver that came with your device. This tool is designed specifically for the security screws located at the bottom of the faceplate. If you can't find it, don't worry; a T6 torx-head screwdriver will work as a substitute, which you might already have at home.
It's important to guarantee that your workspace is organized, as losing those tiny screws can be a hassle. Additionally, consider how you can apply best practices for home organization to streamline your task. You might also want to have a flat and skinny object, like a butter knife, on hand. This can help you pry the faceplate away from the device if it proves difficult to detach.
Once you've got your screwdriver and any additional tools ready, you're set to identify and remove the security screw. This is a vital step before lifting the faceplate off your Ring Doorbell 2. With your tools and a clear workspace, you'll be well-prepared for this task.
Step-by-Step Faceplate Removal

Removing the faceplate from your Ring Doorbell 2 requires careful attention and a few simple steps. Start by locating the security screw at the bottom of the faceplate. Grab the star-shaped screwdriver that came with your device and unscrew it. Carefully slide the faceplate upwards to release it from the device. If you are having trouble, consult the Ring Doorbell 2 instruction manual for step-by-step instructions on how to remove faceplate. Once the faceplate is removed, you can gain access to the battery and other components for maintenance or replacement.
Once the screw is loosened, position your thumbs at the bottom of the faceplate and push upward gently. This will help to loosen the cover. If you find it stubborn, you can use a flat object to carefully pry it away. It's crucial to approach this task with a steady hand, as minor mistakes during removal can lead to significant consequences, much like how small errors can impact various aspects of life, such as communication and emotional reactions impact of small mistakes.
As the faceplate becomes loose, pull it away from the doorbell's body in a smooth motion. It's crucial to keep a steady hand to avoid dropping the faceplate, as it can easily get damaged.
After you've successfully removed the faceplate, place it in a secure location to prevent any accidents. This will also help you access the battery compartment without hassle in the future.
Accessing the Battery

Now that you've removed the faceplate, you can access the battery compartment easily.
It's essential to guarantee the device is powered off before you remove the battery for safety.
Utilizing AI in Cybersecurity can help enhance the security of your smart home devices against potential threats.
Once you've got the battery out, replacing it's a straightforward process that'll keep your Ring Doorbell 2 running smoothly.
Battery Compartment Location
Accessing the battery compartment of the Ring Doorbell 2 requires you to first remove the faceplate by unscrewing the security screw at the bottom of the device. Once the faceplate is off, you'll easily find the battery compartment.
Here's a quick overview of the steps:
| Step | Description | Notes |
|---|---|---|
| 1. Remove Faceplate | Unscrew the security screw at the bottom. | Use a Torx screwdriver. |
| 2. Locate Battery Tab | Find the black tab at the bottom of the battery. | This tab helps in removal. |
| 3. Remove Battery | Press down on the black tab and pull the battery out. | Verify device is off first. |
| 4. Reinsert Battery | Replace the battery and verify it's charged. | Check connections before reassembly. |
After you've accessed the battery compartment, make certain the device is powered off to prevent any issues during removal. Once you've replaced the battery, carefully reinsert it and reattach the faceplate, making sure everything is secure.
Safe Battery Removal
After you've successfully taken off the faceplate, it's important to handle the battery removal safely to prevent any damage to your Ring Doorbell 2.
Start by locating the battery compartment inside the device. To detach the battery, gently press down on the black tab at the bottom while pulling it out towards the bottom of the compartment. This method guarantees you avoid any unnecessary stress on the device.
Before you proceed, make certain the device is powered off. This step is essential for avoiding electrical issues that could arise during the process. Remember, your security matters, and you don't want to compromise it with a faulty installation.
Here are some feelings you might experience during this process:
- Relief when the faceplate comes off easily.
- Anxiety as you handle the battery for the first time.
- Pride in successfully maintaining your security system.
- Satisfaction when you complete the task without any hiccups.
Battery Replacement Process
To replace the battery in your Ring Doorbell 2, start by removing the faceplate, which involves unscrewing the security screw at the bottom. Use a screwdriver that fits the screw head properly to avoid stripping it. Once you've removed the security screw, gently pull the faceplate away from the device.
Now that the faceplate is off, locate the battery compartment inside. You'll see the battery secured in place. To detach it, carefully pull the black tab while pressing down to release it from the device. Remember, it's crucial to verify the device is powered off before you remove or replace the battery to avoid any electrical issues.
After you've replaced the battery with a new one, slide it back into the compartment. Make sure it's seated properly. Finally, snap the faceplate back into place and secure it once more with the security screw. Double-check that everything is tight and secure, and your Ring Doorbell 2 is ready to go. Following these steps will help you maintain your device efficiently.
Replacing the Faceplate

Replacing the faceplate on your Ring Doorbell 2 is a straightforward process that allows you to customize its appearance. To begin, make certain you've removed the security screw at the bottom of the faceplate using the provided screwdriver.
Once that's done, grab your new faceplate. Hold it at a 45-degree angle to line up the top hook with the corresponding hole on the doorbell. This angle makes alignment much easier!
After you've positioned the faceplate properly, snap the bottom into place. Feel the satisfaction of a seamless fit as you secure it. Finally, don't forget to replace and tighten the security screw to guarantee the faceplate stays firmly attached.
Here's why you'll love switching up your faceplate:
- Refresh the look of your entryway.
- Express your unique style.
- Enhance your home's curb appeal.
- Celebrate seasonal changes effortlessly.
With these simple steps, you'll enjoy a personalized Ring Doorbell 2 that reflects your style while keeping your home secure. Happy customizing!
Common Installation Issues

Removing your Ring Doorbell 2 can sometimes be tricky, especially if it feels stuck on the mounting bracket. Many users face installation issues during the removal process, even after taking out all the security screws.
It's essential to verify that you've completely removed these screws before attempting to detach the doorbell. If you're still having trouble, don't worry—you're not alone.
Some people suggest using tools like paint scrapers to help separate the doorbell from the bracket. This can provide a bit of leverage, making it easier to pull away. However, be careful not to damage the doorbell or the mounting surface.
Patience and persistence are key. Sometimes, a little extra force is necessary to successfully remove the doorbell. If it feels stubborn, take a moment to reassess and verify all screws are indeed out.
Rushing can lead to frustration, so take your time. By understanding these common installation issues and applying some helpful tips, you can make the removal process smoother and less stressful.
User Experiences and Tips

When removing the faceplate from your Ring Doorbell 2, you might encounter some common challenges that other users have faced.
Many recommend practical tips for success, like using a paint scraper for leverage and ensuring all screws are out before trying to detach it.
Plus, insights from the community can provide helpful support and solutions to make the process easier.
Common Installation Challenges
Many users often struggle with the seemingly stubborn faceplate of the Ring Doorbell 2, finding it tricky to detach from the mounting bracket. The removal challenges frequently stem from tightly secured security screws or the faceplate not releasing easily even after you've taken out the screws. This frustration can lead to feelings of helplessness and annoyance.
- You might feel like you're wrestling with your doorbell.
- It's disheartening when the faceplate just won't budge.
- You could spend more time than expected on a simple task.
- The fear of damaging your device can be overwhelming.
To overcome these challenges, try using a paint scraper or a flat object to gently pry the faceplate off if it feels stuck.
Remember to grip the doorbell and the bracket separately, pulling upward on the doorbell while pushing down on the bracket.
Patience and persistence are essential, as a little force may be necessary to detach the faceplate without causing damage.
Don't give up; many have faced these hurdles and successfully removed their faceplates!
User Tips for Success
Users have found that applying upward pressure with their thumbs while supporting the front of the faceplate with their fingers can make a significant difference in successfully detaching it. Before you begin, verify you have the specific security screwdriver to remove the security screw at the bottom of the faceplate.
If the faceplate feels stuck after loosening the screw, try using a flat tool like a paint scraper or butter knife to gently pry it away. Remember, patience and persistence are key; some force may be necessary, especially if the faceplate hasn't been removed in a while.
Here's a quick reference table to help you during the removal process:
| Step | Tip |
|---|---|
| 1. Gather tools | Use the specific security screwdriver |
| 2. Apply pressure | Thumbs up, fingers supporting |
| 3. If stuck | Use a flat tool to gently pry |
Community Support Insights
Countless individuals have shared valuable insights on the Ring Community forum, highlighting effective techniques for overcoming the challenges of removing the faceplate from the Ring Doorbell 2. Users often face stubborn security screws and tight fits, making the faceplate removal process tricky.
Here are some helpful tips from the community:
- Apply upward pressure on the doorbell while pushing down on the mounting bracket to help facilitate separation.
- Ensure all security screws are fully removed before attempting to detach the faceplate to prevent damage.
- Use a paint scraper or similar tool to gently pry the doorbell off the mounting bracket if you encounter resistance.
- Be patient; it's essential not to rush the process as this can lead to frustration and potential damage.
These shared experiences emphasize the value of community support and collaboration, providing you with practical solutions and encouragement as you navigate the faceplate removal process. Remember, you're not alone in this!
Additional Support Resources

The Ring Community offers valuable resources where you can share experiences and get advice on removing the faceplate from your Ring Doorbell 2. You can tap into extensive support articles and video tutorials available on the Ring website, which provide clear visual guidance throughout the removal process. These resources are designed to make your experience smoother and more straightforward.
If you find yourself facing challenges, don't hesitate to reach out to the Ring support team. They're equipped to offer personalized assistance and troubleshoot any difficulties you might encounter.
Additionally, community forums are a fantastic place to discuss common issues and solutions with fellow users. By engaging with others, you can build a collective knowledge base that can help you overcome installation challenges.
Keep in mind that due to COVID-19 precautions, support wait times might be longer than usual. To avoid delays, it's a good idea to utilize the online resources available for immediate assistance.
Frequently Asked Questions
How to Remove the Ring Video Doorbell 2 From the Mounting Bracket?
To remove the Ring Video Doorbell 2 from its mounting bracket,
you'll first need to remove the security screws at the bottom using the provided screwdriver.
Once the screws are out, grip the doorbell firmly and pull upward to detach it from the bracket.
If it feels stuck, you might need to use a paint scraper gently to pry it off.
Just make sure not to damage the device while doing so.
How Do I Get the Mounting Plate off of My Ring Doorbell?
You've got to wonder if that mounting plate's glued on!
To get it off your Ring Doorbell, first, make sure all the security screws at the bottom are out.
Grip the doorbell firmly and pull upward, using steady pressure.
If it sticks, a thin tool like a paint scraper can help loosen it.
Just remember, a little patience goes a long way when dealing with stubborn devices.
Good luck!
How to Remove Door Bell Cover?
To remove the doorbell cover, start by locating any screws or clips that secure it.
If there are screws, use a screwdriver to turn them counterclockwise.
For clip-style covers, gently pry it away from the wall using a flat tool, like a butter knife.
Make sure you support the cover as you pull it away to avoid dropping it.
Once removed, store it safely to prevent damage or loss.
How to Unscrew Ring Doorbell Without Tool?
Did you know that nearly 30% of homeowners struggle with basic DIY tasks?
If you need to unscrew a Ring doorbell without a tool, start by checking if the screw is loose.
You can use a flat object, like a butter knife, to gently pry the faceplate off.
If that doesn't work, wrap a rubber band around the screw head for extra grip.
Always be careful not to damage the device during the process!
Conclusion
Removing the faceplate from your Ring Doorbell 2 might seem intimidating, but it's simpler than you think.
Once you've got the right tools and follow the steps, you'll be ready to access the battery or replace the faceplate in no time.
Don't worry if you hit a snag—many users have faced similar challenges and successfully navigated them.
Embrace the process, and you'll gain confidence in maintaining your device.
You've got this!