
To prepare your Ring Doorbell Chime, make sure your doorbell system has a power supply of 10-24 volts AC. Disconnect the existing chime wires from the Front and Trans terminals, then link a jumper cable between them. Install your Ring doorbell, connecting the existing wires properly. Turn the power back on at the circuit breaker and check for indicator lights on your device. Use the Ring app to activate Automatic Chime Detection and test the chime by pressing the doorbell. If you need troubleshooting advice or want more features, there’s helpful information to enhance your setup. Once the chime is working, you can personalize your Ring Doorbell Chime experience by adjusting ring doorbell sound settings in the app. You can change the volume, select different chime tones, and even set a unique chime for specific contacts or events. If you run into any problems or have questions about adjusting ring doorbell sound, the Ring app also offers troubleshooting tips and support resources to aid you.
(Target audience: Homeowners with a Ring Doorbell Chime)
Why wait? Enhance your doorbell experience now!
Key Takeaways
- Verify your existing doorbell system supplies 10-24 volts AC before installation to ensure compatibility with the Ring device.
- Disconnect the existing doorbell chime wires and connect a jumper cable between the Front and Trans terminals for proper functionality.
- Mount the Ring doorbell securely by following the template for screw hole placement and ensure all connections match the existing wiring.
- Restore power at the circuit breaker and check for power indications on the Ring device, confirming connections through the Ring app.
Ring Chime — Enhanced audio for real-time alerts you can hear from anywhere, easy plug-in setup, simple wifi & Bluetooth connectivity, sleek design, White
Hear when someone's there — Receive notifications when motion is detected by your cameras or someone rings your…
As an affiliate, we earn on qualifying purchases.
As an affiliate, we earn on qualifying purchases.
Required Tools and Equipment
To set up your Ring Doorbell Chime, you'll need a few essential tools and equipment to guarantee a smooth installation process. Start by gathering a compatible Ring device and a power source, as these are vital for your installation. Next, make sure you have a screwdriver and the necessary screws and anchors for mounting your Ring Doorbell Chime. Once you have all the tools and equipment ready, you can follow the step-by-step instructions provided by Ring to connect your device and customize your ring doorbell sound settings to your preference. This will ensure that your doorbell chime is set up exactly how you want it, providing you with the perfect alert for when someone is at your door. Additionally, don’t forget to download the Ring app on your smartphone to complete the setup process. The app will allow you to customize and control your Ring Doorbell Chime, including setting up your Ring Doorbell sound, adjusting the volume, and receiving notifications. Once everything is set up, you’ll have a fully functional and personalized doorbell chime that will enhance the security and convenience of your home.
You'll also need the Ring app installed on your smartphone to manage the settings and features of your Ring Chime. It's also wise to verify you have a clean and organized workspace, as a tidy environment can enhance your efficiency during the installation process. Additionally, having a few basic cleaning supplies can help you maintain any surfaces you might need to work on what should be in a home cleaning kit.
When physically installing your Ring, a screwdriver is necessary for securing the device, and consider having wall anchors if you're mounting it on hard surfaces. If you're connecting to an existing doorbell system, wire strippers may be required to prepare the wires for a proper connection.
Don't forget to have a Wi-Fi-enabled device handy; this will allow you to connect your Ring Doorbell to your home network seamlessly. For the best results, you might also want to use a level to verify your Ring Doorbell is mounted straight.
Having these tools ready will help you efficiently set up your Ring Chime and enjoy its features without unnecessary delays.

24V Doorbell Transformer, 500MA AC Adapter for All Ring Video Doorbell Versions, 18ft Doorbell Power Supply, Power Cable Compatible with Ring, Nest, Wyze, and Eufy Doorbells
COMPATIBILITY: 24V universal US power cable provides continuous power for popular smart doorbells. Compatible with all Ring Video…
As an affiliate, we earn on qualifying purchases.
As an affiliate, we earn on qualifying purchases.
Connecting the Jumper Cable

Begin by verifying your existing doorbell system supplies between 10-24 volts AC, as this voltage range is vital for connecting the Jumper Cable. It's important to confirm this to avoid any issues during installation.
Additionally, if you're looking to enhance your home's functionality, consider integrating important kitchen gadgets that streamline daily tasks.
To get started, locate the existing doorbell chime. You'll need to disconnect the wires from the Front and Trans terminals, which prepares the area for the Jumper Cable connection.
Next, take the Jumper Cable and connect one end to the Front terminal and the other end to the Trans terminal. Make sure to tighten the terminal screws securely to guarantee a solid connection. This step is significant for maintaining the integrity of your setup.
After connecting the Jumper Cable, verify that the wires from your existing doorbell system remain accessible for future use when you install the Ring Doorbell. You might need them later, so don't tuck them away just yet.

Ring Doorbell Screws Replacement, Blue Double-Ended T6 T15 Screwdriver with 20Pcs/5Set Security Screws – Battery Change & WiFi Setup for Video Doorbell Camera Replacement Kits
Compatible with: Our universal screwdriver works for multiple scenarios (doorbell maintenance, small electronics repair), while the matching screws…
As an affiliate, we earn on qualifying purchases.
As an affiliate, we earn on qualifying purchases.
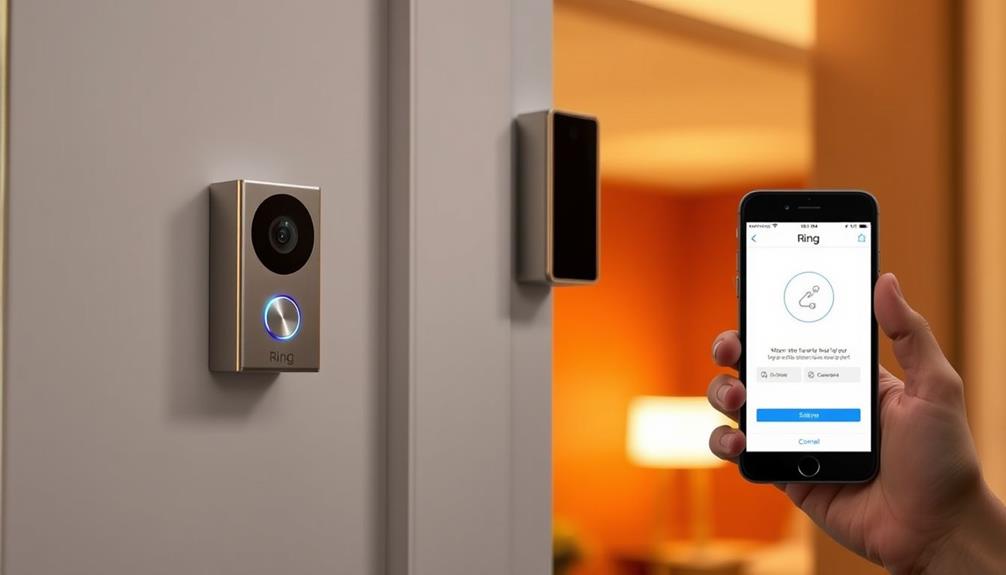
Mounting the Video Doorbell

To mount your Video Doorbell, start by marking the screw hole locations with the included template for accurate placement.
This process guarantees that your installation is both aesthetically pleasing and functional.
Next, connect the existing doorbell wires to the screw terminals, making sure they match correctly.
This step is essential for a secure and functional installation.
If you're interested in enhancing your home with innovative designs, check out exclusive design insights
Marking Screw Hole Locations
Marking the screw hole locations accurately guarantees a secure and level installation of your Ring Video Doorbell. Follow these steps to confirm proper alignment and stability:
- Use the Ring as a Template: Place the doorbell against the wall where you plan to mount it and use it to mark the screw holes.
- Confirm Level Placement: Make sure the marks are level to avoid an uneven installation, which can affect the doorbell's performance.
- Prepare for Hard Surfaces: If you're mounting the doorbell on brick or concrete, gather wall anchors to provide additional stability.
Once you've marked the screw hole locations, double-check that they align with your existing doorbell wiring. This step is essential for accurate placement and avoids complications during installation.
Use a pencil or marker to make clear, visible marks where the screws will go. Before you start drilling, take a moment to confirm everything is lined up correctly.
A precise installation not only enhances the functionality of your Ring Video Doorbell but also contributes to its overall aesthetic appeal. Happy mounting!
Connecting Doorbell Wires
Connecting your doorbell wires is essential for ensuring your Ring Video Doorbell operates correctly and efficiently.
First, access the existing doorbell wires, typically found at the front and trans terminals of your doorbell system. Strip about 1/4 inch of insulation off the ends of these wires to prepare them for connection.
Next, securely connect the doorbell wires to the corresponding terminals on your Ring Video Doorbell. Make sure the wire from the existing doorbell chime connects to the 'Front' terminal, while the other wire attaches to the 'Trans' terminal.
Once the wires are connected, use the included mounting screws to attach your Ring Video Doorbell to the wall. Be careful not to over-tighten the screws, as this could damage the device.
After mounting, restore power at the breaker. Check for a power-on indication from your Ring Video Doorbell to confirm successful installation.
If everything's working, you're all set! This connection process is vital for the functionality of your Ring Video Doorbell and ensuring it communicates with your chime effectively.

Smart Ring For Women Men, Health Tracker with Heart Rate, Blood Oxygen, Blood Pressure, Sleep Monitor, Step Counting, IP68 Waterproof Fitness ring, No App Fees for iPhone & Android (Silver, 9#)
【Please Measure Size Before Buying】Before purchasing your Oucscru smart ring, we strongly recommend that you refer to the…
As an affiliate, we earn on qualifying purchases.
As an affiliate, we earn on qualifying purchases.
Restoring Power and Testing

Once you've installed your Ring Doorbell, it's time to restore power at the circuit breaker.
You'll want to make sure the doorbell powers on by checking for the pulsing Ring logo.
After that, test the chime to confirm everything is working properly.
Power Restoration Steps
After you've finished installing your Ring Video Doorbell, restore power at the circuit breaker to make certain the device gets the electricity it needs to function properly. Here are some important power restoration steps to follow:
- Restore Power: Switch the circuit breaker back on, making sure the doorbell receives power.
- Check for Power-On Indication: Look for a light on your Ring that's flashing or solid, confirming it's powered up.
- Press the Doorbell Button: Test the system by pressing the button on your Ring and listen for the chime sound in your home.
If your doorbell doesn't power on, double-check all connections and make certain the existing doorbell wiring is properly connected.
Once everything is powered up, open the Ring app to confirm that your in-home chime is set up correctly. If you don't hear the chime, revisit the In-home Chime Settings in the app to make sure it's correctly configured.
Don't forget to test the automatic chime detection to verify it's working seamlessly. Following these steps will help you make sure your Ring Video Doorbell is ready to go!
Chime Functionality Testing
To guarantee your Ring Doorbell chime is functioning properly, start by checking its power status and testing the chime settings in the app. After restoring power at the circuit breaker, verify the Ring Doorbell's LED indicator lights up. Next, open the Ring app and enable Automatic Chime Detection to assess the chime functionality.
Here's a quick checklist to guide you through the testing process:
| Step | Action | Outcome |
|---|---|---|
| 1. Restore Power | Check circuit breaker | LED indicator lights up |
| 2. Open Ring App | Access In-home Chime Settings | Automatic Chime Detection is enabled |
| 3. Test Your Doorbell | Press the doorbell button | Chime sounds if functioning correctly |
| 4. Configure Chime Type | Adjust settings in Advanced Settings | Select desired chime type |
| 5. Troubleshooting | Restart auto-detection if needed | Consult troubleshooting guides if issues persist |
If the chime doesn't sound after pressing the button, manually configure the chime type in the advanced settings. Conduct another test to confirm if it's working as expected. If issues persist, refer to the troubleshooting guides for further assistance.
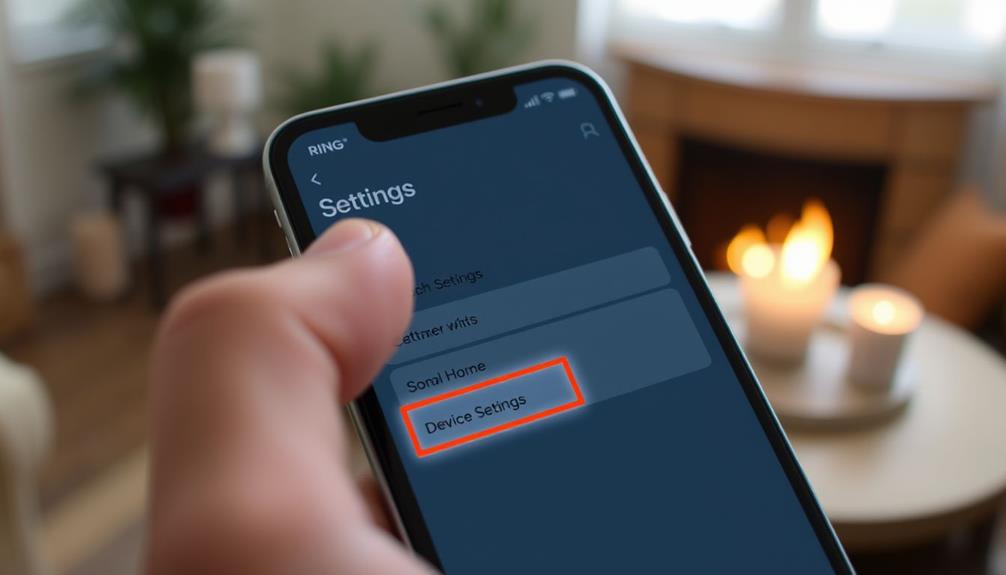
Configuring Chime Settings

Configuring your Ring Doorbell's chime settings is vital for guaranteeing you get notified whenever someone rings your doorbell. Follow these steps to set up your chime effectively:
- Open the Ring app: Access the device settings menu for your doorbell.
- Enable Automatic Chime Detection: This feature in the In-home Chime Settings helps identify and connect to your existing chime.
- Select Chime Type: If Automatic Chime Detection doesn't work, manually choose the Chime Type from the Advanced Settings.
Once you've made your selections, allow some time for the changes to update.
After that, it's important to test the chime by pressing the doorbell button. This guarantees everything's working as intended.
For enhanced sound options, consider purchasing a Ring Chime or Chime Pro, specifically designed to complement your Ring devices.
Troubleshooting Common Issues

If your Ring doorbell chime isn't working, there are several common issues you can troubleshoot to get it back up and running.
First, check if Automatic Chime Detection is enabled in the Ring app under In-home Chime Settings. If it's not working, try restarting the detection process.
Next, confirm that your chime model is compatible with your Ring doorbell; supported models include Video Doorbell (2nd Gen), 3, 3 Plus, 4, Battery Doorbell Plus, and Battery Doorbell Pro.
If your chime doesn't sound when the doorbell is pressed, inspect the power supply and wiring. Make sure everything is properly connected and that the circuit breaker is turned on.
Sometimes, connectivity issues can arise, so consider restarting both your Ring doorbell and chime by disconnecting and reconnecting the power.
For a manual setup, navigate to Advanced Settings in the Ring app and choose the appropriate Chime Type, allowing time for the updates to take effect before testing.
Additional Resources and Support

After troubleshooting your Ring doorbell chime issues, accessing additional resources can provide further assistance and enhance your setup experience. Here are three key resources to take into account:
- Ring Help Center: This is your go-to source for step-by-step installation guides and troubleshooting articles. You'll find detailed information on chime auto detection and common issues.
- Ring App Support Features: Use the Ring app to navigate device settings automatically. It can help you configure your chime and resolve any setup hiccups.
- FAQs Section: Check the FAQs on the Ring website for quick answers to questions about chime compatibility and functionality.
If you still need help for your Ring, don't hesitate to contact customer support. They can provide personalized assistance for any lingering issues.
Additionally, think about subscribing to Ring Protect for enhanced features, including video storage and professional monitoring services.
With these resources at your fingertips, you'll be well-equipped to guarantee your Ring doorbell chime functions smoothly and effectively.
Frequently Asked Questions
How Do I Connect My Ring Doorbell to Chime?
To connect your Ring Doorbell to a chime, start by checking if your chime is compatible.
Open the Ring app and select your doorbell device.
Enable Automatic Chime Detection in the In-home Chime Settings.
If it doesn't detect automatically, you can manually select the chime type in Advanced Settings.
Finally, press the doorbell button to test if the chime sounds.
Enjoy the convenience of knowing when someone's at your door!
How Do I Get My Ring Doorbell to Ring Inside?
To get your Ring Doorbell to ring inside, start by securing a suitable chime.
Connect it to your Wi-Fi, then launch the Ring app.
Navigate to your Doorbell device and select "In-home Chime Settings."
Make certain Automatic Chime Detection is enabled.
If it doesn't detect, manually set it up through "Advanced Settings."
Remember, your Doorbell needs to be hardwired or charged.
Why Is My Ring Doorbell Not Ringing Inside My House?
If your Ring Doorbell isn't ringing inside your house, check its connection to your in-home chime.
Make sure your doorbell model's compatible with your chime system.
Use the Automatic Chime Detection feature in the Ring app to see if your chime is recognized.
If it's not working, manually adjust the settings in the app.
Also, verify your doorbell's getting enough power, as low power can affect chime functionality.
Why Is My Ring Doorbell Chime Not Working?
If your Ring Doorbell chime isn't working, check its compatibility with your model first.
Make sure the chime's power supply is adequate; a hardwired chime needs proper voltage, and a battery-operated one must have a charged battery.
Use the Ring app to enable Automatic Chime Detection, and if that doesn't work, manually adjust the settings.
Restart both the chime and Ring Doorbell to refresh their connection.
Conclusion
Setting up your Ring doorbell chime can feel like piecing together a puzzle, but once it clicks, the satisfaction is worth it.
Imagine the first time you hear that chime ring—it's like welcoming a friend into your home.
With your chime properly configured, you'll feel secure and connected, knowing who's at your door.
So go ahead, follow the steps, and enjoy the peace of mind that comes with your new setup!