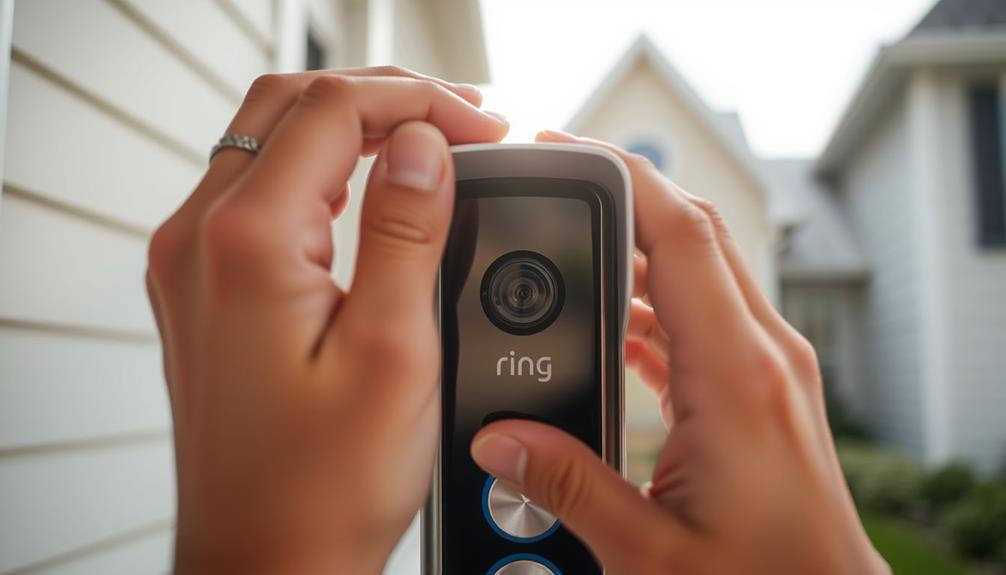

When removing the Ring doorbell cover, you will require a T6 Torx screwdriver for the security screw located at the bottom of the faceplate. Begin by loosening this screw, then exert upward pressure from the bottom of the faceplate to lift it off. If it is stuck, carefully pry it with a flat object such as a butter knife. Be cautious in supporting the faceplate while performing this task. Once removed, place the cover in a safe place. This procedure allows you to access the battery, ensuring your device remains in good condition. Additional tips for guidance are available! If encountering difficulty with the ring doorbell cover removal, you can refer to the manufacturer’s website or contact customer service for further aid. It is essential to adhere to the correct instructions to prevent any harm to the device. After successfully removing the cover, proceed with any necessary maintenance or repairs. Remember to securely reattach the cover once done. When removing your Ring Doorbell cover, handle the device with care to prevent damage. If faced with challenges during the process, do not hesitate to seek help from the manufacturer or a professional. Maintaining your Ring Doorbell with regular checks can help ensure its peak performance and longevity.
Key Takeaways
- Use a T6 Torx-head screwdriver to loosen the security screw located at the bottom of the faceplate.
- Apply upward pressure with your thumbs to detach the faceplate from the device.
- If stuck, gently pry the faceplate off with a flat, skinny object like a butter knife.
- After removal, place the faceplate and screws in a secure location to avoid loss or damage.

TEKPREM 8 in 1 Small Torx Screwdriver Set with T3 T4 T5 T6 T7 T8 T9 T10 Torx Security Bits,Complete Star Repair Kit for Apple,Macbook,Mac mini,Xbox one, Xbox360,PS3,PS4,PS5,Computer and Pocket Knives
[Small Torx Screwdrivers Tool Set]: The new TEKRREM small, complete Torx screwdriver set includes T3, T4, and T5…
As an affiliate, we earn on qualifying purchases.
As an affiliate, we earn on qualifying purchases.
Tools and Preparation
To successfully remove the Ring Doorbell cover, you'll need a few key tools and a bit of preparation.
First, make sure you have the special star-shaped screwdriver that came with your Ring doorbell kit or an alternative T6 torx-head screwdriver. This is essential for loosening the security screw located at the bottom of the faceplate. Understanding the importance of proper tools and techniques is critical for achieving a successful DIY project, much like how personal growth and wellness encourages individuals to equip themselves for life's challenges.
Before you start, set up a clean workspace to prevent losing any small parts, like screws. A tidy area makes it easier to keep track of everything you'll need.
As you prepare, have a flat and skinny object, like a butter knife, on hand. This can help you pry the faceplate off if you encounter any resistance.
Once you've gathered your tools and cleared your workspace, you're ready to tackle the task.
Remember, the key step is to turn the security screw counterclockwise using your screwdriver. If you happen to lose this screw during the process, don't worry—replacement screws can be easily ordered online or through customer service.
With these preparations in place, you'll be set for a smooth removal of your Ring Doorbell cover.

OYOCAM Video Doorbell Key Replacement Tool, Doorbell Screwdriver Replacement Compatible with Battery Doorbell (2024), Doorbell Camera Opening Key Tool Video Doorbell Screwdriver
【Compatible Models】: Video Doorbell Key Replacement Tool Doorbell Screwdriver Replacement are compatible with Battery Doorbell (2024), Wired Doorbell…
As an affiliate, we earn on qualifying purchases.
As an affiliate, we earn on qualifying purchases.
Faceplate Removal Process

Begin by locating the security screw at the bottom of the faceplate and use your star-shaped screwdriver to loosen it by turning counterclockwise. Once that's done, you're ready to remove the faceplate. For a seamless experience, consider having a soft cloth nearby to prevent scratches on the surface, especially if you have a variety of materials available for the doorbell's design.
Follow these steps for a smooth process:
- Apply upward pressure with your thumbs from the bottom of the faceplate.
- If the faceplate feels stuck, use a flat and skinny object, like a butter knife, to gently pry it away without damaging the body of the doorbell.
- Once it's loosened, support the front with your fingers.
- Pull it away in one fluid motion to avoid dropping it.
After successfully removing the faceplate, place it in a secure location to prevent any potential damage during maintenance. By following these steps, you'll guarantee a hassle-free removal process and maintain the integrity of your doorbell.

20Pcs Security Screws for Camera Doorbell Screws Replacement with Video Doorbell 2/3/4/Pro 2, CTYUKHS
Video Doorbell Screws: If you lost your original video doorbell screws, this will be the perfect replacement for…
As an affiliate, we earn on qualifying purchases.
As an affiliate, we earn on qualifying purchases.
Battery Access Steps

Access the battery by first removing the faceplate, which allows you to reach the battery compartment inside the device. Start by locating the security screw at the bottom of the faceplate. Use the provided Ring screwdriver or a compatible tool to remove the faceplate carefully. Once it's off, you'll see the battery compartment. It's important to maintain clean air in your home, as air purifiers improve indoor air quality considerably, which can enhance the overall performance of your smart devices by reducing dust and allergens.
Next, find the black tab inside the compartment. Press down on this black tab while gently pulling the battery downward to detach it from the device. It's vital to check the battery's charge before reinserting it, as a depleted battery may lead to device malfunctions. If the battery needs charging, do it now to make sure your Ring Doorbell operates smoothly.
After charging the battery, it's time to insert the battery back into the compartment. Align the battery properly and push it back in until it clicks securely in place. Make sure it's snug, so there's no chance of it disconnecting. Once you've done that, you're ready to replace the faceplate and secure everything back in its place. Your Ring Doorbell should now be ready for action.

UTENEW 5pcs Professional Opening Pry Repair Tools Flathead Metal Pry Bars Crowbar
Durable Material: Our flat head crowbars are made of stainless steel. Will not rust. Strong toughness and solid,…
As an affiliate, we earn on qualifying purchases.
As an affiliate, we earn on qualifying purchases.
Replacing the Faceplate

Replacing the faceplate on your Ring Doorbell is straightforward once you know how to align it correctly.
You'll want to make sure it's securely fastened, so it stays in place, and remember that you can easily swap out different colors to match your style.
Let's go over the best techniques for alignment, fastening, and customization options.
Faceplate Alignment Techniques
To align the faceplate correctly, start by positioning the top hook at a 45-degree angle with the corresponding hole on the doorbell body. This angle simplifies the alignment process, making it easier for you to guarantee a secure fit. Once the top hook is in place, gently push the bottom of the faceplate in until it snaps securely.
Here are some key steps to remember for perfect alignment:
- Check the Orientation: Make sure the faceplate is facing the right way before you begin.
- Use Gentle Pressure: As you push the bottom, apply gentle pressure to avoid damaging the faceplate.
- Look for Flush Fit: Guarantee the faceplate sits flush against the doorbell without any gaps.
- Reinsert the Security Screw: After snapping the faceplate back, use your screwdriver to replace and tighten the security screw at the bottom.
Following these techniques will help you achieve proper alignment while guaranteeing your doorbell remains secure and functional.
Securely Fastening the Cover
After confirming the faceplate is aligned properly, you can securely fasten it back onto the Ring Doorbell. Start by holding the faceplate at a 45-degree angle, which makes it easier to align the top hook with the corresponding hole on the doorbell body. Once aligned, push the faceplate into place until it snaps securely. Confirm the faceplate is pushed in completely to avoid gaps, providing a snug fit against the doorbell body.
Next, locate the security screw at the bottom of the faceplate. Use the provided screwdriver to tighten the screw fully, which will help secure the faceplate in place.
To confirm everything is stable, gently tug on the faceplate. This will indicate that it's properly fastened and that there are no loose parts. Here's a quick overview of the steps:
| Step | Action |
|---|---|
| 1 | Align the faceplate at a 45-degree angle |
| 2 | Push until it snaps into place |
| 3 | Confirm a snug fit |
| 4 | Replace the security screw |
| 5 | Tighten and check for stability |
Following these steps will confirm your Ring Doorbell cover is securely fastened.
Interchangeable Color Options
If you want to refresh your Ring Doorbell's look, you can easily swap out the faceplate for one of the many available color options. This feature allows for interchangeable faceplates, so you can customize the appearance of your doorbell to fit your personal style or home decor.
Here are some popular color options you might consider:
- Classic white
- Sleek black
- Vibrant red
- Soft blue
To replace the faceplate, start by ensuring you align the top hook with the corresponding hole. Hold the new faceplate at a 45-degree angle for proper installation. Once it's correctly aligned, you can easily snap it into place, ensuring a secure fit.
For added customization, consider using silicone skins that provide extra protection against the elements. These skins not only enhance your doorbell's longevity but also allow for even more color options.
With this simple process, you can keep your Ring Doorbell looking fresh and stylish while enjoying the benefits of easy installation and interchangeable faceplates.
Securing the Faceplate

Securing the faceplate of your Ring Doorbell is vital for guaranteeing it stays in place and functions properly. Start by holding the faceplate at a 45-degree angle to align the top hook with its corresponding hole in the doorbell's body. This position makes it easier to snap the faceplate into place with proper alignment.
Once you've attached the faceplate, it's time to secure it. Locate the security screw at the bottom of the faceplate. If you need to, first remove the security screw using the star-shaped screwdriver. Then, replace the security screw and tighten it fully. This step is important because it prevents the faceplate from coming loose over time, guaranteeing that your doorbell remains secure.
If you've lost the original security screw, don't worry! You can easily order replacement security screws online in packs to maintain the integrity of your installation. By following these steps, you'll guarantee that your Ring Doorbell faceplate is securely in place, providing you with peace of mind and reliable functionality.
Common Installation Issues

Even with a securely attached faceplate, you might run into common installation issues that can complicate the process of removing your Ring Doorbell cover. Here are some potential pitfalls to watch for:
- Missing or Incorrect Screws: Verify you have the right screws for your model; otherwise, you may struggle with the installation.
- Stripped Screws: If you encounter stripped screws, it's tough to use the provided screwdriver effectively, making removal a headache.
- Accessing Setup Mode: If the faceplate screw isn't removed properly, you may have difficulty entering setup mode for reconnection.
- Tool Types: Different models require specific tool types, like T15 or T6 Torx screws, leading to confusion if you're unprepared.
Addressing these installation issues is essential for a smooth removal process. Double-check your screws and tools before you start, and keep an eye out for any stripped screws that might hinder your progress.
Community Support Resources

When you're tackling installation or maintenance of your Ring doorbell, the community is a great resource.
You can share your experiences, get expert troubleshooting tips, and find help with installation issues.
Don't hesitate to tap into this supportive environment where other users are enthusiastic to assist you.
User Experience Sharing
Joining the Ring Community provides you with a wealth of user experiences and troubleshooting tips for effectively removing your doorbell cover. You'll find a supportive group ready to share their insights, which can make the process smoother and less frustrating.
Here are some key points to take into account:
- Stripped Screws: Many users recommend using a rubber band for better grip on stripped security screws during faceplate removal.
- Alternative Methods: If you're missing or have a stripped security screw, community discussions often highlight backup methods for removing the faceplate.
- Tool Recommendations: Users frequently share the best types of screwdrivers that work well with various Ring models, ensuring you have the right tool for the job.
- Real-Time Support: The community serves as a valuable resource where you can post questions and get feedback from others who've faced similar challenges, including tips on accessing the battery.
With these shared experiences, you'll gain confidence and clarity as you navigate the process of removing your Ring doorbell cover. Don't hesitate to tap into this supportive network for help!
Expert Troubleshooting Tips
Expert troubleshooting tips from the Ring Community can greatly simplify the process of removing your doorbell cover and resolving any related issues.
If you're struggling to get the faceplate away from the device, consider using the provided Ring screwdriver to carefully unscrew the security screw back. Some users have found that using rubber bands or needle-nosed pliers can help improve grip when dealing with stripped screws.
If you're unsure about how to proceed, don't hesitate to post specific questions in the community forum. You'll often receive tailored advice from experienced members who've faced similar challenges. They can guide you on how to remove and charge your doorbell while ensuring you don't damage the unit.
For persistent issues that aren't resolved through community advice, it's best to call at one and seek direct support from Ring's customer service. They can provide you with expert guidance customized to your device model.
Installation Assistance Availability
The Ring Community is a valuable resource where you can ask questions about installation challenges and get practical solutions from fellow users. Engaging with this community not only helps you resolve issues but also enhances your understanding of the Ring doorbell and its features.
Here are some ways you can benefit from the community:
- Post Your Question: Share your specific installation question and receive tailored responses.
- Discover Practical Solutions: Learn from other users who've faced similar challenges and how they overcame them.
- Access Expert Support: If you're still stuck, Ring representatives are available to provide direct support for persistent issues.
- Utilize Troubleshooting Guides: Explore a variety of articles and guides on installation and maintenance shared by both the community and Ring.
Troubleshooting Tips

When you're having trouble removing the Ring Doorbell cover, there are several troubleshooting tips that can help you succeed.
First, make sure you're using the correct screwdriver, typically a T6 Torx, to match the security screw type for your model. If the security screw is stripped, you can try placing a rubber band between the screwdriver and the screw for better grip during removal. This can often help you turn the screw without slipping.
If you still can't remove the faceplate, consider using needle-nosed pliers to carefully extract any stubborn screws. Sometimes, visibility can be an issue, so adjust your angle or improve your lighting to get a clearer view of the screws.
If you've made multiple attempts and are still struggling, don't hesitate to reach out for assistance. Contacting Ring support might provide you with effective solutions, including tool replacement and additional troubleshooting tips.
Additional Maintenance Guidance

Regular maintenance can greatly enhance your Ring Doorbell's performance and longevity. To keep your device functioning at its finest, follow these tips:
- Check the battery: Regularly monitor the battery level and replace it as needed to guarantee uninterrupted service.
- Clean the exterior: Use a soft, damp cloth to clean the doorbell. This prevents dirt buildup, which can interfere with the camera and sensors.
- Inspect the faceplate and security screws: Periodically check for any signs of wear or damage. Replacing these parts when necessary helps maintain security and functionality.
- Update the app and firmware: Keeping the Ring app and device firmware updated guarantees you have the latest features and security patches.
Additionally, when you remove the faceplate, store it along with any security screws in a labeled container. This prevents loss and makes reassembly easier.
Frequently Asked Questions
How Do I Take the Cover off a Ring Doorbell?
To take the cover off a Ring Doorbell, you'll need to start by locating the security screw at the bottom.
Use the special screwdriver that came with your doorbell to unscrew it.
Once that's done, apply upward pressure at the bottom of the faceplate while holding the front gently.
If it's stuck, a flat object can help pry it loose.
How to Remove Door Bell Cover?
Oh, the mystery of the doorbell cover! It's like trying to crack a secret code, isn't it?
To remove it, you'll want to locate any visible screws first. If you're lucky, they'll be easy to spot.
If not, grab a flat tool and gently pry at the edges. Just be careful—no one wants a broken doorbell cover.
Once you've got it off, place it somewhere safe and tackle whatever's inside with confidence!
How Do You Remove a Ring Doorbell Cover With a Stripped Screw?
If you're dealing with a stripped screw, start by placing a rubber band between the screwdriver and the screw to enhance grip.
If that doesn't work, grab some needle-nosed pliers to twist the screw if it's sticking out enough.
You can also try a screw extractor kit for stubborn screws.
Make sure you're using the right size screwdriver to prevent further stripping.
If all else fails, reach out to Ring customer support for help.
How to Unscrew Ring Doorbell Without Tool?
If you need to unscrew your Ring doorbell without a tool, try using a rubber band over the screw head for extra grip.
If the screw's stripped, grab some needle-nosed pliers to twist it out.
Alternatively, use a flat object like a butter knife to gently pry off the cover.
In case you can't get it off, don't hesitate to reach out to Ring customer support for help or tool suggestions.
Conclusion
As you navigate the journey of your Ring doorbell, think of it as tending to a garden.
Just as a gardener carefully prunes to allow growth, you'll need to remove the cover to nurture your device's performance.
With each step, you cultivate a space of security and connection.
Embrace the process, for maintaining your doorbell invites peace of mind, allowing your home to bloom with safety and watchfulness, just like a flourishing garden under the sun.