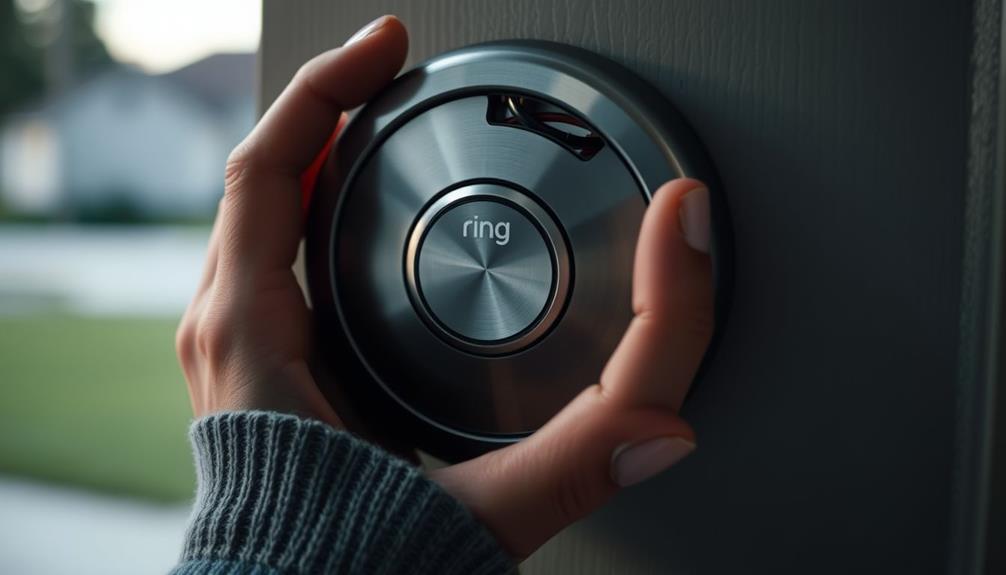
Instructions for removing the cover of your Ring Doorbell Pro by locating the security screw at the bottom and turning it counterclockwise using a security screwdriver or T6 Torx screwdriver. Apply upward pressure to detach the faceplate. Use a flat object like a butter knife if it’s stuck. Keep the screw safe for reassembly and store the faceplate in a safe place. Read more about the reassembly process and common challenges you may encounter. Removing the faceplate is a simple task that should be done carefully to prevent damage. Make sure to align the faceplate securely and refer to the manufacturer’s guidelines or seek professional assistance if needed during reassembly.
Key Takeaways
- Locate and unscrew the security screw at the bottom of the faceplate using the included security screwdriver or a T6 Torx screwdriver.
- Apply upward pressure with your thumbs at the bottom of the faceplate while supporting the front with your fingers.
- If the faceplate is stuck, use a flat object like a butter knife to gently pry it off without causing damage.
- Keep the security screw in a safe place for reassembly after removing the faceplate.

Screwdriver for Ring Doorbell,EMiEN Torx T6 T15 Bit Screwdriver For Ring Video Doorbell,Doorbell 2,Doorbell Pro And Elite Battery Change, Charge & Replacement, Wifi Password Reset Access
[ DOORBELL SCREWDRIVER ] : Double Head T6 & T15 Torx Head Screwdriver Used For Video Doorbell,Doorbell 2,Doorbell…
As an affiliate, we earn on qualifying purchases.
As an affiliate, we earn on qualifying purchases.
Ring Doorbell Overview
The Ring Video Doorbell Pro is designed to provide you with reliable security and high-definition monitoring right at your doorstep. This smart doorbell boasts wired installation, ensuring consistent power and functionality.
With its high-definition video streaming, you can easily keep an eye on your entrance through the convenient smartphone app. Additionally, many homeowners are incorporating sustainable home decor elements into their entryways, creating an inviting space while maintaining security.
One of the standout features of the Ring Doorbell Pro is its two-way audio communication. This means you can interact with visitors, whether you're at home or away, enhancing your ability to manage deliveries or unexpected guests.
Additionally, the built-in motion detection alerts you to activity in real-time, allowing you to respond promptly to any potential security threats.
When it comes to installation, the Ring Doorbell Pro includes a faceplate and a security screw, ensuring a secure fit. This attention to detail not only enhances the aesthetic appeal but also contributes to its overall stability.
Plus, it integrates seamlessly with other smart home systems, making it a thorough security solution for your home.
With the Ring Doorbell Pro, you're investing in a reliable security system that keeps you connected and informed about what's happening at your doorstep.

JSAZCKC Doorbell Screwdriver Replacement for WiFi Password Reset and Battery Change, Torx T6 T15 Bit Screwdriver for Doorbell
[Doorbell Screwdriver] This upgraded doorbell screwdriver fits most models of doorbells, and if you lose your doorbell screwdriver,…
As an affiliate, we earn on qualifying purchases.
As an affiliate, we earn on qualifying purchases.
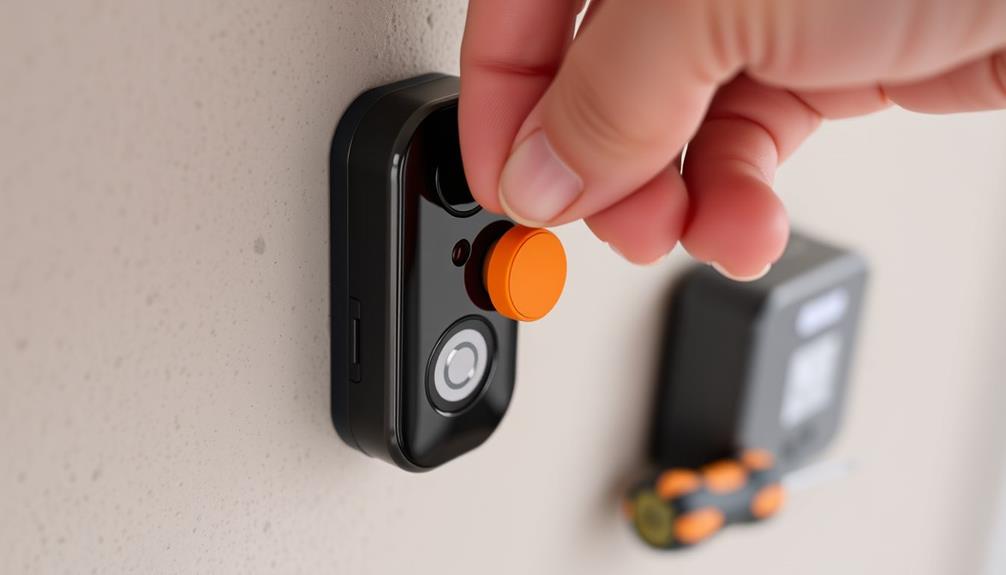
Tools Needed for Removal

To successfully remove the Ring Doorbell Pro cover, you'll need a few specific tools to guarantee a smooth process. Having the right equipment on hand will make the task easier and help you avoid any unnecessary frustrations. Regular maintenance of your appliances, such as ensuring that your doorbell functions correctly, can lead to enhanced performance and longevity energy consumption patterns.
Here's what you'll need:
- Security screwdriver: This tool is included with your Ring Doorbell Pro and is specifically designed to fit the security screws. If you have it, use it for the best results.
- T6 Torx screwdriver: If your security screwdriver is missing, a T6 Torx screwdriver can serve as a suitable alternative. This tool will help you access the screws without damaging the device.
- Flat and skinny object: Having a flat and skinny object, like a butter knife, can be helpful for prying the cover off if it's stuck. Just be gentle to avoid any scratches or damage.
Before you start, make sure your workspace is clean. This will help prevent losing small parts like screws and tools during the removal process, ensuring a smooth and easy experience.

Video Doorbell Key Removal Tool Compatible with Ring Battery Doorbell 2024 Release, Wired Doorbell Pro (N ewest Model), Wired Doorbell Plus (N ewest Model) 2PACK
COMPATIBILITY: compatible with Ring Battery Doorbell 2024 Release,Compatible with Wired Doorbell 2nd Gen (Newest Model), Wired Doorbell Plus…
As an affiliate, we earn on qualifying purchases.
As an affiliate, we earn on qualifying purchases.
Faceplate Removal Steps

To safely remove the faceplate of your Ring Doorbell Pro, you'll need a few specific tools and follow a step-by-step guide.
It's important to handle the device carefully to avoid any damage during the process.
Be prepared for some common challenges you might encounter, like stubborn screws or misalignments, so having a plan in place can help.
If you need assistance with cleaning or maintenance, you might consider what to expect from a home cleaning service.
Let's get started on making this removal as smooth as possible.
Tools Needed for Removal
A special star-shaped screwdriver, often included with your device, is essential for removing the Ring Doorbell Pro cover. This screwdriver, also known as a T6 torx-head screwdriver, is specifically designed to help you remove the security screw at the bottom of the faceplate.
Here's a quick list of tools you'll need:
- Provided Ring Screwdriver: Use the special star-shaped screwdriver that came with your doorbell for best results.
- Flat Object: A flat and skinny item, like a butter knife, can be handy if the faceplate is stubborn and needs extra prying.
- Replacement Options: If you've misplaced the original screwdriver or security screw, you can easily order replacements through customer service or online.
Before you start, make sure you turn the security screw counterclockwise to loosen it.
Once that's done, you can begin the process to remove the faceplate.
Having the right tools on hand will make this task simpler and prevent any damage to your device.
Step-by-Step Removal Guide
Start by locating the security screw at the bottom of the Ring Doorbell Pro faceplate and use the provided screwdriver to turn it counterclockwise until it's loose.
Once you've removed the screw, apply upward pressure with your thumbs at the bottom of the faceplate. Support the front of the faceplate with your fingers to help detach it from the doorbell.
If the faceplate doesn't come off easily, don't worry. You can gently insert a flat object, like a butter knife, into the gap to pry it away from the doorbell. Be cautious during this step to avoid damaging the faceplate.
As you remove the faceplate, handle it carefully to prevent dropping or scratching it. Once you've successfully removed it, place the faceplate in a secure location.
Remember to keep the security screw in a safe place, too, as you'll need it for reassembly later. Following these steps will guarantee a smooth faceplate removal process for your Ring Doorbell Pro.
Common Challenges Encountered
Removing the faceplate of your Ring Doorbell Pro can present several common challenges that may complicate the process. Addressing these issues ahead of time can save you frustration and time.
- Visibility Issues: If you're in a poorly lit area, spotting the security screws can be tricky. Make sure you have adequate lighting to see what you're doing clearly.
- Using the Correct Tool: It's vital to use the right screwdriver. Many users mistakenly grab a Phillips screwdriver instead of the specific T6 Torx screwdriver, leading to delays. Always have the correct tool on hand.
- Stripped Screws: A stripped screw is a frequent challenge. If the screwdriver can't grip, you might need to resort to alternative methods, like using a rubber band for added traction. Keep in mind that multiple attempts can worsen the stripping, so be cautious.

Screwdriver Bit Set for Video Doorbell, Doorbell Sews Rplacement & WiFi Password Reset and Battery Change, Double-Ended T6 T15 Screwdriver with 20Pcs Fits for All Doorbell Models (Blue)
【Compatible with All Video Doorbells】: Our Universal screwdriver and screws accessories fit for All models of Video Doorbells….
As an affiliate, we earn on qualifying purchases.
As an affiliate, we earn on qualifying purchases.
Accessing the Battery

To access the battery in your Ring Doorbell Pro, you'll first need to take off the faceplate by unscrewing the security screw at the bottom and gently prying it loose.
Once the faceplate is removed, you'll find the battery compartment located in the lower section of the device.
Before you proceed, make certain the device is powered off to avoid any electrical issues.
To remove the battery, carefully press down on the black tab and slide the battery towards the bottom of the doorbell. This action will help you pull the battery out without damaging any components.
If you're replacing or recharging the battery, verify that you align it properly when reinserting.
Once you've positioned the battery back into the compartment, press it in until you hear a click, confirming it's securely in place.
After you've accessed the battery and made your changes, don't forget to reattach the faceplate by reversing the steps you took to remove it.
This simple process will keep your Ring Doorbell Pro functional and ready to protect your home.
Reassembling the Doorbell

After you've successfully accessed the battery, you can begin reassembling the Ring Doorbell Pro by aligning the top hook of the faceplate with the corresponding hole on the device. To make this process easier, hold the faceplate at a 45-degree angle. This guarantees proper alignment before snapping the bottom back into place securely.
Follow these steps to complete the reassembly:
- Align the faceplate: Start by positioning the top hook correctly, making sure it fits into the device's hole.
- Snap the bottom: Gently press the bottom of the faceplate until it clicks into place, confirming a tight fit.
- Secure the faceplate: Don't forget to replace and tighten the security screw at the bottom of the faceplate. This step is vital to keep the faceplate firmly attached.
If you're looking for a new look, remember that you can swap out faceplates for different colors.
For added protection, consider using silicone skins available online, which can also enhance your device's aesthetic.
Enjoy your reassembled Ring Doorbell Pro!
Troubleshooting Common Issues

Encountering common issues while trying to remove the Ring Doorbell Pro cover can be frustrating, but knowing how to troubleshoot can make the process easier.
One frequent problem users face is difficulty with faceplate removal due to stripped screws. This often stems from using the wrong tool or making repeated attempts to unscrew. Ascertain you're using the correct T6 torx-head screwdriver for the security screw at the bottom of the cover; using any other type can hinder your progress.
Visibility can also complicate matters. Make sure you're working in a well-lit area and have a clear line of sight to identify the security screw properly. If your screwdriver doesn't catch on the screw, try placing a rubber band over it for added grip, which can help in loosening stripped screws.
If you still struggle with faceplate removal after these tips, don't hesitate to reach out to the Ring support team. They can provide tailored guidance based on your specific situation, making sure you can successfully remove the cover without further frustration.
Community Support Resources

The Ring Community offers valuable resources where users can connect, ask questions, and share insights about the Ring Video Doorbell Pro. It's a great place to find support and engage in discussions with fellow users who face similar challenges. You can create an account to participate, allowing you to post your questions and share your experiences.
Here are some key features you'll find in the Ring Community:
- Troubleshooting Articles: Access a wealth of guides that provide step-by-step instructions for common issues, including faceplate removal.
- Expert Assistance: The Ring support team is available to help with persistent problems or specific inquiries, ensuring you get the right answers.
- User Experiences: Immerse yourself in discussions where community members often share practical solutions and tips based on their own experiences.
Frequently Asked Questions
How to Remove Faceplate of Ring Doorbell Pro?
To remove the faceplate of your Ring Doorbell Pro, start by unscrewing the security screw at the bottom using the provided screwdriver.
Once that's done, apply upward pressure with your thumbs at the bottom while supporting the front with your fingers.
If it feels stuck, gently pry it with a flat object like a butter knife.
Remember to keep the screw safe for reattaching the faceplate later.
How Do You Take the Ring Doorbell Cover off to Charge?
Taking off the cover might seem intimidating, but it's a straightforward task.
First, you'll find the security screw at the bottom. Grab your Ring screwdriver or a T6 torx-head screwdriver and loosen it.
Once that's done, push up from the bottom of the faceplate with your thumbs. If needed, gently pry it off with a flat object.
Now, you can access the battery for charging or replacement. It's that simple!
How to Remove Door Bell Cover?
To remove a doorbell cover, start by locating any screws or fasteners holding it in place.
Use a screwdriver to loosen and remove them. If there's a security screw, you might need a special tool.
Once the screws are out, gently pry the cover off with your fingers or a flat tool, being careful not to damage the wall.
If it's stuck, a bit of upward pressure can help loosen it.
How to Remove Ring Doorbell Faceplate Without Tool Youtube?
If you're looking to remove the Ring Doorbell faceplate without tools, YouTube has plenty of helpful tutorials.
You can watch these videos to see various techniques in action. Most methods involve applying gentle upward pressure or using common household items to pry the cover.
Just make certain the doorbell's powered down before you start.
Following these visual guides can make the process easier and guarantee you avoid damaging the device.
Conclusion
Removing the cover of your Ring Doorbell Pro isn't as intimidating as it seems.
You might worry about damaging your device, but with the right tools and steps, you'll have it off in no time.
Just follow the guide, and you'll access the battery easily for any needed maintenance.
Remember, taking care of your doorbell guarantees it stays in top shape, so don't hesitate to tackle this task—your security deserves it!