
To uninstall your old Ring doorbell, start by shutting off the power to the circuit breaker for safety precautions. Then, gather your tools, including a T15 Torx screwdriver. Use this tool to take out the security screw located at the bottom of the faceplate, and carefully detach the doorbell from its mounting bracket. If you do not have the specified screwdriver, a small flathead screwdriver can serve as a substitute. After taking out the doorbell, make sure to seal any remaining holes with silicone to prevent drafts or moisture. For more detailed instructions or helpful tips on removing the doorbell, you can find plenty of useful advice below.
Key Takeaways
- Gather essential tools, including a T15 Torx screwdriver and safety goggles, before starting the removal process.
- Turn off power at the circuit breaker to ensure safety during the removal.
- Use the Ring app to navigate to Device Settings and select 'Remove this Device.'
- Remove the security screw at the bottom of the faceplate to detach the doorbell from its mounting bracket.

Bonsicoky T15 Torx Security Screwdriver with Magnetic Tip, 178mm/7"
❤What You Get: 1 Pcs Torx Screwdriver; Torx Size: T15; Handle Length: 78mm/ 3.1"; Overall Length: 178mm/ 7".
As an affiliate, we earn on qualifying purchases.
As an affiliate, we earn on qualifying purchases.
Reasons for Removal
There are several reasons you might decide to remove your old Ring doorbell, from upgrading to a newer model to simply moving to a new home.
If you're shifting to a different brand, like Arlo or Google, you'll want to remove your Ring doorbell to make way for your new system. Additionally, as you consider essential kitchen gadgets for your new setup, you may also want to guarantee that your security devices are up-to-date and compatible with your lifestyle.
Moving homes often means taking your security devices with you, so you'll need to remove the old Ring doorbell to install it at your new location.
Upgrading to a newer model of the Ring doorbell can also be a common reason for removal. Newer models often come with enhanced features or improved technology that might better suit your needs.
Additionally, if your old doorbell requires maintenance or battery charging, you may need to remove it temporarily to make sure it stays functional.

One Way Screw Remover Tamper Proof Screw Removal Tool Used for Removing Tamper-Resistant One Way Screws
One Way Screw Remover Tamper Proof Screw Removal Tool
As an affiliate, we earn on qualifying purchases.
As an affiliate, we earn on qualifying purchases.
Required Tools

When you're ready to remove your old Ring doorbell, having the right tools on hand is vital.
Essential oils can also provide a calming atmosphere to help you focus during the task, as essential oils can enhance mood.
You'll need a few essentials, and there are alternatives if you're missing something.
Plus, don't forget to take into account safety precautions while you work.
Essential Tools Checklist
To guarantee a smooth removal process, gather the necessary tools, including a screwdriver from the Ring package or a small flathead screwdriver if it's missing. If your doorbell has security screws, a T15 Torx head screwdriver will come in handy as a backup option for removing them.
Maintaining a clean environment is vital, and using air purifiers can help eliminate dust and allergens during home improvement tasks.
If your old Ring doorbell is hardwired, you'll need a voltage tester to confirm no power is present before disconnecting any wires. This step is essential for your safety while removing the device.
Additionally, keep silicone or filler handy to seal any holes left behind after you've successfully removed the doorbell. Having these materials ready will help you tidy up the area and maintain your home's appearance.
Before starting, take a moment to account for all necessary tools. This simple step can prevent interruptions during the removal process, saving you time and hassle.
Safety Precautions Needed
Before you begin removing your old Ring doorbell, it's important to take safety precautions to protect yourself and your home.
First, make certain to wear safety goggles to shield your eyes from any debris or unexpected falls while you're working. This is especially important if you're using power tools during the process.
Next, confirm that the power supply is turned off. If your Ring doorbell is hardwired, shutting off the power at the circuit breaker is vital to avoid electrical shocks.
Once you're certain the power is off, gather the necessary tools: a T15 Torx screwdriver will help you remove the security screws. If you've misplaced it, a small flathead screwdriver can serve as an alternative.
After you've successfully removed the doorbell, it's wise to have silicone or filler ready to seal any holes left behind. This will prevent leaks or pest issues around your home.
Tool Alternatives Available
Having the right tools on hand is essential for efficiently removing your old Ring doorbell, especially if you find yourself without the original screwdriver. Fortunately, there are several alternatives you can use.
Here's a quick guide to help you choose the right tool for the job:
| Tool | Description | Use Case |
|---|---|---|
| Small Flathead Screwdriver | A common household tool that can fit in tight spaces | Use to manipulate the security screw if the original is missing |
| T15 Torx Head Screwdriver | Specifically designed for security screws | Ideal for removing security screws easily |
| Pliers | A gripping tool that can hold and turn screws | Use if the screw is not stripped and you need leverage |
| Ring Customer Support | Assistance from the manufacturer | Contact for help or to request a replacement screwdriver |
| Compatibility Check | Ensuring tools match your doorbell model | Prevents damage to your device while removing |

Klein Tools ET310 AC Circuit Breaker Finder, Electric and Voltage Tester with Integrated GFCI Outlet Tester
ACCURATE CIRCUIT BREAKER IDENTIFICATION: Quickly locate the correct breaker with precision using our circuit breaker finder, ensuring efficient…
As an affiliate, we earn on qualifying purchases.
As an affiliate, we earn on qualifying purchases.
Preparation Steps

Before you start removing your old Ring Doorbell, make certain you've gathered all the necessary tools, like a screwdriver and drill.
It's essential to turn off the power at the circuit breaker to keep yourself safe from electrical hazards.
Clearing the area around the doorbell will also help guarantee a smooth and easy removal process.
Necessary Tools Gathered
To guarantee a smooth removal process, gather essential tools like a T15 Torx screwdriver and a drill for any stubborn screws. Having the necessary tools gathered beforehand will save you time and frustration during the steps for removing your old Ring doorbell.
Start with the T15 Torx screwdriver, as it's vital for loosening the security screws on the doorbell itself. If the screws are particularly stubborn, the drill will help you tackle them more efficiently.
Additionally, check if you need any extra mounting hardware for reinstallation, should you plan to set up a new doorbell in its place. This preparation guarantees that you're not caught off guard during the process.
Don't forget to clear the area surrounding the doorbell; this will provide easy access and prevent any obstacles while you're working.
Safety Precautions Taken
Turning off the power to your doorbell at the circuit breaker is vital for preventing electrical hazards during the removal process. Before you start, take a moment to verify you've prepared adequately. Here are some safety precautions to keep in mind:
- Turn off power to the doorbell: This is essential to avoid any electrical shocks while you work.
- Wear safety goggles: Protect your eyes from debris that may fall during disassembly.
- Gather necessary tools: Have a screwdriver, drill, and any other tools you may need on hand.
- Clear the area: Remove any obstacles or debris around the doorbell to guarantee safe and easy access.

GE Advanced Silicone Caulk for Kitchen & Bathroom, Clear, 2.8 fl oz Tube, 1 Pack – 100% Waterproof Silicone Sealant, 5X Stronger Adhesion, Shrink & Crack Proof
100% Silicone Caulk Protection: This silicone caulk clear provides ultimate waterproof protection, ensuring a reliable seal against water…
As an affiliate, we earn on qualifying purchases.
As an affiliate, we earn on qualifying purchases.
Device Removal Process

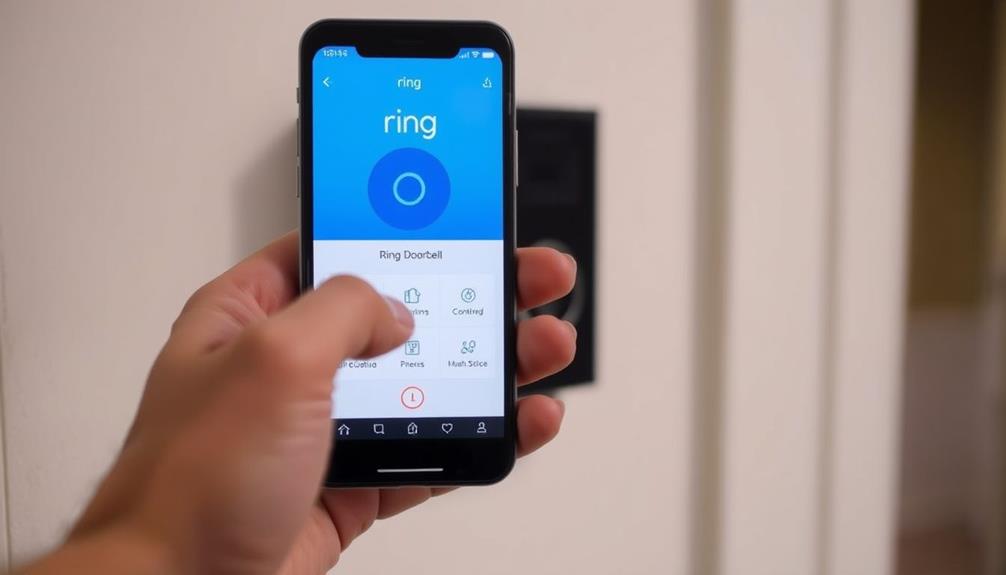
Removing an old Ring doorbell involves a few straightforward steps through the Ring app. First, open the app and navigate to the Dashboard. Here, you'll see a list of your devices; select the one you wish to remove.
Once you've selected the doorbell, access the Device Settings. You'll find the option labeled 'Remove this Device.' Tap on it to start the removal process.
After selecting this option, you'll need to confirm the removal by following the prompts. This step guarantees that the device is properly unlinked from your account. It's crucial to complete this process to prevent any future issues with your Ring devices.
Once the doorbell is removed, it's a good idea to check the Ring website. This way, you can manage any associated subscription plans and verify there's no interruption in service.
Charging the Doorbell

After confirming your old Ring doorbell is removed from your account, it's time to charge the device for peak performance. Follow these steps to make the charging process simple and efficient:
- Remove the Security Screw: Use the provided screwdriver to locate and remove the security screw at the bottom of the faceplate.
- Access the Battery: Gently pull down the bottom portion of the faceplate to reveal the battery compartment.
- Release the Battery: Press the small silver lever to release the battery from the device.
- Charge the Battery: Use the appropriate charging method to power the battery until it's fully charged.
Once the battery is fully charged, reattach it to the doorbell, confirming it fits snugly.
Finally, secure the faceplate back in place and tighten the security screw to prevent any tampering. Proper charging will confirm your doorbell operates efficiently, keeping your home secure.
Removing Without Tools

If you find yourself without the special security screwdriver, you can still detach your Ring doorbell using a few clever techniques.
First, check around your home for a small flathead screwdriver. This can often be used to carefully manipulate the security screw. Just make sure to be gentle to avoid stripping the screw.
If that doesn't work, you might have a T15 Torx head screwdriver in your toolbox, which can also help you attempt to remove the screw.
Once you've managed to loosen the screw, follow the standard removal steps. Carefully pull the doorbell away from the mounting bracket.
Keep in mind that handling the device and screws with care is essential to prevent any damage.
If you find after trying these methods that you still can't detach the doorbell, you can always contact Ring customer support to request a replacement tool.
They'll guide you through the process, ensuring you can access your Ring account to post any updates or questions you may have.
Post-Removal Considerations

Once you've successfully detached your Ring doorbell, it's important to address a few key considerations to guarantee a smooth changeover. Ignoring these steps could lead to unnecessary hassle down the line. Here's what you should do:
- Clean the Area: Confirm the installation site is free from debris or dust. A clean surface is vital for future installations or upgrades.
- Store Components Safely: Keep the removed Ring doorbell and its components in a secure location. This is essential if you plan to reinstall or upgrade later.
- Update the Ring App: Remove notifications related to the old device in the Ring app. This helps maintain a clutter-free user experience and prevents confusion.
- Consider Upgrading: Explore options for newer models. Technology evolves quickly, and you might find enhanced features or better performance that suit your needs.
Lastly, if you have unwanted hardware, be sure to dispose of it responsibly. Follow local guidelines for electronic waste disposal to minimize environmental impact.
If you have any post-removal questions, don't hesitate to seek assistance!
Frequently Asked Questions
How Do You Remove a Ring Doorbell Without a Special Screwdriver?
To remove a Ring doorbell without a special screwdriver, you can use a small flathead screwdriver to carefully manipulate the security screw.
If that doesn't work, try using a T15 Torx head screwdriver as a backup option.
Be cautious not to strip the screw while you're at it.
If you're still struggling, it might be best to contact Ring customer support for a replacement screwdriver designed specifically for your device.
How Do You Remove a Wired Ring Doorbell From the Wall?
Removing a wired Ring doorbell is like untangling a knot; it takes patience and the right tools.
First, turn off the power to guarantee safety.
Grab a screwdriver and find the security screws at the bottom, removing them.
Gently pull the doorbell from its bracket.
Use a voltage tester to verify no power remains before disconnecting the wires.
How Do You Remove a Ring Doorbell Without a Drill Mount?
To remove a Ring doorbell without a drill mount, start by locating the security screws at the bottom.
Use a small flathead or T15 Torx screwdriver to unscrew them.
Once you remove the screws, gently pull down the faceplate to access the battery pack if it's rechargeable.
For hardwired models, pull the device away from the bracket.
Don't forget to label any wires if you plan to reinstall later!
How Do I Disconnect My Ring Doorbell From Previous Owner?
To disconnect your Ring Doorbell from the previous owner's account, you'll need to act quickly and efficiently.
Open the Ring app, navigate to the Devices Profile for your doorbell, select General Settings, and then choose Device Settings.
Confirm the removal, and you'll transfer any subscription to your account.
Don't forget to check that your app's updated; this guarantees a smooth changeover and keeps your service uninterrupted.
Conclusion
As you step back and admire the empty wall where your old Ring doorbell once hung, a sense of accomplishment washes over you.
You've freed up space for a new device, perhaps one that better fits your needs or style.
With the old doorbell safely removed, you're ready to embrace the fresh possibilities ahead.
So, take a deep breath, envision the new chapter, and let the upgrade begin—your home's next evolution awaits!