To install your Ring Doorbell at an incline, begin by selecting the appropriate wedge or corner kit for your specific model. These kits allow for adjustments of up to 15 degrees to improve visibility. Make sure you have the necessary tools such as a drill, screwdriver, and level. Position the chosen kit at a height of about 4 to 5 feet for optimal results. Utilize the Live View feature in the Ring app to verify the angle before finalizing the installation. Consider using multiple kits for better performance. Once you’ve mastered the setup, you’ll ensure a clear view of your visitors. There are more options to discover for an enhanced installation!
Key Takeaways
- Choose the appropriate wedge or corner kit based on your Ring model for optimal angle adjustment.
- Drill holes and securely attach the bracket using screws and wall anchors for stability.
- Use the Live View feature to verify the camera angle and ensure there are no blind spots.
- Combine multiple kits for enhanced visibility and reduced false motion alerts.

RIOVO Adjustable 30 to 55 Degree Doorbell Angle Mount Compatible with Ring/Blink Video Doorbell/Battery Doorbell, Replacement Angle Adjustment Adapter Mounting Bracket Wedge Kit
Compatible Model: This angle mount compatible with RlNG Battery Doorbell (2024 Release) / Video Doorbell 2 / Video…
As an affiliate, we earn on qualifying purchases.
As an affiliate, we earn on qualifying purchases.
Selecting the Right Kit
When you're choosing a mounting kit for your Ring Doorbell, it's important to take into account your specific installation needs for best performance.
What to look for in a home cleaning service can also apply here, as careful consideration of the right tools is vital for achieving peak results.
If you need to adjust the camera angle for better visibility, a Wedge Kit can be your best friend. It allows you to angle the doorbell down by 5 degrees, which helps reduce false motion alerts from passing traffic.
If you're installing your doorbell on a corner or near an adjacent wall, a Corner Kit is the way to go. This kit lets you angle the doorbell 15 degrees left or right, improving motion detection and minimizing light reflections that can interfere with your camera's view.
To customize the angle further, you can combine up to three Wedge Kits or use one Wedge Kit with one Corner Kit. Just make sure to check the compatibility of the kits with your specific Ring Video Doorbell model, as different models have unique mounting requirements.

Ring Corner Kit for Video Doorbell (2nd Generation) & Battery Doorbell
Tilt your Ring Video Doorbell towards your walkway for improved motion detection and a better view of visitors.
As an affiliate, we earn on qualifying purchases.
As an affiliate, we earn on qualifying purchases.
Preparing for Installation

Gather your tools and materials to guarantee a smooth installation process for your Ring Doorbell. You'll need essentials like a drill, screwdriver, and level to make certain of a secure and accurate mounting.
Consider selecting a mounting kit that matches your Ring Video Doorbell model, such as a Wedge or Corner Kit, which is vital for effective angle adjustment. For your home improvement projects, you might find inspiration in best glass stoves that combine modern design and advanced technology, enhancing your overall setup. This choice allows you to achieve the ideal view of your entryway.
Before you start, measure the height at which you plan to mount the doorbell. Ideally, it should be between 4 to 5 feet from the ground to enhance visibility and reduce false motion alerts.
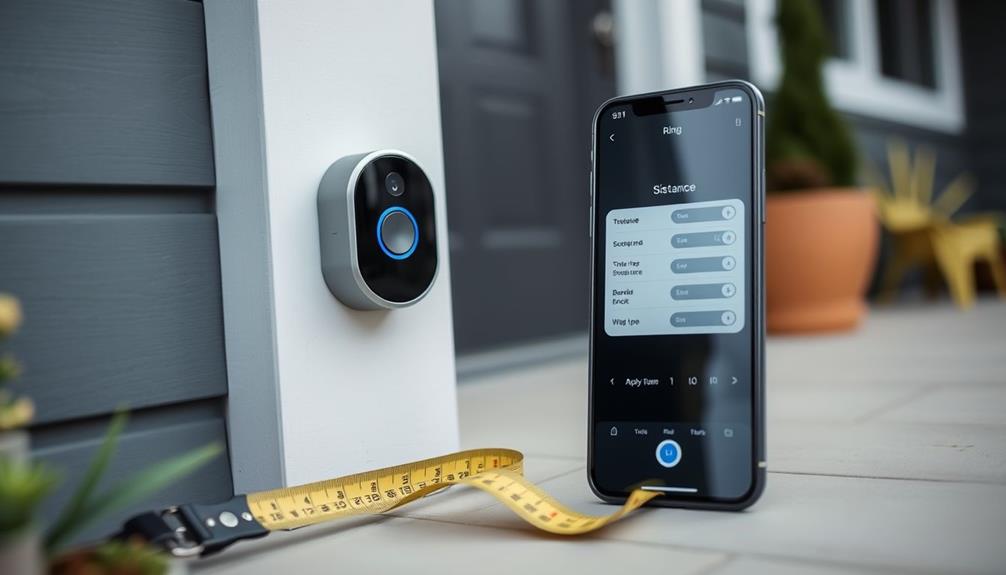
Once you've got your height set, use the Live View feature in the Ring app to verify the angle of the mount before you secure it permanently. This step helps confirm that you're capturing the desired field of view.
RIOVO Adjustable 30 to 55 Degree Doorbell Angle Mount Compatible with Ring/Blink Video Doorbell/Battery Doorbell, Replacement Angle Adjustment Adapter Mounting Bracket Wedge Kit
Compatible Model: This angle mount compatible with RlNG Battery Doorbell (2024 Release) / Video Doorbell 2 / Video…
As an affiliate, we earn on qualifying purchases.
As an affiliate, we earn on qualifying purchases.
Tools You Will Need

You'll need a few essential tools to guarantee a successful installation of your Ring Doorbell. First, grab a drill equipped with a 1/4 inch (6mm) drill bit. This will help you create holes in the wall for securing the Angle Mount.
A set of screws and wall anchors, usually included with your mounting kit, is vital for attaching the doorbell securely to the bracket. Additionally, ensuring a stable installation is similar to choosing the perfect farmhouse sink, so consider the material and support of the surface you're working with.
Next, a level tool is key to ensuring your doorbell is mounted straight, even when it's angled. This small step can make a big difference in functionality and appearance.
You'll also need a screwdriver to tighten the screws, ensuring everything is fastened securely to the mount.
If you're mounting on a wooden surface, consider using a stud finder. This optional tool helps locate studs for added stability and support, which is especially useful for heavier installations.
RIOVO Adjustable 30 to 55 Degree Doorbell Angle Mount Compatible with Ring/Blink Video Doorbell/Battery Doorbell, Replacement Angle Adjustment Adapter Mounting Bracket Wedge Kit
Compatible Model: This angle mount compatible with RlNG Battery Doorbell (2024 Release) / Video Doorbell 2 / Video…
As an affiliate, we earn on qualifying purchases.
As an affiliate, we earn on qualifying purchases.
Step-by-Step Installation Guide

Start by selecting the right wedge or corner kit that fits your Ring Video Doorbell model to achieve the best viewing angle. Once you've got that, gather the necessary tools for installation. Make certain you have:
- A drill
- Screws
- Wall anchors (for masonry surfaces)
Next, follow these steps for a successful installation. If you're mounting on masonry, use the drill to create holes for the wall anchors. If it's wood, just screw the bracket directly into the surface.
After that, attach your Video Doorbell to the installed wedge or corner kit. Before finalizing everything, use the Live View feature in the app to check the angle and visibility. This step is vital to guarantee you're getting the right view.
If you need more adjustment options, remember that you can combine up to three wedge kits or one wedge and one corner kit. Just make certain to test the view before completing the installation for peak performance. With these steps, you'll have your Ring Doorbell mounted perfectly!
Testing the Viewing Angle

Now that you've mounted your Ring doorbell, it's time to test the viewing angle.
Use the Live View feature in the app to check if your camera captures the area you want to monitor, adjusting as necessary for the best angle.
Don't forget to have someone stand at different distances to guarantee they're clearly visible in the frame.
Optimal Angle Selection
Testing the viewing angle with the Live View feature in the app confirms you find the ideal position for your Ring Doorbell before finalizing the installation.
To achieve the best angle, consider the following tips:
- Use the Wedge Kit to angle the doorbell down by 5 degrees, especially for installations over 4 feet high.
- For corner or adjacent wall installations, the Corner Kit provides a 15-degree angle adjustment.
- Be cautious when stacking multiple Wedge Kits; too many can affect performance and overall view.
Taking the time to test the angle means you won't miss important details in your camera's view.
It's vital to make sure that your Ring Doorbell captures everything from visitors to deliveries without blind spots.
By strategically using the Wedge Kit and checking your setup with the app, you can confidently enhance your Ring Doorbell's performance.
Live View Verification
After positioning your Ring Doorbell at the ideal angle, use the Live View feature in the app to verify its field of view and confirm you're capturing everything you need. This step is essential for guaranteeing proper coverage of your entryway. Walk up to your door while monitoring the Live View, and see how well the camera captures your approach in real-time.
If you notice any blind spots or obstructions during this test, don't hesitate to adjust the angle of your doorbell. Once you've made any changes, check the Live View again to guarantee maximum visibility and reduce false motion alerts.
Here's a quick checklist to help you during the Live View verification process:
| Step | Action |
|---|---|
| 1. Mount Doorbell | Install at the chosen angle |
| 2. Open Live View | Access the feature in the Ring app |
| 3. Walk Up to Door | Observe camera's performance |
| 4. Adjust if Necessary | Modify angle based on observations |
| 5. Recheck Live View | Confirm enhanced visibility |
Following these steps will help you confirm your Ring Doorbell is set up perfectly for security.
Troubleshooting Common Issues

When mounting your Ring Doorbell, you might run into some common installation challenges that can affect performance.
Adjusting the camera positioning is essential, especially if you're not capturing the right angles for package visibility.
Let's look at how to address these issues effectively.
Common Installation Challenges
Many users encounter installation challenges that can considerably affect the performance and usability of their Ring Doorbell. These issues often stem from improper setup or unclear instructions, leading to frustrating experiences.
Here are some common challenges you might face:
- Difficulty capturing lower angles for better package visibility.
- Alignment issues that hinder motion detection effectiveness.
- Gaps in fit that expose the doorbell to moisture and bugs.
Addressing these challenges is essential for ensuring your Ring Doorbell operates effectively. For instance, if you struggle with visibility, consider adjusting the angle or height during installation.
If your doorbell isn't aligned properly, it may miss important motion events, reducing its overall effectiveness.
Additionally, ensuring a snug fit will help prevent environmental factors from damaging the doorbell, which is vital for durability.
Don't hesitate to seek alternative mounting solutions or further guidance if you find the current instructions lacking.
Tackling these common installation challenges will enhance your Ring Doorbell's performance, improving your overall experience with the device.
Camera Positioning Adjustments
Addressing installation challenges not only improves your Ring Doorbell's performance but also highlights the importance of making camera positioning adjustments for peak functionality. When mounting your doorbell at an angle, using a wedge kit is essential. This kit can help angle the camera down by 5 degrees, enhancing visibility of visitors and minimizing false alerts from passing cars.
To achieve ideal camera positioning, verify the doorbell is installed at a height of no more than 4 feet. This height boosts motion detection and package visibility. If you struggle with capturing lower angles for package visibility, try combining a wedge kit with corner kits to expand the doorbell's field of view.
Before finalizing your installation, use the Live View feature in the Ring app to verify the camera's angle and confirm it meets your needs. Additionally, if moisture or bug intrusion is a concern, check for any gaps around the installation area. Sealing these gaps will safeguard your device and improve its longevity.
Combining Multiple Kits

Combining multiple wedge and corner kits can enhance your Ring Doorbell's angle, improving visibility and motion detection. By stacking up to three Wedge Kits or one Wedge Kit with one Corner Kit, you can achieve the ideal installation for your needs. However, it's important to proceed with caution to guarantee peak performance.
Here are some tips to keep in mind:
- Test the Setup: Use the Live View feature in the Ring app to check the angle before securing the installation.
- Check Compatibility: Verify the kits are compatible with your specific Ring Video Doorbell model to avoid installation issues.
- Consider Performance: Stacking multiple kits might alter the angle, which could affect the doorbell's functionality.
User Feedback and Experiences

When mounting your Ring Doorbell, you might encounter some installation challenges that other users have faced as well.
Many have shared their preferences for angle adjustments to enhance visibility, especially if your doorbell is mounted higher.
Plus, the community's suggestions can guide you in finding better solutions to common issues, like waterproofing and fit gaps.
Installation Challenges Encountered
Many users encounter frustrating installation challenges with their Ring doorbell, particularly when it comes to aligning angle mounts for the best camera view. Here are some common struggles you might face:
- Alignment Issues: Getting the right angle can be tricky, often leading to misdirected camera views.
- Unclear Instructions: Many users report that installation instructions lack clarity, making it hard to achieve the desired angle.
- Compatibility Problems: Some corner kits aren't compatible with all Ring models, wasting both time and money.
You're not alone in grappling with these installation challenges. Community discussions often highlight the need for better support, as many users seek guidance on overcoming alignment issues.
To make your installation smoother, consider reaching out to others who've done it before or look for updated resources from Ring. Addressing these common problems early on can save you time and frustration in achieving the perfect setup for your doorbell.
Angle Adjustment Preferences
Addressing the alignment challenges mentioned earlier, users have expressed a strong preference for adjustable mounts that offer angles between 30 to 55 degrees, greatly improving visibility and reducing blind spots. Many users specifically highlight the benefits of a 45-degree corner kit, particularly for the Ring Doorbell Pro 2. This preference comes from a desire to enhance viewing angles and effectively capture the entryway while minimizing the visibility of the sky.
Users have noted that proper angle adjustments can greatly improve the functionality of their doorbells. By focusing on entryways instead of the sky, you can guarantee that your Ring captures clear footage of visitors. However, some have encountered minor alignment issues during installation, emphasizing the necessity for clear instructions and precise measurements.
Additionally, there's a trend in combining wedge kits with no-drill mounts, allowing for ideal angle adjustments without damaging surfaces. This innovative approach caters to various angle adjustment preferences, providing flexibility for users to achieve the best viewing angle while maintaining the integrity of their home's exterior.
Community Suggestions Shared
Numerous users have shared valuable suggestions for improving the installation and functionality of their Ring Doorbell, emphasizing practical solutions based on their experiences. Here are some key takeaways from the community:
- Utilize wedge kits if your doorbell is mounted higher than 4 feet for better visibility and fewer false motion alerts.
- Expect minor alignment issues during installation, but the process typically only takes 10 to 15 minutes using existing holes.
- Combine multiple wedge kits cautiously; while it can adjust the angle, testing the view before final installation is essential to guarantee peak performance.
These insights can help you achieve a more effective installation. By following these community suggestions, you'll enhance your Ring Doorbell's functionality and avoid common pitfalls.
Don't hesitate to engage with others for additional tips or to share your own experiences!
Maintenance and Care Tips

Regular maintenance is essential to keep your Ring Doorbell functioning at its best and guarantee it captures clear video footage.
Start by regularly inspecting the mounting screws and brackets to verify they're tight. This helps maintain the doorbell's secure and angled position.
Next, clean the camera lens and surrounding area with a soft, damp cloth. This prevents dirt and debris from obstructing the view, which can affect video quality.
Don't forget to inspect the waterproofing seals periodically. It's vital to confirm they're intact and effective, particularly around the angle adjustment points. Moisture intrusion can harm your device, so check this regularly.
After performing any maintenance or adjustments, test the angle and view using the Live View feature in the app. This confirms peak performance, assuring you capture everything you need.
If you have unused mounting kits, store them in a dry place. Keeping them preserved for future use guarantees you're always ready for any adjustments or replacements.
Following these simple maintenance tips will keep your Ring Doorbell in top shape, providing you with reliable security and peace of mind.
Additional Resources and Support

To guarantee you get the most out of your Ring Doorbell, a variety of resources and support options are available to assist with your mounting and installation needs. Here are some valuable resources you can tap into:
- Comprehensive Guides: Ring provides detailed articles tailored to each product type, making sure you mount your doorbell at the right angle.
- Installation Instructions: Access specific guidelines for Wedge and Corner Kits to achieve ideal viewing angles and minimize false motion alerts.
- Ring Community: Join the Ring Community to share your experiences and get advice from fellow users who've successfully tackled angled mounting.
These resources are designed to enhance your experience and make certain your Ring Doorbell operates effectively.
By utilizing these support options, you can confidently address any mounting issues or installation questions that arise, ultimately leading to a more efficient and satisfying setup.
Frequently Asked Questions
Can I Install a Ring Doorbell at an Angle?
Yes, you can install a Ring Doorbell at an angle.
Using Wedge or Corner Kits, you can adjust the viewing angle to enhance motion detection and get a clearer view of visitors.
The Wedge Kit allows for a 5-degree downward adjustment, while the Corner Kit offers a 15-degree angle adjustment.
Just make sure to follow the installation instructions carefully for the best results and test the view before finalizing the setup.
Can Ring Be Mounted at an Angle?
Absolutely, you can mount your Ring Doorbell at an angle!
This adjustment enhances your view of visitors and improves motion detection.
Using specialized kits like Wedge Kits or Corner Kits, you can achieve the perfect angle for your setup.
These kits not only help in maximizing visibility but also minimize false alerts and light reflections.
Just grab some basic tools, and you'll have it done in no time, usually within 10 to 15 minutes!
Can I Adjust Ring Doorbell Camera at an Angle?
Yes, you can adjust your Ring Doorbell camera at an angle.
Using Wedge Kits, you can tilt it downwards by up to 5 degrees for better visibility and fewer false alerts.
If you're installing it on a corner, Corner Kits let you angle it 15 degrees left or right.
For more flexibility, adjustable mounts are available, allowing significant angle adjustments.
Installation is quick, often taking just 10 to 15 minutes.
Does Ring Doorbell Come With Angle Bracket?
No, the Ring Doorbell doesn't come with an angle bracket in the standard package.
You'll need to purchase angle kits separately to achieve the desired installation angle.
The Wedge and Corner Kits are available, allowing you to adjust your doorbell's position for better visibility.
Conclusion
So, you've mastered the art of mounting your Ring doorbell at an angle, thinking you've outsmarted the world of home security.
But remember, no matter how cleverly you position it, there's always that one neighbor who'll find a way to block the view.
Irony, right? You've got the perfect setup, yet the only thing it captures is their cat napping on your porch.
At least now you can watch over the feline intruders with style!