To change the battery for your Ring Doorbell, start by identifying your model. Gather essential tools like a micro Phillips screwdriver and a plastic spudger. Carefully remove the faceplate and slide out the old battery. Insert the new compatible battery, ensuring it's securely in place. Reattach the faceplate and tighten the screws with your screwdriver. It usually takes 5 to 10 hours to charge the battery fully using a USB cable. Don't forget to check the Ring app for battery status and troubleshooting tips. Stick around to discover more on maintaining your doorbell's performance.
Key Takeaways
- Identify your specific Ring Doorbell model to ensure you purchase the correct replacement battery.
- Gather essential tools such as a micro Phillips screwdriver and a plastic spudger for safe removal.
- Carefully remove the faceplate and slide out the old battery, then insert the new one securely.
- Reattach the faceplate, ensuring all screws are tightened to prevent any loose parts.
Battery Replacement Overview
When it comes to replacing the battery in your Ring Doorbell, understanding the model-specific features and processes is vital for a smooth experience.
Different models have different battery replacement methods, so knowing which one you own is critical. For instance, if you have the Ring Doorbell 2, 3, or 3 Plus, you can easily replace the battery by removing the faceplate with a star-shaped screwdriver. Simply slide out the battery, and you're good to go.
Additionally, incorporating a modern farmhouse aesthetic in your entryway can enhance the overall appeal of your home while guaranteeing your Ring Doorbell remains a functional part of your decor.
Keep in mind that the battery life for your Ring Doorbell typically ranges from 6 to 12 months, depending on how often you use features like motion detection.
To recharge the battery, just connect it using the included USB cable. Expect it to take about 5 to 10 hours for a full charge.
You can also stay informed about your battery's health through the Ring app, which sends you low battery notifications.
This feature helps ensure you don't miss timely recharging or battery replacement, keeping your Ring Doorbell operational and your home secure.
Tools Needed for Replacement
To successfully replace your Ring Doorbell battery, you'll need a few essential tools.
Having the right equipment on hand not only makes the process smoother but also guarantees your safety while working.
For instance, understanding air purifier maintenance can help you appreciate the importance of keeping your devices in good working order.
Additionally, using proper tools can prevent damage to your doorbell during the battery replacement process.
Let's go over what you need for a quick and efficient battery replacement.
Essential Tools for Replacement
What tools do you need for replacing the battery in your Ring Doorbell?
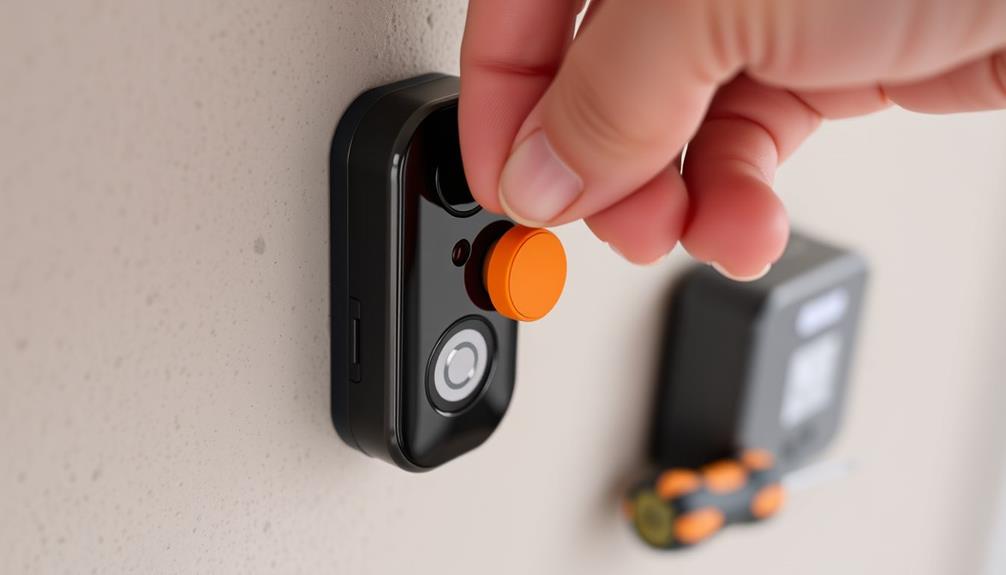
First and foremost, you'll need a micro Phillips screwdriver to remove the screws securing your doorbell. This tool is essential for accessing the battery compartment.
Additionally, ensuring you have a clean and organized workspace will help streamline the process and prevent any mishaps, much like the importance of having the right equipment in a home cleaning kit.
Next, grab a plastic spudger; this handy tool helps you safely pry off the faceplate without damaging your device.
You'll also require a compatible replacement battery for your specific Ring Doorbell model, especially if you have an older version with a non-removable battery.
A USB cable is necessary for charging the new battery once it's installed, ensuring it's fully powered before you put everything back together.
In some cases, double-sided tape might be needed to secure the new battery in place, particularly if it's a replacement for the original.
Finally, set up a clean, well-lit workspace to help you use your tools effectively and prevent losing any small screws during the process.
Having the right tools on hand will make your battery replacement smoother and more efficient, getting your Ring Doorbell back in action in no time.
Safety Precautions to Follow
Before you start replacing the battery in your Ring Doorbell, it's important to follow some key safety precautions to protect yourself and your device. Using the right tools and techniques will make the process smoother and safer.
| Safety Precautions | Tools Needed |
|---|---|
| Wear gloves and eye protection | Micro Phillips screwdriver |
| Guarantee proper battery disposal | Plastic spudger |
| Have a compatible replacement battery | USB cable |
Make certain you have a compatible replacement battery ready, specifically designed for your Ring model. After you replace the battery, you'll need a USB cable to charge it fully before reassembly. If the original battery's adhesive has worn off, double-sided tape will help secure the new battery in place.
Always handle batteries carefully, especially when removing them. Following these safety precautions will help you avoid any potential hazards while you replace the battery in your Ring Doorbell. Remember, a little preparation goes a long way in guaranteeing a safe and successful battery replacement.
Tips for Efficient Repair
Having the right tools on hand can make changing the battery in your Ring Doorbell quick and hassle-free. First, grab a micro Phillips screwdriver to remove the screws securing the faceplate. You'll also need a plastic spudger to safely pry off the faceplate without damaging your device. Once the faceplate is removed, you’ll see the compartment where the battery is housed. Gently slide the battery out and replace it with a fully charged one, making sure the contacts align with the charging port. If you’re unsure **how to insert Ring Doorbell battery**, simply refer to the user manual or observe the directional arrows on the battery for guidance.
It's important to guarantee that your home is equipped with safe electrical practices, such as using appliance surge protection to prevent damage to your devices during unexpected power surges.
Before you start, verify you have a compatible replacement battery for your specific Ring Doorbell model. The first-generation models use a different battery than the newer versions, so double-check that you've got the right one.
Once you've replaced the battery, you'll need a USB cable to charge it fully before reassembling your doorbell.
As you disconnect the old battery, pay close attention to the wire orientation. Keeping track of this will help you reconnect the new battery correctly.
After installing the new battery, you might need double-sided tape to secure it inside the device properly.
Step-by-Step Replacement Process

To change your Ring Doorbell battery, you'll need a few specific tools to get started.
Home security systems, like the Ring Doorbell, can enhance your property's safety and provide peace of mind, especially since the presence of security systems deters potential burglars.
Once you've replaced the battery, it's vital to reassemble everything properly to guarantee your device works seamlessly.
Let's walk through the steps together.
Tools Required for Replacement
You'll need a few essential tools to replace the battery in your Ring Doorbell, ensuring a smooth and efficient process.
First, grab a star-shaped screwdriver. This tool is vital for removing the security screw on the faceplate of your doorbell.
Next, have a plastic spudger on hand. It'll help you safely pry off the faceplate without damaging your device.
Don't forget to get a compatible rechargeable lithium-ion battery tailored to your Ring Doorbell model, as the battery design can vary between generations.
To recharge the new battery after installation, a USB charging cable is necessary. This will plug into the device's micro USB port, allowing you to power up the new battery easily.
Lastly, while not always needed, double-sided tape can be useful for securing the new battery in place, ensuring it stays firmly during the replacement process.
With these tools required for replacement, you'll be well-equipped to tackle the battery swap efficiently and effectively.
If you're looking to make the most of your summer activities, consider visiting a local waterpark for some family fun, especially those that feature thrilling slides and relaxing rivers water parks in Washington DC.
Reassembly After Replacement
With the new battery installed, it's time to reassemble your Ring Doorbell. Start by carefully aligning and sliding the new battery back into the compartment, ensuring the connectors engage properly. Once the battery is securely in place, you should hear a click, confirming it is properly seated. Afterward, tighten the screws on the faceplate to protect the battery and restore your device’s weatherproof seal. By following these steps to install battery in Ring Doorbell, your device should power up and function as expected.
This step can be made easier by cultivating a creative environment at home, which encourages meticulousness and attention to detail, family activities that promote creativity.
Once the battery is secure, take the plastic cover and press it firmly into place, making sure there are no gaps that could expose the internal components.
Next, grab your micro Phillips screwdriver to reinsert and tighten the four screws that hold the aluminum face-plate. Ensuring a snug fit is vital for maintaining the device's integrity.
After you've secured the face-plate, double-check all screws to confirm they're tightly fastened. This step is essential to prevent any loose parts during operation.
Common Battery Issues
Many users face significant battery issues with their Ring Doorbells, particularly after the warranty expires. One of the most common battery issues you might encounter is the Ring Doorbell battery failing to charge. This often occurs due to the internal battery design, which complicates replacement and troubleshooting. You may find the battery's longevity disappointing, as it generally lasts only 6 to 12 months depending on how you use your device.
Additionally, incorporating AI technology in home security systems can provide enhanced monitoring, potentially aiding in battery management and overall device performance, as seen in AI security solutions.
Furthermore, many users report feeling overwhelmed by frequent low battery notifications. These alerts can be frustrating, especially when they prompt you to recharge or replace the battery constantly. Unfortunately, finding clear guidance from customer support about battery replacement options can be a challenge, leaving you feeling stuck and unsure of your next steps.
With ongoing dissatisfaction regarding the Ring Doorbell battery, some users have even discussed potential class action lawsuits, hoping to push for changes in Ring's battery policies. If you're experiencing any of these common battery issues, it's essential to explore your options for resolution to guarantee your doorbell remains functional and reliable.
User Experiences and Feedback

Frustration often fills user discussions about the Ring Doorbell, particularly regarding its non-removable battery design and the frequent low battery notifications. Many users find the battery-changing process inconvenient, especially with the 2nd Generation model. You might feel overwhelmed when faced with constant alerts about low battery levels, almost like harassment, especially when they ramp up just before the battery fails.
Additionally, some users have expressed concerns about how to effectively manage their retirement investments, drawing parallels to the importance of diversification of retirement portfolio in mitigating risks, similar to how they wish for better battery management solutions.
Battery longevity is another hot topic among users. Reports indicate that the rechargeable battery tends to underperform after the warranty expires, raising concerns about planned obsolescence. This dissatisfaction has led many to question the durability and reliability of the product.
Some users are so fed up that they're considering switching to alternative providers, seeking better battery management solutions and removable battery options. The sentiment is clear: they want improvements to enhance their experience with the Ring Doorbell.
If you've shared these frustrations, you're not alone. It's essential for Ring to listen to user feedback and make necessary adjustments to meet your expectations. Improved battery solutions could vastly improve user satisfaction and reduce the ongoing frustration surrounding battery issues.
Community Support Resources
The Ring Community offers a valuable platform where you can connect with other users to share experiences and seek advice on battery-related issues with your Ring Doorbell. By creating an account, you can post questions, participate in discussions, and access a wealth of knowledge from fellow users. This community-driven environment provides insights into troubleshooting and product features, helping you navigate any challenges you may face.
| Resource Type | Description |
|---|---|
| User Discussions | Engage with other Ring users on battery issues and solutions. |
| DIY Guides | Access links to iFixit guides and video tutorials for battery replacement. |
| Product Feedback | Share your experiences and frustrations, influencing potential product improvements. |
| Community Support | Connect with a support network of users facing similar challenges. |
Active participation in the Ring Community not only fosters a sense of solidarity but also enriches your understanding of the product. Engaging in discussions can lead to better solutions and shared tips that may enhance your experience with your Ring Doorbell.
Alternative Repair Solutions

Exploring alternative repair solutions can help you tackle battery replacement issues with your Ring Doorbell effectively. If you're facing challenges, consider checking out resources like iFixit, which offers detailed guides for DIY battery replacements. These guides can be particularly useful for earlier models that don't feature removable batteries. Additionally, online videos provide various methods for accessing and replacing your battery, making the process easier to understand.
For those interested in functional and aesthetic improvements, you might find insights on comprehensive professional services that enhance your home security setup.
You might also find value in the Ring Community forums where users share tips and experiences. Many community members advocate for purchasing a second battery, allowing you to swap it out and maintain uninterrupted usage while one battery charges. This approach can be particularly beneficial if you rely on your doorbell for security.
While there's no official support for battery replacements, many users successfully replace their batteries using these DIY methods. They often document their experiences, helping others navigate similar issues.
If you're considering a repair, these alternative solutions provide practical insights and options to keep your Ring Doorbell—whether wired or battery-powered—running smoothly.
Battery Specifications
When it comes to battery specifications, your Ring Doorbell is powered by a robust 6,000mAh rechargeable lithium-ion battery. This battery is designed to provide ample power for the device's features, allowing you to enjoy reliable performance. Depending on your usage, the battery life typically ranges from 6 to 12 months. Factors like motion detection frequency and two-way audio use can impact how often you need to recharge. To extend Ring Doorbell battery life, you can adjust settings such as reducing the sensitivity of the motion detection or limiting the use of features like Live View. Additionally, disabling alerts for less active zones can also contribute to increased efficiency. By optimizing these settings, you can potentially lengthen the time between charges, ensuring consistent performance with minimal maintenance.
Here's a quick comparison of the battery specifications across different Ring Doorbell models:
| Model | Battery Type | Charging Method |
|---|---|---|
| Ring Doorbell 2 | 6,000mAh Lithium-ion | Easy removal |
| Ring Doorbell 3 | 6,000mAh Lithium-ion | Easy removal |
| Ring Doorbell 3 Plus | 6,000mAh Lithium-ion | Easy removal |
| Peephole Cam | 6,000mAh Lithium-ion | Easy removal |
| Ring Doorbell 1 | 6,000mAh Lithium-ion | Full device removal |
Recharging the battery takes only a few hours with the included USB cable. Keep in mind that increased motion events may lead to more frequent charging needs, so adjust your settings accordingly for peak battery life.
Maintenance Tips

To keep your Ring Doorbell running smoothly, you'll want to establish a regular charging schedule and monitor battery health closely.
Being aware of environmental factors can also help extend the battery's lifespan.
Let's explore some practical tips to maintain your doorbell's performance and guarantee it stays charged when you need it most.
Regular Charging Schedule
Establishing a regular charging schedule for your Ring Doorbell helps guarantee it operates smoothly and effectively. It's vital to charge the battery every 6 to 12 months, depending on your usage and environmental factors. To keep on top of your doorbell's performance, regularly check the battery percentage through the Ring app under Device Health.
Here's a simple guide to help you manage your charging schedule:
| Usage Level | Charging Frequency | Notes |
|---|---|---|
| Low Usage | Every 12 months | Minimal motion events; less strain. |
| Moderate Usage | Every 9 months | Regular activity; check often. |
| High Usage | Every 6 months | Frequent motion and audio use. |
| Low Battery Alert | Recharge immediately | Prevents device malfunction. |
If you receive low battery notifications, recharge the battery right away to guarantee consistent operation. Charging typically takes 5 to 10 hours, so plan accordingly to minimize downtime. By keeping these tips in mind, you'll maintain ideal battery performance and maximize the efficiency of your Ring Doorbell.
Battery Health Monitoring
Regularly monitoring your Ring Doorbell's battery health is essential for guaranteeing its ideal performance and longevity. You can easily check the battery percentage through the Ring app under Device Health. This way, you'll stay informed about its status and can charge it in a timely manner.
To make things even easier, set up low battery notifications in the app. This feature will alert you when the battery level drops below a certain threshold, allowing you to take action before it runs out completely.
Depending on your usage patterns, aim to charge the battery every 6 to 12 months, especially if you frequently use motion detection features. Additionally, keep the charging cable and connection points clean and free from dust or debris; this guarantees efficient charging performance.
If you encounter any battery issues, consult the Ring app for troubleshooting tips. You might also want to try resetting the device to restore proper functionality.
Environmental Impact Awareness
Being mindful of the environmental impact of battery usage can greatly enhance your Ring Doorbell maintenance routine.
Start by ensuring you properly dispose of old batteries. Many local regulations require recycling to prevent environmental contamination, so check your area's guidelines.
Opt for rechargeable batteries to minimize waste and reduce the carbon footprint associated with single-use batteries. This choice not only supports sustainability but also saves you money in the long run.
Regular maintenance is key; clean the battery contacts and follow proper charging practices to extend your battery's lifespan.
To further promote efficient resource use, consider investing in a second battery. This reduces downtime and allows your Ring Doorbell to operate continuously without the hassle of frequent recharging.
Engaging in community discussions about battery recycling initiatives can also raise awareness and encourage responsible disposal practices.
By taking these steps, you contribute positively to the environment while ensuring your Ring Doorbell remains functional and ready to protect your home.
Troubleshooting Battery Problems
Troubleshooting battery problems with your Ring Doorbell involves checking connectivity, battery health, and verifying proper charging conditions.
Start by confirming that your device is connected to Wi-Fi. Poor connectivity can greatly affect performance and charging, so make sure your Doorbell has a strong signal.
Next, check the battery health through the Ring app under Device Health. This feature allows you to monitor the battery's status and lifespan, which usually ranges from 6 to 12 months depending on usage.
If you notice the battery isn't charging, use the included USB cable to connect it to a power source. Verify the cable is functional and free of damage.
Don't forget to inspect the charging port for dust or debris. Cleaning it gently can often resolve charging issues.
If you still experience persistent battery problems, consider resetting the device. This can sometimes resolve glitches affecting performance.
If all else fails, reach out to Ring support for further assistance and troubleshooting steps.
Frequently Asked Questions
How Do I Change the Battery on My Ring Doorbell?
To change your battery, you'll start by locating the security screw on the faceplate.
Use the provided star-shaped screwdriver to remove it.
Once that's done, push the faceplate upwards to detach it.
Next, press the black tab on the battery to release it, then slide it out.
Insert a fully charged battery, reattach the faceplate, and make sure it clicks back into place.
Regularly check the battery percentage in the app for peak performance.
How Do You Remove a Ring Doorbell Battery Cover?
Ever wondered how to easily remove a Ring Doorbell battery cover? It's simpler than you think!
Start by grabbing a star-shaped screwdriver to take out the security screw at the bottom of the faceplate.
Then, push the faceplate upwards with your thumbs and fingers to detach it.
Once it's off, press the black tab on the battery to release it, and you're good to go!
Just be careful while handling the battery.
How Do You Open a Ring Doorbell to Charge a Battery?
To open your Ring Doorbell for charging, grab a star-shaped screwdriver and remove the security screw at the bottom of the faceplate.
Once that's done, push the faceplate upwards with your thumbs and fingers to detach it.
Next, press the black tab on the battery to release it and slide it out.
Charge the battery with the USB cable until it's full, then reinsert it and snap the faceplate back into place.
Does Ring Doorbell 2 Have a Removable Battery?
Yes, the Ring Doorbell 2 has a removable battery.
This feature makes it convenient for you to swap out the battery without needing to take down the entire device.
The rechargeable lithium-ion battery typically lasts between 6 to 12 months, depending on how you use it.
It's a good idea to keep a second battery handy so you can charge one while the other's in use, ensuring your doorbell stays powered.
Conclusion
To summarize, changing the battery for your Ring Doorbell is a straightforward process that enhances your home's security.
Notably, studies show that homes with video doorbells see a 55% reduction in package theft, highlighting their effectiveness.
Regular maintenance and troubleshooting can help prevent issues, ensuring your device runs smoothly.
By staying proactive, you can enjoy the peace of mind that comes with a fully functional Ring Doorbell, keeping your home safe and secure.