Charging your Ring Doorbell battery is easy. First, remove the device if you have a 1st or 2nd generation model; you'll need to connect a micro-USB cable. For newer models like Ring Doorbell 3 and 4, just unscrew the faceplate to access the Quick Release Battery. Plug it in for about 5 to 10 hours. You'll know it's charging when you see a red light, and a solid green light means it's fully charged. Be sure to check the battery status in the Ring app for peak performance. Stick around, and you'll uncover more tips for maintaining your doorbell's battery life!
Key Takeaways
- Connect a micro-USB cable to the battery and charge for 5-10 hours until the solid green light indicates a full charge.
- For 1st and 2nd Generation models, remove the entire unit to access the battery for charging.
- Newer models like Ring Doorbell 3 and 4 feature Quick Release Battery Packs for easier charging without full unit removal.
- Check battery status in the Ring app to monitor charge percentage and power usage for optimal management.
Help Resources
Accessing help resources for charging your Ring Doorbell battery can simplify the process and guarantee you're following the right steps for your specific model.
The Ring Help Home offers extensive support, including step-by-step guides that cater to different Ring Doorbell versions. By exploring these resources, you can understand the installation and troubleshooting processes related to your battery. Additionally, ensuring you have the right cleaning materials and tools, much like those recommended for maintaining a home, can enhance your overall device upkeep essential items for a home cleaning kit.
The Ring app is another valuable tool. It not only allows you to monitor your battery status but also provides access to helpful guides on optimizing battery life and charging practices. This proactive approach helps you maintain your device efficiently, ensuring you get the most out of your Ring Doorbell.
If you run into any issues or have questions about charging, don't hesitate to reach out to Ring's customer service. They're equipped to handle queries about battery charging and can provide tailored support to resolve your concerns.
Additionally, the FAQs section on the Ring website answers common questions, making it easier to troubleshoot any problems you might face. By leveraging these help resources, you'll feel confident in managing your Ring Doorbell's battery effectively.
Charging Procedures
Charging your Ring Doorbell battery is straightforward, but knowing the right methods and what the status indicators mean is essential.
A properly functioning doorbell camera can greatly enhance your home security, providing you with peace of mind and increased safety.
You'll want to familiarize yourself with how to connect the micro-USB cable and watch for the charging lights.
Let's go over the best charging methods and what those lights really tell you about your battery's status.
Charging Methods Overview
To recharge your Ring Doorbell battery, simply connect a common micro-USB cable directly to the battery for 5-10 hours, depending on the power source.
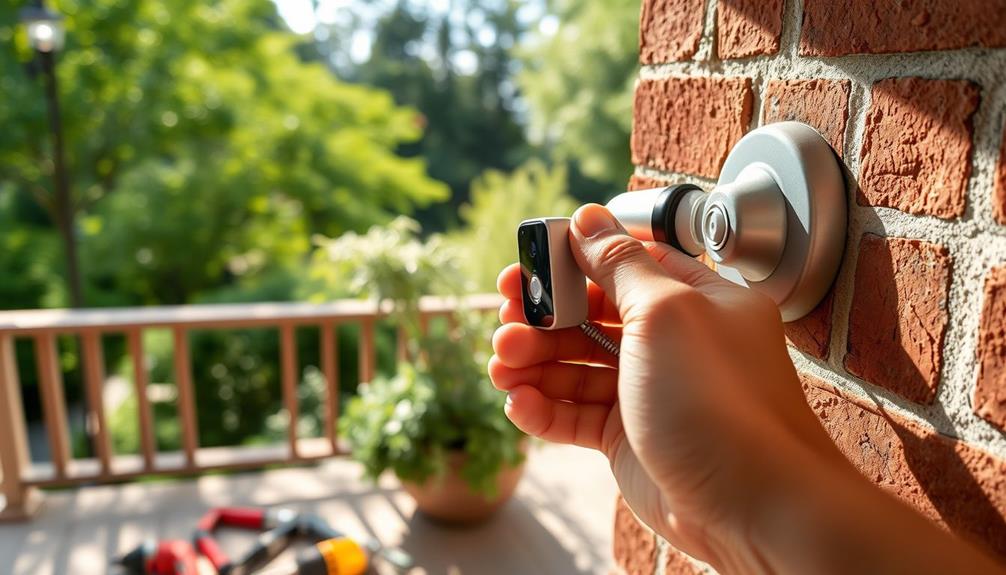
For the 1st and 2nd Generation Ring Doorbells, you'll need to remove the entire unit to access the battery for charging. However, newer models come equipped with a Quick Release Battery Pack, making it easier to charge without complete disassembly.
Maintaining ideal air quality in your home can also be beneficial for overall health, as indicated by the importance of air purifiers.
When you're charging the battery, keep an eye on the charging status. The indicator lights will show red and green during the charging process, with a solid green light indicating that the battery is fully charged.
If your Ring Doorbell is hardwired, remember that it still requires a battery to function properly. Even while receiving a trickle charge from the wiring, you may still need to charge the battery periodically.
To guarantee ideal performance and avoid issues with incorrect battery reporting, always make sure your battery is fully charged before installation.
Following these steps will help keep your Ring Doorbell running smoothly and efficiently.
Battery Status Indicators
When you connect your Ring Doorbell to a power source, the battery status indicators provide clear visual feedback on its charging progress.
During charging, you'll notice a red light illuminating, signaling that the battery is actively charging. As part of enhancing user experience, it's important to monitor these indicators for ideal device performance and longevity.
Once the battery is fully charged, the indicator will switch to a solid green light, letting you know it's ready for use.
Charging the battery typically takes between 5 to 10 hours, depending on the power source you choose, like a USB port or wall outlet. If you have a model with Quick Release Battery Packs, accessing the battery is easier, allowing you to charge it without removing the entire unit.
After charging the battery, it's vital to securely reattach it along with the faceplate. This guarantees your Ring Doorbell functions properly.
Regular monitoring of the battery status indicators helps you manage battery health and maintain peak performance. By keeping an eye on these indicators, you can effectively track the charging process and be confident that your device is always ready to go.
Effective clustering improves user experience and content discoverability.
Model-Specific Charging

When it comes to charging your Ring Doorbell, the methods can vary by model.
You'll need to follow specific instructions for accessing the battery and understanding the charging indicators.
It's important to also consider your Ring Doorbell's environmental factors, as certain conditions can affect its performance.
For instance, keeping it away from strong scents can help maintain its functionality, as cats may be sensitive to odors in the vicinity 10 Smells Cats Hate.
Let's break down the different charging approaches, battery access steps, and what those indicator lights really mean.
Charging Methods Overview
Different models of Ring doorbells feature specific charging methods that cater to their design and functionality.
For instance, the Ring Video Doorbell (1st & 2nd Generation) requires you to completely remove the unit. You'll need a micro-USB cable to connect to the charging port, which takes about 5-10 hours to become fully charged. It's important to verify that the battery is properly maintained to avoid issues, much like how you'd verify peak performance with an airless paint sprayer during painting projects.
In contrast, newer models like the Ring Video Doorbell 3 allow you to access the battery by unscrewing the faceplate and pressing the release tab. This design makes it easier for you to charge the battery while keeping the doorbell mounted.
If you have a hardwired Ring doorbell, keep in mind that while it can provide a trickle charge, the battery still needs independent charging when it's low.
You can monitor the battery life through the Ring app, which will also show you the charging indicators. Look for red lights while charging, and a solid green light will indicate that the battery is fully charged and ready for use.
Understanding these charging methods verifies your Ring doorbell remains functional and reliable.
Battery Access Instructions
To access the battery for charging, you'll need to follow specific instructions depending on your Ring doorbell model. Here's a quick guide to help you through the process: First, determine if your model has a removable battery or if the entire device needs to be removed from the bracket for charging. If the battery is removable, you can simply slide it out and connect it to a USB cable. For more detailed steps, you can refer to Ring’s official guide on *how to charge Ring doorbell* for your specific model.
| Ring Doorbell Model | Battery Access Instructions | Charging Details |
|---|---|---|
| 1st Generation | Remove the entire unit from the wall using a screwdriver. | Use a micro-USB cable; 5-10 hours. |
| 2nd Generation | Same as 1st generation; full removal required. | Use a USB port or wall outlet. |
| Ring Doorbell 3 & 4 | Unscrew the faceplate to access the Quick Release Battery. | Look for red and green lights. |
| Ring Doorbell Pro | Same as 3 & 4; Quick Release Battery available. | Charging time varies; see above. |
| Ring Video Doorbell Elite | Remove the faceplate; battery slides out easily. | Check lights for charging status. |
While charging, keep an eye on the red and green lights: red means it's charging, and green means it's fully charged. After charging, make sure to securely reinstall the battery and faceplate to guarantee your Ring Doorbell functions properly.
Charging Indicators Explained
Understanding the charging indicators for your specific Ring doorbell model can help guarantee you're aware of the battery's status during the charging process.
For the Ring Video Doorbell (1st & 2nd Gen), you'll notice a red light while charging, which will switch to a solid green light once the battery is fully charged. If you're using models with Quick Release Battery Packs, the same red light indicates charging, shifting to green at full capacity.
The typical charging time for the Ring Doorbell battery ranges from 5 to 10 hours, largely depending on your power source—using a USB port may take longer compared to a wall outlet.
It's essential to have a fully charged battery installed before setup to avoid incorrect charge reporting. After charging, remember to securely reattach the faceplate and test the doorbell. This guarantees that the battery percentage is accurately reflected and your doorbell functions at its best.
By keeping an eye on these charging indicators, you can maintain the performance of your Ring doorbell effectively.
To enhance your home's aesthetic, consider how a modern farmhouse bedroom can create a serene atmosphere while you manage your smart home devices.
Checking Battery Status
Checking the battery status of your Ring Doorbell is straightforward with the Ring app, where you can quickly view the current charge percentage and power usage.
To begin, open the Ring app and navigate to the menu. Select your doorbell under the Devices section. Here, you'll find the battery percentage displayed under Power Settings.
Regularly monitoring your battery status is important, as effective clustering improves user experience and helps you manage energy consumption effectively by identifying features that may drain your battery faster.
Additionally, the Power Usage feature shows which functions are draining your battery the most, allowing you to manage energy consumption effectively.
Regularly monitoring the battery status in the app is essential for identifying any unusual patterns, particularly with fast-draining batteries. If you notice that the battery appears to be incorrectly reported, double-check that it's fully charged and properly installed to maintain accurate readings.
This simple step can help prevent confusion and guarantee your doorbell remains operational. By keeping an eye on these metrics, you can make sure your Ring Doorbell stays charged and ready to protect your home.
Troubleshooting Tips

If your Ring Doorbell isn't performing as expected, troubleshooting can help resolve common issues that might be affecting battery life and functionality.
Understanding cybersecurity measures can also guarantee that your devices are secure and functioning properly, as network disruptions can impact performance.
Here are some essential tips to get things back on track:
- Check your battery status in the Ring app to identify any features that affect battery life.
- Charge the battery fully before installing it. If you notice incorrect battery discharge/reporting, this might be the culprit.
- Verify your Wi-Fi connection. A weak signal can cause the doorbell to use more power as it constantly reconnects to your Wi-Fi.
- Confirm the security screws are properly installed after charging the battery. This prevents operational issues and helps maintain functionality.
After following these steps, check your battery charge again and test the doorbell to confirm everything's working correctly.
If you need to, you can charge the battery by removing it from your Ring and then reinstall it.
Power Management
Effective power management is vital for maximizing the performance and longevity of your Ring Doorbell battery.
If you're using battery-powered Ring Video Doorbells, it's important to guarantee the battery is fully charged before installation. This prevents incorrect battery reporting, which can affect device performance. Additionally, understanding how thermal energy transfer works in devices can help you appreciate the importance of ideal power usage for efficient operation, similar to how heat pumps maintain efficiency through proper thermal management thermal energy transfer basics.
If you opt for a hardwired setup, keep in mind that the wiring provides only a trickle charge to maintain the battery's power. While this helps, it won't completely recharge it; the battery can drop to 90% before the device starts utilizing wired or solar power. To enhance your battery life, consider using a USB power source to charge the battery while it's not in use.
Additionally, having a second battery on hand can facilitate uninterrupted operation. You can switch out the primary battery while it charges, guaranteeing your doorbell remains functional.
Always monitor your battery percentage through the app to manage power effectively and avoid downtime. Implementing these power management strategies will help you get the most out of your Ring Doorbell, guaranteeing reliable performance over time.
Importance of Full Charge

A full charge is vital for your Ring Doorbell to operate at its best, guaranteeing responsiveness and reliability without interruptions. When your device is fully charged, you can enjoy:
- Optimal Performance: A fully charged battery assures your doorbell works efficiently, capturing every moment without delay.
- Accurate Power Management: Charging your battery to full capacity helps prevent incorrect battery reporting, allowing for better monitoring of its status.
- Extended Lifespan: Consistently maintaining a full charge can greatly extend the battery's lifespan, preventing quicker deterioration caused by partial discharges.
- Correct Functionality with Hardwired Power: Even when connected to hardwired power, your device relies on the battery. A full charge guarantees it operates correctly during power outages.
The charging process usually takes between 5 to 10 hours, depending on your power source. That's why it's important to plan for a full charge before you start relying on your device.
Maintenance and Lifespan
How can you guarantee your Ring Doorbell battery lasts as long as possible? Focus on proper maintenance and monitoring. Start by ensuring your battery is fully charged before installation. Use the Ring app to regularly check battery health and performance.
| Maintenance Tips | Details |
|---|---|
| Proper Charging Practices | Avoid deep discharges to enhance battery lifespan. |
| Temperature Range | Keep the battery between 32°F and 122°F. |
| Software Updates | Regularly check the Ring app for updates. |
| Hardwired Setup | Remember, the battery needs periodic charging even with a trickle charge. |
| Monitoring Usage | Adjust settings based on usage patterns. |
Frequently Asked Questions
How to Charge the Battery on a Ring Doorbell?
To charge the battery, start by removing the faceplate and pressing the release tab to take out the battery.
Grab a micro-USB cable and connect it to a power source. You'll typically wait around 5 to 10 hours for a full charge.
Keep an eye on the charging status: a red light means it's charging, while a green light indicates it's fully charged.
Once done, reinstall the battery and secure the faceplate.
How Long Does It Take to Charge a Dead Ring Doorbell Battery?
"Good things come to those who wait."
When you're charging a dead Ring Doorbell battery, it typically takes between 5 to 10 hours. The exact time depends on your power source; wall outlets generally charge faster than USB ports.
Keep an eye on the indicator light—red means it's still charging, while green shows it's fully charged.
How Often Do I Need to Charge My Ring Doorbell?
You'll need to charge your Ring Doorbell battery every 1 to 6 months, depending on how much you use it.
If you frequently receive motion alerts or record video, it might drain faster, so keep an eye on the battery status through the Ring app.
Charging it fully before installation helps it last longer, and remember that even hardwired models may require occasional recharging during high usage periods.
Does Ring Doorbell Come With Battery Charger?
You might be wondering if your Ring Doorbell comes with a battery charger.
Well, here's the twist: it doesn't! Instead, you'll find a micro-USB cable in the package, perfect for charging the battery.
To get to the battery, you'll need to remove the unit or faceplate.
Charging takes about 5 to 10 hours, depending on the power source.
Conclusion
To summarize, charging your Ring doorbell battery is a straightforward process that keeps your home secure.
Whether you're using a USB cable or a solar charger, always check the battery status regularly to verify it's ready to go.
Remember, a fully charged doorbell is like a knight in shining armor, always prepared to protect your castle.
With proper maintenance, you can extend its lifespan and enjoy peace of mind for years to come.